Crispy Spicy Poha Chivda | पोहा चिवडा रेसिपी | Easy Chickpea Peanut Chili Mix |
Автор: Food Travel & Globe
Загружено: 2026-01-05
Просмотров: 141
Описание:
Crispy Spicy Poha Chivda | पोहा चिवडा रेसिपी | Easy Chickpea Peanut Chili Mix | #PohaChivda #Chivda
Khatta Mitha Chivda Recipe - Sweet Sour Poha namkeen recipe
१ किलो पातळ पोह्यांचा चिवडा | या ७ टिप्स पाळून बनवा, मऊ न होणारा चिवडा 1kg Patal Pohe Chivda Recipe
लहानशा कढईत १ किलो भाजके पोह्यांचा कुरकुरीत चिवडा । घरगुती चिवडा मसाला | 1 Kilo Bhajke Pohe Chivda
10 मिनिटांत दिवाळीला तयार करा कुरकुरीत भाजक्या पोह्यांचा चिवडा |Bhajkya Pohecha Chivada|
एकदम खस्ता कुरकुरा बाजार जैसा पोहा नमकीन बनाए और महिनो तक खाए | Poha Chivda Recipe | poha recipe
Description:
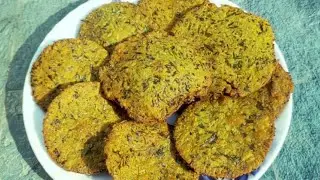
Poha Chivda (also known as Chivda) is a popular Indian savory snack mix that's crispy, spicy, and perfect for tea time or festivals like Diwali. This version focuses on the key ingredients you mentioned: poha (flattened rice), chickpeas (typically roasted chana dal), peanuts, and chopped green chilies. It's lightly spiced and can be made with minimal oil for a healthier twist. This recipe serves about 4-6 people and takes around 30-45 minutes.
Ingredients:
2 cups thin poha (flattened rice)
1/2 cup roasted chickpeas (chana dal; if not pre-roasted, you'll roast them)
1/2 cup raw peanuts
4-5 green chilies, finely chopped (adjust for spice level)
10-15 curry leaves (fresh or dried)
2 tablespoons oil (preferably peanut or vegetable oil)
1 teaspoon mustard seeds
1/2 teaspoon turmeric powder
1/2 teaspoon red chili powder (optional, for extra heat)
1 teaspoon sugar (optional, for a hint of sweetness)
Salt to taste
A pinch of asafoetida (hing, optional)
Optional add-ins for extra flavor (common in variations): 1/4 cup cashews, 1/4 cup raisins, or sliced dry coconut.
Step-by-Step Instructions:
1.Prepare the poha: Heat a large wok or kadai over low-medium heat. Add the thin poha and dry roast it, stirring continuously for 4-5 minutes until it becomes crisp and light. It should curl slightly at the edges but not brown. Remove from heat and set aside in a large mixing bowl. This step ensures the poha stays crunchy without deep
2. Roast the peanuts and chickpeas: In the same wok, add the raw peanuts and dry roast them on medium heat for 3-4 minutes until they turn golden and their skins start to crack. Remove and set aside. Next, if your chickpeas (chana dal) aren't pre-roasted, add them to the wok and roast for 2-3 minutes until crisp. Combine the roasted peanuts and chickpeas with the poha in the bowl
3.Make the tempering: Heat 2 tablespoons of oil in the wok over medium heat. Add mustard seeds and let them splutter (about 30 seconds). Then add a pinch of asafoetida (if using), the chopped green chilies, and curry leaves. Fry for 1-2 minutes until the chilies soften and the curry leaves become crisp. Be careful not to burn them stir frequently.
4. Add spices: Lower the heat and stir in the turmeric powder, red chili powder (if using), salt, and sugar. Mix well for about 30 seconds to release the aromas. Turn off the heat to prevent the spices from burning.
5. Combine everything: Pour the hot tempering mixture over the poha, peanuts, and chickpeas in the bowl. Toss everything gently but thoroughly to coat evenly. Let it cool completely this helps the flavors meld and keeps the chivda crisp. Taste and adjust salt or spice if needed.
6. Store and serve: Once cooled, store the chivda in an airtight container. It stays fresh for up to 2 weeks at room temperature. Enjoy as a snack with tea or coffee!
Hastag:
#PohaChivda #IndianSnacks #DiwaliRecipes #EasyRecipe #HealthySnacks #NamkeenRecipe #VegetarianSnacks #CookingTutorial #Foodie #RecipeVideo #QuickSnacks #IndianFood #HomemadeSnacks #SpicySnacks #TeaTimeSnacks #ViralRecipe #CrispyChivda #ChickpeaRecipe #PeanutSnacks #StreetFoodIndia
Tips:
Use thin poha for the best texture; thick poha might need longer roasting.
If you want a no-oil version, dry roast everything separately and mix with powdered spices, but the tempering adds better flavor.
For variations, add fried cashews or raisins in step 2 for sweetness and crunch.
Always work on low heat to avoid burning, as poha can turn bitter if over-roasted.
Повторяем попытку...

Доступные форматы для скачивания:
Скачать видео
-
Информация по загрузке: