Fender Blues Jr - Everything You Need To Know Refined & Updated!
Автор: Pro Amp Solutions
Загружено: 2025-05-23
Просмотров: 3188
Описание:
I've made several refinements to Pro Amp Solutions reliability and voicing modifications for the Fender Blues Jr and I go through each one in more detail in this video. Join me as I walk through the modifications and explain the eye candy. The outcomes are worth the watch. Reach out to me at [email protected] if you would like me to modify your Blues Jr or if you would like me to curate a kit for you. Love Your Tone!
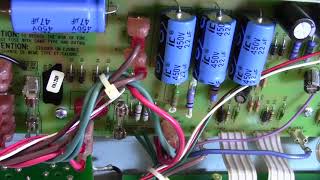
Following are the refined and updated reliability and tone voicing stages and associated component details for the newer green board.
RELIABILITY:
Stage 1: Filter Cap Replacement & Adjustable Bias – ESSENTIAL!:
C25: 47uF 450V F&T Axial Electrolytic (100uF for Stage 1 Tone Voicing)
C26 47uF F&T 500V Axial Electrolytic
C27, C28: 22uF F&T 500V Axial Electrolytic
C33:100uF 35V Nichicon Radial Electrolytic 2.5mm or 5mm Lead Spacing
R52: 50K 10-Turn Potentiometer
Stage 2: Speaker Cable & Input Jack:
Jack: Switchcraft Type 12A Shunt Tip
Speaker Cable: Neutrik or Amphenol Plug & 18AWG Stranded Wire Soldered To Speaker
Stage 3: Replacement Tube PCB:
There are multiple options available, here is the one I use...
https://borishelectronics.com/product...
Replace Ribbon Cables with 22AWG Stranded Teflon Jacketed Wire - I used RED for Plates, YELLOW for Screens, WHITE for signal grids, BLUE for cathodes, GREEN for ground in this video.
TONE VOICING:
Stage 1: Reservoir Cap & Speaker Change:
C25: 100uF 450V F&T Axial Electrolytic
Speaker: Your Preference, My Favorites: Scumback BM75-8-25W, Eminence GA-SC64, Celestion Creamback
Stage 2: Tone Stack, Coupling Caps, Bypass Caps, Treble Bleed Cap, Power Tube Screen Resistors & Plate Resistors, Heater Elevation:
C6: .1uF 400V Polypropylene Film
C3: 330pF 500V MLCC NO-COG
R11: 82K 1/2W Metal Film
C2, C8: .022uF 400V Polypropylene Film
C1: 1uF 63V Vishay Axial Electrolytic
C4: 2.2uF 63V Vishay Axial Electrolytic
C3: 120pF 500V Silver Mica
R35, R36: 470R or even 1K, 3W Metal Film
R3, R8, R16, R30: 100K 1W Metal Film (Plate Resistor Noise Reduction)
R28: 91K 1W Metal Film (Plate Resistor Noise Reduction)
R29: 9.1K 1W Metal Film (Plate Resistor Noise Reduction)
Heater Elevation: Cut Trace & Jumper Wire - See Video For Implementation
Stage 3: Reverb Tank, Reverb Power Supply, Reverb OpAmp, Reverb Input, Reverb Return Filter, Reverb Treble Bleed:
Reverb Tank: MOD 8BB2C1B (See Video For Mounting Application With Bag & Cardboard)
C30, C32: 680uF 50V Nichicon Radial Electrolytic 5mm Lead Spacing
C31, C34: 470uF 25V Nichicon Radial Electrolytic 5mm Lead Spacing (NOTE OF CAUTION - C34
POLARITY IS INCORRECTLY MARKED ON THE CREAM BOARD, NEGATIVE SHOULD BE TOWARDS THE BOTTOM OF THE AMP.
D7,D8: 1N5353B 16V 5W Zener
R50, R53: 220R 3W Metal Film
U1: NJM4556 Hi Current Dual OpAmp
R39: 180R 1/2W Carbon Film
R40: 18K 1/2W Carbon Film
C19: Replace with 3.9K 1/2W Carbon Film & 10nF 100V Polypropylene in SERIES
C23: Replace with 820R 1/2W Carbon Film & 3.3nF 100V Polypropylene in SERIES
TUBE VOICING RECOMMENDATIONS:
Power Tubes: TAD EL84-STR or Tung-Sol EL84/6BQ5
Phase Inverter: TAD 12AX7/ECC83-Cz or Tung-Sol 12AX7
1st Preamp Tube: TAD 12AX7/ECC83-Cz or Mullard CV4004/12AX7
2nd Preamp Tube: TAD 12AX7/ECC83-Cz or Mullard ECC83/12AX7
SUBJECT MATTER TIME SEGMENTS:
0:00 Welcome, Let’s Get Started!
Contact Information: [email protected]
Thank You For Watching My Channel,
John
Повторяем попытку...

Доступные форматы для скачивания:
Скачать видео
-
Информация по загрузке: