etrailer | 2009 Workhorse W-Series Roadmaster Rear Anti-Sway Bar: Complete Installation
Автор: etrailer
Загружено: 2023-10-31
Просмотров: 285
Описание:
Click for more info and reviews of this Roadmaster Anti-Sway Bars:
https://www.etrailer.com/Anti~Sway-Ba...
Check out some similar Anti-Sway Bars options:
https://www.etrailer.com/Vehicle-sway...
Search for other popular Workhorse W-Series parts and accessories:
https://www.etrailer.com/vehicle/2009...
https://www.etrailer.com
Don’t forget to subscribe!
/ etrailertv
Full transcript: https://www.etrailer.com/tv-install-r...
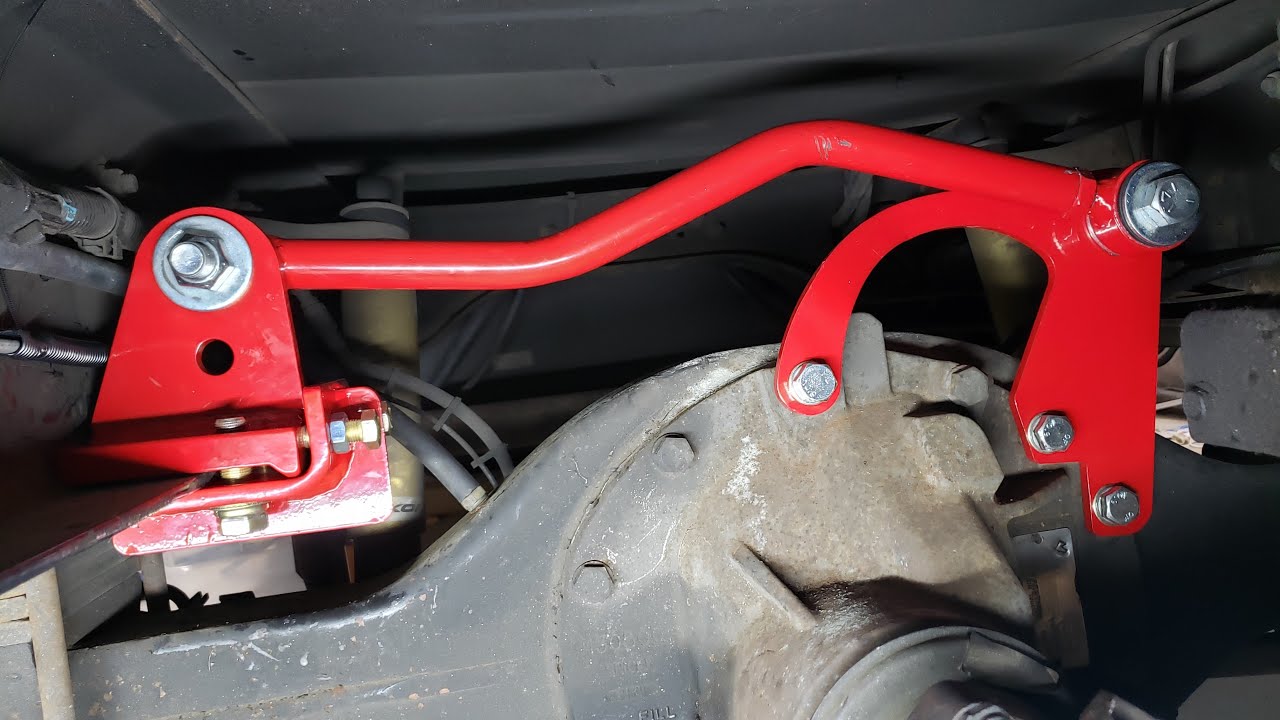
Hey everybody, Conner here today at etrailer.com. Today we're gonna be going over and showing you how to install the Roadmaster rear anti-sway bar here for our 2009 Workhorse W Series Chassis. So this is what our anti-sway bar is gonna look like installed. As you can see here, we have a connection to the bottom of the tie plate for our axle U-bolts and we have a connection here at the top to our frame. So in regards to upgrade you can make to your motor home the rear anti-sway bar is gonna be the most beneficial. It's gonna be the most felt upgrade.
So if you are planning to make some upgrades I definitely recommend starting with the rear anti-sway bar. Essentially what this is gonna do is we're out driving on the highway, we get passed by a semi that creates a large gust of wind that hits the side of our RV and it causes us to rock back and forth. Now this rocking back and forth is actually known as body roll and our rear anti-sway bar is gonna reduce that felt body roll because it's a connection between our axle and the frame. It's gonna tighten up and stiffen that connection. So we're not gonna have as much rocking back and forth.
You may also experience these body roll symptoms where we're making evasive maneuvers. We have to swerve out of the way. Overall, it's gonna help us feel much more in control of our motor home and it's give us more confidence when we're out on the road. So we talked about the rear anti-sway bar being one of the first grades you'd upgrades you'd want to consider for your motor home. However, we do have some other things as well such as a steering stabilizer, a front anti-sway bar and SumoSprings if you're interested.
So if those sound like a good fit for you, be sure to go ahead and check out our selection. So in regards to installation, it's nothing that's too difficult per se but it is gonna take you a little bit of time. We will actually have to drill a few holes into the frame on either side, but aside from that we don't really need any other major modifications. So now that we've gone over some of the benefits and features, let's go ahead and jump right into that installation so we can show you how it's done. So to start our installation today, we're gonna come back to the rear axle of our motor home here.
We're gonna direct look directly inside we're gonna see the two U-bolts, one on each side. We have the nuts securing the U-bolts to the axle. We wanna go ahead and spray down all of our nuts now because we're gonna be removing them. We're just gonna be using some penetrating oil here and the longer you let it set ideally the easier they'll be to break free. So now we'll take our 15/16 inch socket. We'll go ahead and remove the nuts to our U-bolt. So now with both of our nuts free we can go ahead and remove our U-bolt. So now we'll take our new U-bolt and our kit here which is gonna be much longer than the factory U-bolt. We'll go ahead and place that into position. So now we're gonna take our supplied washers and our supplied U-bolt nuts. We're gonna go ahead and tighten and torque these two nuts here before we remove the other side. So now we're gonna take our 1 and 1/16 inch socket. We're just gonna snug our two nuts up for now. Keep in mind when we're tightening U-bolts we need to work our way back and forth through each one. Now we'll switch back to our 15/16 inch socket and we'll move our other two nuts for our other U-bolt. We're gonna be replacing this with a longer one as well. So now we'll come back and take our 1 and 1/16 inch socket and we'll torque down our four nuts to our U-bolt here to the factory specifications. Once that's done, we'll repeat this process on the other side. So now we're gonna take our plate here. We can go ahead and install it over our U-bolts we just installed. Now as you can see here, the plate sort of comes to a point. We have two small holes up here. These need to be facing the front of the RV and towards the center just like this. Once we have our plate into position, we'll go ahead and take our flat washers and U-bolt nuts to secure it. And once we get this side done we'll simply repeat the same process on the other side. Now we're just gonna go ahead and snug up all of our nuts before we torque them down. Now we can go ahead and torque down our hardware. So the next thing we're gonna do is we're gonna ge
Повторяем попытку...
Доступные форматы для скачивания:
Скачать видео
-
Информация по загрузке: