How To Replace seal in Fiat Distributer - International Auto Parts
Автор: InternationalAutoWeb
Загружено: 2011-11-29
Просмотров: 5997
Описание:
Distributors:
http://www.international-auto.com/ign...
International Auto Parts Home Page:
http://www.international-auto.com/
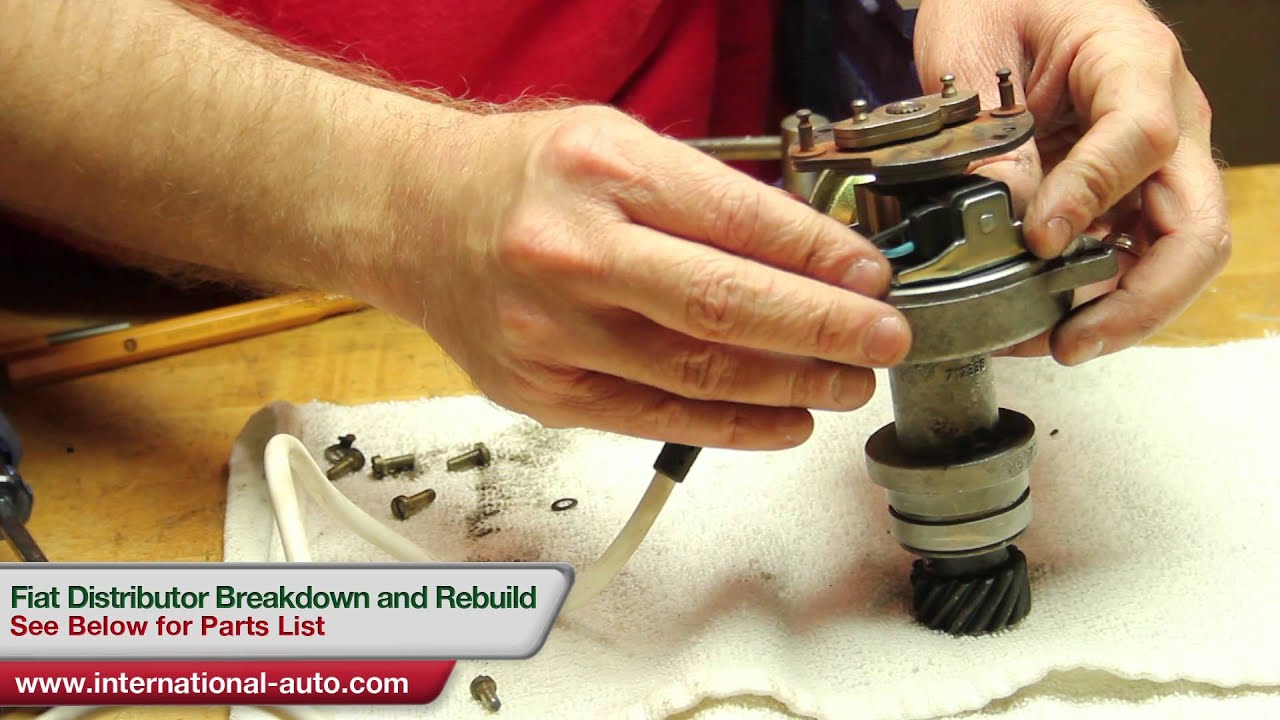
Today we'll be discussing replacing the seal in the distributor on the Fiat dual overhead cam motor. This will apply to the electronic distributor and the points distributor.
Oil coming up from the center shaft of the distributor is a common problem. It is fixed by replacing the lower seal. This is a fairly easy job and can be done in a short afternoon.
First, the necessary tools and parts: a socket wrench to turn the engine and set it at top dead center before removing the distributor; a timing light to reset the timing after; a wrench to remove the distributor hold-down nut; a punch and hammer to remove the pin and drive gear; a vise to hold the distributor while working on it; a screwdriver or other device to remove the old seal; a driver to install the new seal; some grease to lubricate and protect the seal; some rags; and the new seal.
The first step is to get the distributor out of the car. Set the motor to top dead center (TDC herein). Use the socket wrench and turn the motor clockwise until the mark on the crankshaft pulley matches the TDC mark on the engine. Remove the distributor cap and ensure that the rotor is pointing toward the number four spark plug wire terminal. Leave the cap off and attached to the wires; this will save time at the end. Next, use the 17mm wrench to loosen and remove the nut and hold down clamp, and then the distributor will pull right out.
Once you have the distributor out of the car, the next step is to mount it in the vise to work on it. Find the large end of the pin holding on the drive gear, point it down as the drive pin will only come out one way. Now use the punch and hammer to drive the pin out of the drive gear. Remove the drive gear then the washers and shims. Pay close attention to the shim placement so they can be replaced in the same order they were removed.
Now use the hammer and carefully drive the distributor shaft up the distributor housing until you're able to utilize the screwdriver to pry out the old seal.
Take a small amount of grease and apply it on both sides and the inner and outer edge of the new seal.
Now, to install the new seal in the distributor, make sure the open part of the seal, or the side with the spring, is facing outward. This is very important because it is what will keep oil out of the distributor. Use the seal driver and hammer to drive the new seal in. Push the shaft back down into the distributor, replace the shims and washers—making sure that they're replaced in the same order they were removed. Replace the drive gear, line up the holes, take the pin, find its large end, set it to the top, put it in the shaft, and drive the pin in.
Now the distributor is ready to go back into the car. This is the opposite procedure of the removal. Make sure the rotor is pointing toward the number four spark plug wire terminal, install the distributor cap and wires, slightly tighten the hold-down clamp.
Per the instructions on the timing light, check the timing and ensure it is in spec with the service manual. Fully tighten the distributor clamp. You're now ready to go down the road without that annoying oil leak.
Повторяем попытку...

Доступные форматы для скачивания:
Скачать видео
-
Информация по загрузке: