MicroPython for XBee Setup using XCTU
Автор: Greg Compton
Загружено: 2020-10-22
Просмотров: 4423
Описание:
My goal with these videos is to pass along some of the most basic information you need to start experimenting with your XBee radios. These are things that weren't explained very clearly in the documentation and I couldn't find really clear, concise tutorials to get me started. You see, I'm the type of person who can really benefit from a lot of hand-holding in the very beginning when I'm learning something new, because I don't even know what questions to ask.
So that's that's what these videos are. I'm treating you the way I wish I had been treated when I first started using these radios. I assume you know nothing so I'm going to show you every step in minute detail. And when we are done, you should have enough knowledge to start asking the right questions to learn more. Feel free to ask those questions in the comments and I'll make a video about it.
*****************************************************************
MicroPython for XBee Setup using XCTU
Resources:
Digi MicroPython Guide: https://www.digi.com/resources/docume...
XCTU: https://www.digi.com/products/embedde...
1) Configure radio for MicroPython mode
AP=4
BD=115200 (default is 9600, I like to use 115200)
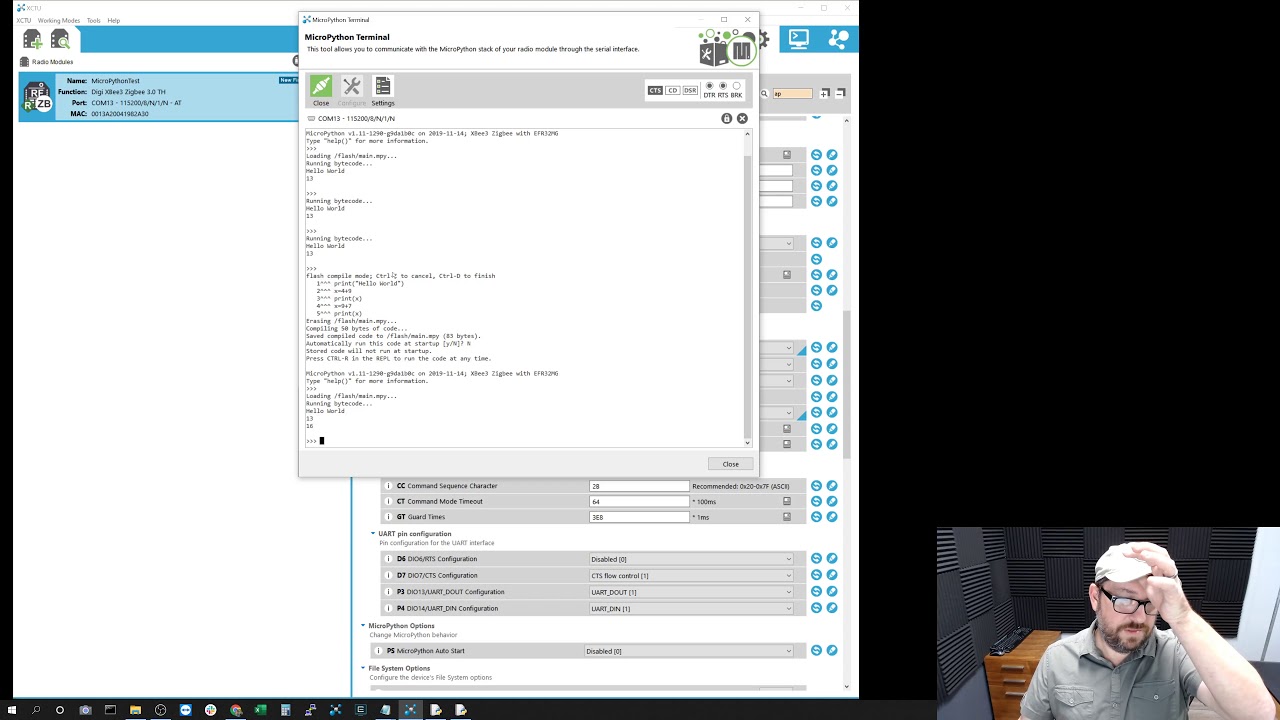
2) Open MicroPython terminal in XCTU
Tools - MicroPython Terminal
Configure
Select Port
Select Baud rate (the same rate as you chose in configuration
Click OK
Click Open
3) Direct entry
print("Hello World")
3+6
4) Paste mode
Ctrl-E to enter paste mode
right-click - paste
Ctrl-D to exit paste mode and run the code
Ctrl-C to exit paste mode without running the code
copy this:
print("Hello World")
x=4+9
print(x)
5) Flash mode
Save code to Flash memory
Ctrl-F to enter Flash mode
right-click - paste
Ctrl-D to exit and save to flash memory
Enter "N" to NOT automatically run this code at startup (we will look at this later)
Ctrl-R to run the code that is saved in flash memory
Remove code from Flash memory
Ctrl-F to enter Flash mode
Ctrl-D to exit and save
Ctrl-R
Note the message "no bundled code to run"
6) File System
In XCTU menu: Tools- File System Manager
Configure
Select Port
Select Baud rate (the same rate as you chose in configuration
Click OK
Click Open (if the connection doesn't open, check that your baud rate settings)
Click Format. You will be prompted with "Are you sure you want to format the XBee file system?" Click Yes. NOTE: If this is the first time the file system has been accessed, you may be prompted to format the file systme when the connection is opened. If so, then click OK.
in left window, navigate to the folder with your xbeeTest.py file
click and drag main.py to the right window
close the connection
open MicroPython Terminal
type "import xbeeTest.py"
the code should run.
press CTRL-R to run the code again
press CTRL-D to perform a soft reboot.
Note that the radio reboots and the python prompt appears...that's it.
7) Run code automatically on startup
in XCTU Configuration
PS = 1
in File System, copy main.py to /flash
close connection in File System window
open connection in MicroPython Terminal
pres CTRL-D to perform a soft reboot
Note that main.py runs automatically
you can wait for the code to end, or press CTRL-C to stop.
** Note: It is not best practice to run .py files. Instead, you should load .mpy files, because it reduces overhead. There is more information in the guide, linked in the description.
*** And now the sky is the limit. You can write your program and have it run on XBee, independently.
Повторяем попытку...
Доступные форматы для скачивания:
Скачать видео
-
Информация по загрузке: