Create SVG Character from Scratch | SVGator
Автор: SVGator
Загружено: 2023-12-05
Просмотров: 6306
Описание:
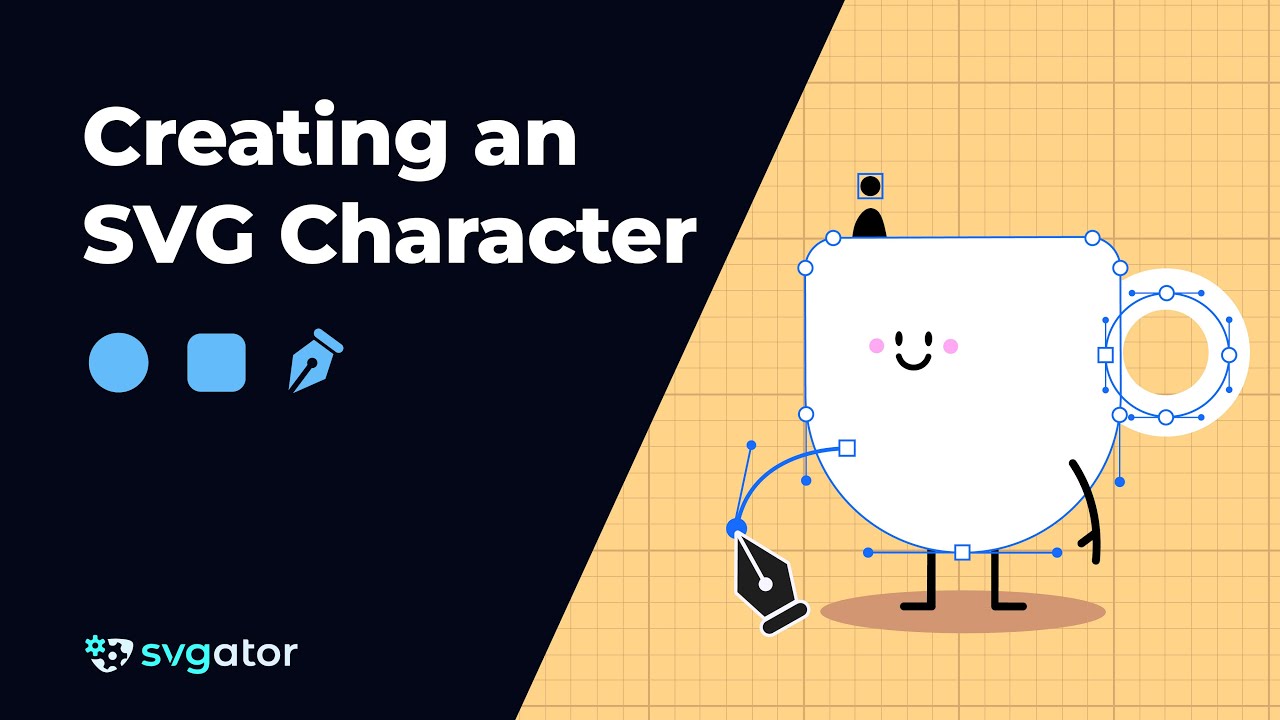
Learn how to create a coffee cup character using the basic shapes and the pen tool.
Start animating: https://www.svgator.com
In the next episode, you will also learn how to animate the illustration.
00:10 Setting up the project
00:33 Create the character's body
1:59 Create the character's face
4:56 Create the character's legs
5:50 Create the character's arms
6:55 Create the character's shadow
8:11 Create the coffee splashes and add the finishing touches
Step 1 - Setting Up the Project
Start by setting the background color. Enable the grid and "Snap to Grid" for precision. Adjust the timeline height and zoom in on the canvas for better visibility.
Step 2 - Create the Character's Body
Draw the coffee cup in the center. Select the Ellipse tool, hold Alt + Shift, and draw a perfect circle. Next, select the rectangle tool and draw a rectangle the same width as the circle, setting its height to 120 pixels. Position the rectangle to partially cover the circle, aligning it to the median line of the circle. Move it down by two grid units for seamless edges. Select both shapes, choose the Union option from the boolean options to merge them, and set the fill to white. Rename this shape "Body."
Step 3 - Create the Character's Face
Draw the eyes using the Ellipse tool, setting the size to 5 pixels by 10 pixels and the fill color to black. Copy and paste the first eye to create the second. Draw a curved smile using the Pen tool. Adjust the bezier handles to achieve a uniform look and set the stroke color to black with rounded ends and a width of 4 pixels. Adjust the face position as needed.
Create cheeks using the Ellipse tool, set the fill color to pink, and duplicate the circle for the other cheek. Align them horizontally and move them up slightly. Group all face elements and name the group "Face."
Step 4 - Create the Character's Legs
Draw the legs using the Pen tool, ensuring vertical and horizontal lines by holding Shift. Set the stroke color to black, enable Rounded Ends and Joins, and set the stroke width to 5 pixels. Copy the first leg to create the second one, flip it horizontally, and position both legs behind the body element. Rename them "Left leg" and "Right leg."
Step 5 - Create the Character's Arms
Draw the arms with the Pen tool, creating a curved path for the arm and another line for the hand. Apply the same stroke settings as the legs: black color, roundness, and 5 pixels stroke width. Group the paths and name the group "Right Arm." Copy, paste, flip, and position the left arm, renaming it "Left Arm" and placing it behind the body.
Step 6 - Create the Character's Shadow
Draw an ellipse with a size of 200 by 30 pixels for the shadow, set a desaturated orange fill color, and place it at the bottom of the elements list. Scale it down on the X-axis to 90% and rename it "Shadow."
Step 7 - Add Finishing Touches
Draw the handle using an 80 by 80 pixels circle with no fill color and a white stroke set to 26 pixels. Position it behind the body. Draw coffee splashes using the Ellipse tool. Create two circles, subtract one from the other to shape the splash, and set the color to black.
Adjust the nodes and beziers for a more organic shape, and position it behind the body. Name it "Coffee" and place its origin point center-top for easier animation. Add a drop of coffee next to the splash, setting its origin point to match the splash for synchronized rotation.
Subscribe: / @svgator
Let's connect:
Facebook: / svgator
Instagram: / svgatorapp
Twitter: / svgatorapp
LinkedIn: / svgator
SVGator | Web-based Animation Tool 🎨 Animate SVG, Lottie, GIF & Video⚡Create lightweight animations with an intuitive and beginner-friendly design tool.
Повторяем попытку...
Доступные форматы для скачивания:
Скачать видео
-
Информация по загрузке: