RENOVATE: Residential Lighting Design Pt 2 Wiring Diagram
Автор: MPC Property Developments & Handy Electrics
Загружено: 2021-03-26
Просмотров: 170
Описание:
RENOVATE: Residential Lighting Design Pt 2 Wiring Diagram
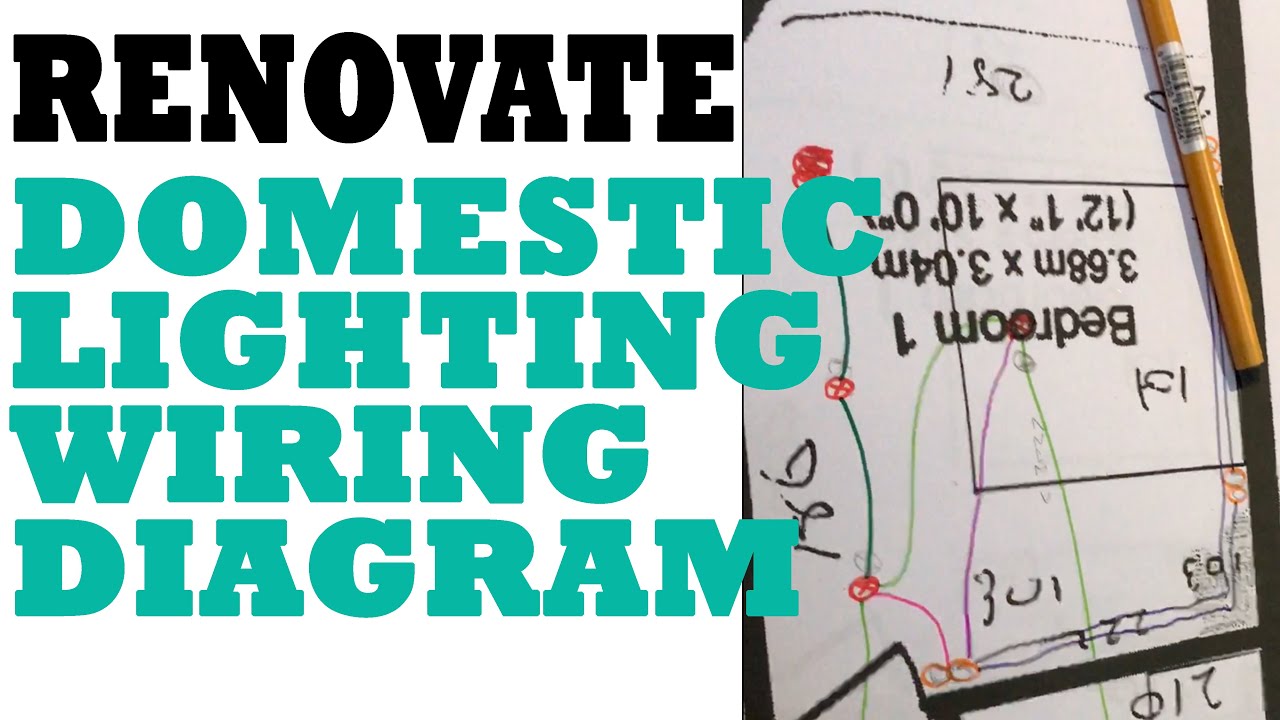
As a continuation from my previous video, where I talked through the thinking of what lights go where in a domestic residential property, in this video we look at the cabling and wiring diagram of the lights and their switching including the supply to the bathroom fan.
I hope you find it useful and see you on the next one.
Find Out More and Say Hello;
http://mpcpropertydevelopments.co.uk/
/ mpcpropertyuk
/ mpcpropertydevelopments
/ mpcpropertydevelopments
/ mpcpropertyuk
Transcript
so now we get
a little bit of a choice when we're
doing our lights there's two methods of
doing light the ceiling rose method and
the
switch through method so basically is
you take your
live wire from the consumer unit to
either your first switch or your first
ceiling rose if you're doing it
the light switch through method that
means you're connecting the neutral in
the light switch
which i don't like i don't think there
should be any connector blocks anywhere
if you can avoid them
so that's why i use the ceiling rose
method because it totally avoids
any connector blocks so i'll take the
live
from the consuming unit to the first
light fitting
so in which case it's probably going to
be this one that will move
on to the spots the bedroom
the second bedroom and then finally
the bathroom lights so there we go up
from the consumer unit into the first
light
into the second into the third fourth
and fifth set lights and nearly forgot
also in your bathroom you gotta think
about your bathroom fan as well so we'll
look how to
connect that to and then what you'll
need is
every set of lights needs to be
connected together so
this light and this light work together
so that i need a link
these three lights all work together so
they need to be linked
and in your bathroom these four lights
all together so they'll
all be linked
now this is where the colored pens come
to their own because so
so from this we need to connect to the
light switch
so from that light we need to connect to
the light switch
and from these lights we need to connect
to light switch similarly
that needs to connect to the light
switch
so the pink is going to be too cool now
we've got to think about
our two-way lights or intermediate
lights in the case of the bedroom
now it's i find it helpful to do this
different color so i know the pink is
too cool
the purple is going to be three-core now
because this is a two-way light switch
uh this needs to connect to the light
switch downstairs
so that will be so that'll be a three
core
going from the upstairs light switch to
the downstairs light switch for the
landing lights
right nearly forgot we need to connect
that light to the light switch too
i've kind of gone a bit off piece with
the wrong color there not to worry
uh that is also two core
so now we've got two light switches
that we need to connect so we need to
connect that to there
that to there and there's two lots of
cables there's two lighting circuits
so this will be your intermediate light
switching for this room
and going to the bathroom whilst lights
don't need any two-way switching
we do need some three-core going to the
fan
uh because we need a timer over and on
there so it needs a permanent live
and a switch live so there you go not
quite as straightforward as the socket
to say this is where the colors come in
because i know purple is three
core
i don't know my pinks
it's too cold
now with pinks i'm probably going to use
brown brown
and those greens
it's two core and that's just gonna be
regular twin on earth so that helps me
when i'm when i'm on site i don't have
to sit there thinking
what's three kill what's too tall and i
do that all in 1.5 mil
so that's uh so that'll easily meet all
the testing requirements
you probably could get away with one
mill but sake of a few quid do 1.5 and
you know you're 100
there maybe the last thing to say is
once you've
done your wiring diagram if you want you
can measure out all the cable lengths
and
uh by your cable accordingly i just buy
rolls of it
and use it by more when i've finished
the roll
but what you can do is make a little
shopping list obviously i've got eight
down lighters two pendants i've got
three one gang one ways
one two gang two way one uh two one gang
two ways
a couple of grid switches setups and
i need uh seven single gang
back boxes to do that so i know what i
need when i'm
out shopping
so there you have it it's uh there's a
real world example of lighting design
it's that will go
into our current projects um i'm pretty
happy with that
i've got videos out there on how to do
one-way two-way and intermediate like
switchings if you want to take a look uh
and i hope you found that useful
see you on the next one bye-bye please
don't forget
to like subscribe and comment thanks see
you on the next
Повторяем попытку...
Доступные форматы для скачивания:
Скачать видео
-
Информация по загрузке: