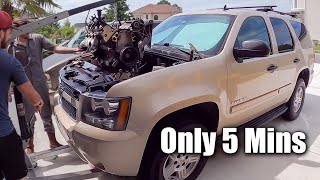
Episode 52: Part 1 of 5.3L engine removal from 2008 Chevy Suburban
Автор: 5.3 Performance Optimization
Загружено: 2021-05-25
Просмотров: 24279
Описание:
Episode 52: Part 1 of 5.3L engine removal from 2008 Chevy Suburban
Here's the video that I used as a guide for this removal. The steps shown in this video worked perfectly for me, and I highly recommend the procedure and order shown in this video:
• 2007 GMC Yukon, Engine Replacement Part 1
Here are my instructions. Simply highlight beginning below the line below, then copy and paste into a word doc or notepad, then print them off:
---------------------------------- instructions below ----------------------------------
Suburban Engine Removal instructions
These instructions are based solely on notes that I took watching the following video series: • 2007 GMC Yukon, Engine Replacement Part 1
These instructions may (probably will) differ from your situation or application.
These instructions are not all-inclusive. You will have to figure some things out on your own.
These instructions are just for engine removal. Engine installation may (or may not) work simply by completing the reverse of these instructions.
Please do your own research and due diligence.
The numbers at the end of each step show the time-stamp in the associated video where that step is shown.
Part 1: • 2007 GMC Yukon, Engine Replacement Part 1
1. Open hood and add lighting as needed. (optional to remove hood)
2. Remove upper fascia fasteners (fascia = front bumper cover) (2:40)
3. Remove both front tires (3:43)
4. Remove lower splash shield to access fog lamp bulb connector (4:25)
5. Disconnect fog lamp connectors (5:10)
6. Remove both lower fascia support bolts (one per side) (5:30)
7. Remove front bumper (fascia) cover (5:40)
8. Remove headlamps (6:05)
9. Remove upper cover that covers radiator. (6:50)
10. Remove front bumper cover support spacer (7:30)
11. Disconnect hood latch switch and ambient temp sensor connectors (8:05)
12. Disconnect hood latch switch and ambient temp sensor connectors. (8:40)
13. Remove lower radiator hold down brace fasteners (9:45)
14. Remove upper radiator hold down fasteners and radiator and cooling fan retaining bolts (10:05)
15. Remove radiator brace. (11:30)
16. If removing condenser, recover freon. (11:40)
17. Remove beauty cover (12:40)
18. Remove air intake (13:00)
19. move Power Steering cooler out of the way (13:55)
20. Unbolt a/c condenser lines and remove condenser (14:19)
21. Remove expansion tank to radiator hose (15:30)
22. Remove lower radiator hose to drain radiator (16:30)
23. Remove upper radiator hose (16:55)
24. Disconnect cooling fan connectors (17:39)
25. Disconnect transmission cooler lines from radiator (18:00)
26. Remove radiator and fan assembly (19:50)
27. Remove serp belts and a/c belt (20:20)
28. Remove battery cables (21:26)
29. Disconnecting alternator heavy and excitation connections (21:51)
30. Remove P/S & Alt bracket assembly from block (23:05)
31. Remove hoses from water pump (24:00)
Part 2: • 2007 GMC Yukon Engine Replacement Part 2
32. Remove engine wire harness (0:09)
33. Unplug fuel injectors and ignition coil pack (0:42)
34. Tuck harness up out of the way (2:20)
35. Disconnect vacuum PCV hose from top of intake manifold (2:35)
36. Disconnect evap purge line from solenoid (3:12)
37. Remove fuel line from fuel rail – use 3/8 inch disconnect tool (3:35)
38. Remove intake manifold bolts (4:20)
39.Remove intake manifold (6:10)
40.Remove AFM and oil pres sensor connectors (6:40)
41. Remove main engine ground from cylinder head (7:00)
42. Remove or reposition A/C compressor (7:35)
43. Disconnect exhaust flanges (8:00)
44.Unbolt starter from engine (12:15)
45. Disconnect knock sensor, oil level sensor, and starter heavy cable (12:42)
46.Detach front cross-over harness (15:35)
47.Disconnect knock sensor and ground cable from drivers side (16:55)
48.Drain oil (17:25)
49.Remove 3 torque converter bolts (17:40)
50. Remove accessible bell housing bolts (18:25)
51. Lower rear of transmission to access top bellhousing bolts (18:45)
52. Reinstall crossmember to support transmission (22:00)
53. Remove front bumper for hoist clearance (23:00)
54. Install engine lift plate (23:30)
55.Remove engine mount bolts on each side – 3 on each side (24:10)
56. Support front of transmission (24:40)
Part 3: • 2007 GMC Yukon, Engine Replacement Part 3
57: Roll in engine hoist and connect the chain to the engine lift plate. (00:25)
58: Begin carefully removing engine (00:50)
59: Clean up engine bay (03:50)
The rest of the steps shown in this video series covers the engine parts swap. I stop my notes here, since this is all that I need to remove the engine. You’re welcome to continue watching the rest of the video series per the links shown below.
Installation of the engine, in most cases, is the reverse of the above steps.
Part 4: • 2007 GMC Yukon, Engine Replacement Part 4
Part 5: • 2007 GMC Yukon, Engine Replacement Part 5
Final Part: • 2007 GMC Yukon, Engine Replacement Finale.
Повторяем попытку...

Доступные форматы для скачивания:
Скачать видео
-
Информация по загрузке: