Navien Ready-Link Manifold System
Автор: Navien Inc. Manager
Загружено: 2022-09-08
Просмотров: 13654
Описание:
Explore the NPE-A2 (Advanced) Series: https://www.navieninc.com/series/npe-a2
Explore the NPE-S2 (Standard) Series: https://www.navieninc.com/series/npe-s2
The YouTube content is for observation purposes only. The information herein is provided “As Is” “With All Faults” and without warranties or representations of any kind, including but not limited to the accuracy of the same. Please seek professional assistance or qualified installers with Navien products. In no way shall Navien be liable for any special, indirect, direct, or consequential damages. Navien assumes no liability for property damage or personal injury or death as a result of any information contained herein and use of the same is voluntary and at your own risk. Navien, at its sole discretion, has the right to change or modify any contents of the video and may review and delete comments made by the viewers. This video is protected by copyright and IP laws and Navien reserves all rights herein.
Your distributor has everything in stock, and you can have it all the same day. Since you build it, you can carry it through the door and/or down the stairs of your installation site. No shipping delays or waiting, no special freight unloading or rigging required, and no concerns about freight damages.
The Ready-Link system saves time on multi-unit tankless water heater installations. Just follow these four simple steps:
1. Pick your Navien unit, NPE-A2 or NPE-S2.
2. Pick your location wall or rack.
3. Pick your matching manifold kits.
4. Pick your venting configuration.
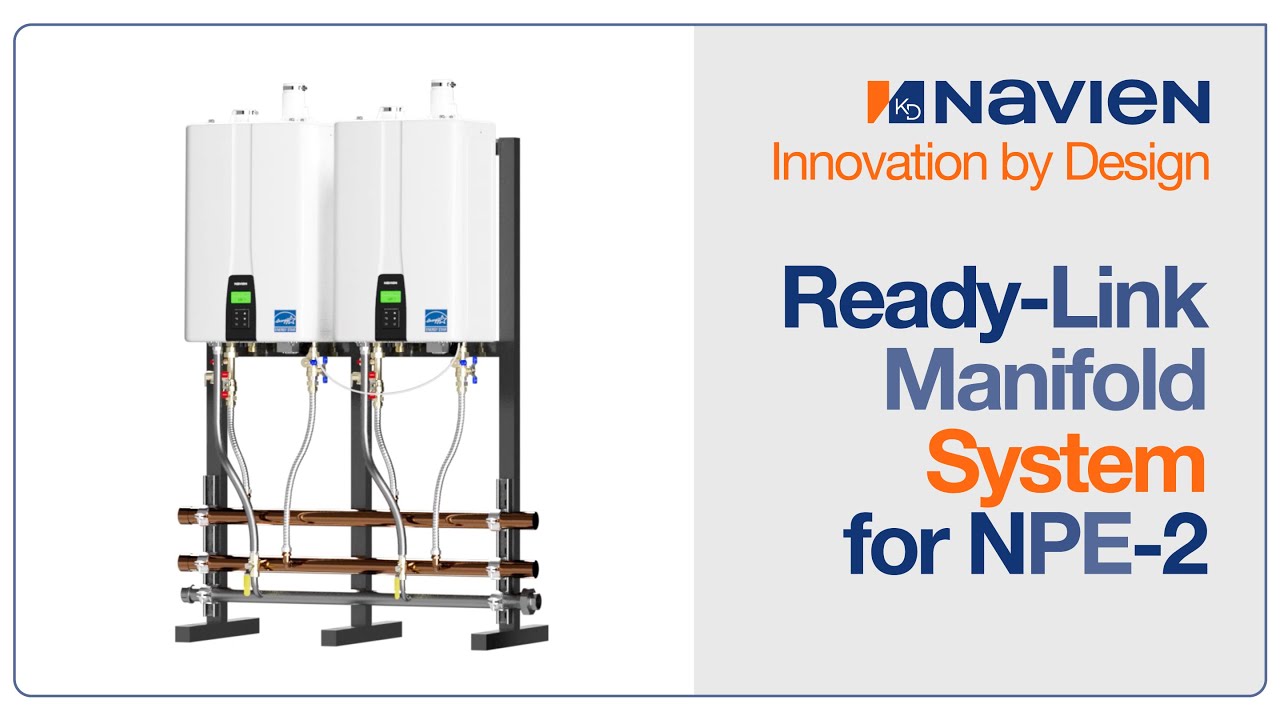
You can install NPE-2 units on a wall or a free-standing Ready-Link rack.
First, assemble the base rack and add-on rack sections. The feet of the assembled rack must be bolted to the floor.
Hang the units on the rack using the NPE-2 series mounting brackets. Install the valves and attach the unistrut.
Mount the gas, cold water and hot water manifolds.
Connect couplings and unions to the manifolds. You may choose to attach couplings and stub-outs before hanging manifolds and cap all the manifolds. However, it may be easier to do this before mounting the pipes.
Then, connect flex water and gas lines and install vent collars for PVC vent pipe.
Be sure to follow instructions for proper setup and cascading of units upon startup.
For free-standing rack applications or a wall-mounted assembly, things couldn't be simpler!
The Ready-Link manifold system can be configured for up to 16 units mounted side by side. When you have more than four units, you will need to select the proper add-on manifolds.
Here, we show two manifolds to serve a total of 8 units mounted side by side. Assemble the system the same way. It may be simpler to attach couplings and stub-outs before mounting the manifolds.
Make sure the ends are capped and attach the water and gas lines.
Install the common vent collars and connect to common venting.
Always follow directions in the installation manual for installing cascade cables and proper startup procedures.
The assembly process for this 8-unit system saves hours over traditional mounting options. You can connect up to 16 units side by side using the Ready-Link Manifold system.
When you have more than eight units connected side by side, you must connect water and gas supply lines between the banks of the units. This configuration must be done for both rack and wall mount installations. You can also mount units back-to-back using the Ready-Link Manifold system. For two units, use the base rack and mount a unit on each side. Keep in mind that the feet of the rack must be bolted to the floor.
Install the valves and unistrut to hold manifolds on one side of the rack. Connect the manifolds to mains, cap the manifolds, and attach water and gas lines. It may be simpler to install couplings, stub-outs, and caps before the manifolds are mounted.
Attach common vent collars to common venting and connect the cascade cables. Be sure to follow directions for proper connection and startup procedures.
Here's everything you need for a fast, simple, compact back-to-back installation. Mounting four or more units back-to-back requires add-on rack sections and add-on manifolds.
Follow the same steps: installing add-on manifolds as needed, connecting them to the mains, and capping the ends. You may want to install couplings and caps before you mount the manifolds.
Attach water and gas lines and common vent collars as required. Always follow the instructions in the installation manual for proper setup and cascading of units upon startup.
Here we see eight units mounted using the same basic process, saving many hours of installation time. When you have more than eight units mounted back-to-back, you need to separate them into two banks and install water and gas lines between the banks.
Повторяем попытку...
Доступные форматы для скачивания:
Скачать видео
-
Информация по загрузке:


