Ultimate HACK to save your CPU in FL Studio 20 when its crackling LIKE HELL
Автор: Music Pervs
Загружено: 2019-09-12
Просмотров: 2641
Описание:
#flstudio20, #flstudio, #flstudiotutorial, #flstudiocpuoptimization,
Subscribe to our telegram channel - t.me/fl_studiopro
Freezing audio instruments in 2019 the best way (FL Studio 20)
Hello, this is Paul Wallen welcome to the music producer channel. In this tutorial I’ll show you relatively new feature in FL Studio 20 – sampling the instrument channels by creating a new DirectWave instrument.
If you have no idea how to do it or even what this method is, let me show you something:
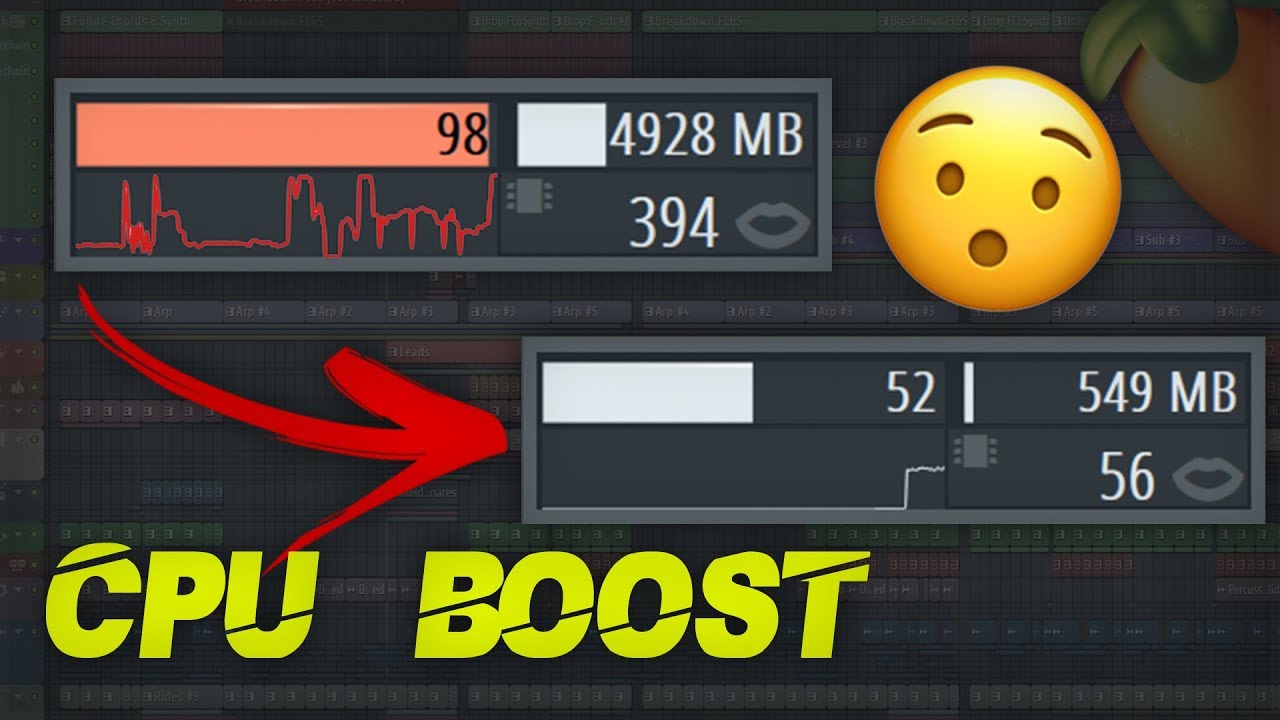
When you have some very CPU greedy instruments (like Omnisphere. Serum, Spire or Diva) in you project and it’s getting freezy in there from constant cracking – you right-click the channel that you want to get rid of in order to free up some CPU. Find “Create DirectWave instrument” command here (Make sure that you have FL Studio 20th version). We got to choose location for our forthcoming sample library or instrument. And after that you will be introduced to those export settings which I will break down for you in every detail just in a minute cause these things are the most important part that is responsible for this high-quality sampled copy (that requires almost no CPU) of your original third party VST instrument that presumably consume a lot of those CPU resources. But this sampled copy I must warn you consumes your RAM. So you got to have some free RAM for that. Cause you got to keep in mind every audio data in your FL project (whether it is a sample, an audio clip or a sample library for Kontakt or DirectWave) is being stored in RAM. And let’s admit that this is a fair enough exchange a lot of CPU resources for let’s say 50 megabytes of RAM.
So to answer the question what it’s actually for:
1st goal is to free up some CPU resources which powerful plugins always seek to consume plenty.
2st goal is collaborations. When you work on a project along with your friend of producer college and there will be situations where you be swapping FL project and you who maybe started this FLP have used let’s say Omnisphere and your friend doesn’t have and of course he doesn’t show a lot of desire to Install huge monster like Omnisphere and just get rid of his 60 Gb of free memory on a hard drive just to have a collaboration with a “no name”. And that’s when channel sampling comes handy where you can just save the 3d party plugin in its every sonic detail in a form of a sample library for the native FL Studio sampler – DirectWave. But to achieve those very details in a sound you got to know how handle those settings.
And here’s exactly how:
1) You got to choose your lower and upper note
2) The amount of keys for the specific zone on a key scale.
3) The amount of velocity layers.
4) Cycle layers
5) When to stop exporting each note
6) Quality settings
7) Processing options
Flexibility lies is in the control of basic sound parameters and effects inside DirectWave
That’s how good this kind new-age freezing is, Instrument channel sampling in FL Studio 20. Probably some of you already knew that FL Studio 20 has this feature, but I hope that I have helped at least a little bit to break those setting details down for you.
Повторяем попытку...

Доступные форматы для скачивания:
Скачать видео
-
Информация по загрузке: