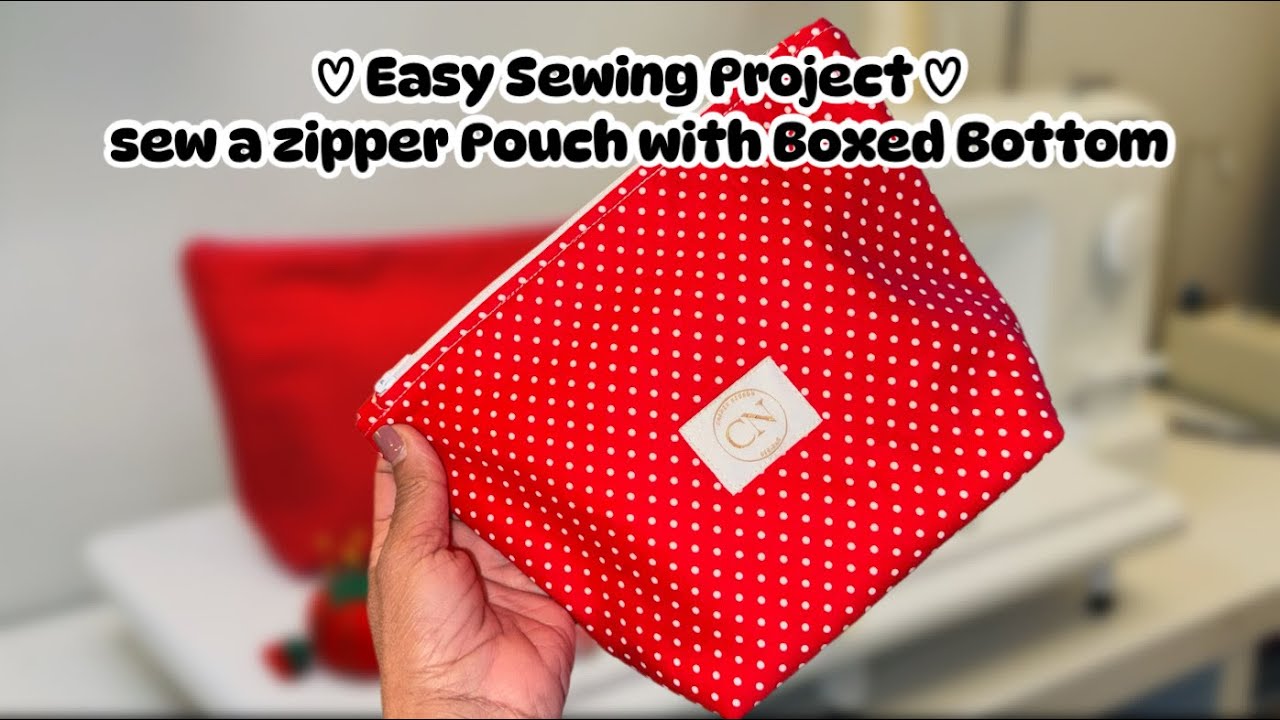
How to Sew a Boxed Zipper Pouch | Easy & Beginner Friendly
Автор: Carmen Negrón Designs
Загружено: 2026-02-01
Просмотров: 43
Описание:
In this tutorial, I show you step by step how to sew a boxed zipper pouch using a simple method that’s perfect for beginners. This pouch features boxed corners for extra space, lining and batting for structure, and fabric-covered zipper ends for a clean, professional finish.
This project is ideal for making a makeup bag, personal essentials pouch, or small travel bag, and it’s easy to customize with your favorite fabrics.
✨ Great project for beginners and confident sewists alike!
BOXED ZIPPER POUCH – STEP-BY-STEP INSTRUCTIONS
(with zipper end covers)
⸻
🧵 MATERIALS
• 2 outer fabric pieces: 11” x 10”
• 2 lining pieces: 11” x 10”
• 2 batting pieces: 11” x 10”
• 2 fabric squares: 2” x 2” (from the cut corners – save them!)
• 1 zipper (10”–11”)
• Thread
• Pins or clips
• Sewing machine
• Scissors
⸻
✂️ CUTTING
1. Cut 2” x 2” squares from the bottom corners of the 11” side on:
• Outer fabric
• Lining
• Batting
2. Save the 2 fabric squares cut from the outer fabric — these will be used to cover the zipper ends.
⸻
🪡 ASSEMBLY
1️⃣ Attach Batting
1. Place batting on the wrong side of each outer fabric piece.
2. Baste or quilt to secure.
⸻
2️⃣ Cover the Zipper Ends
1. Take the two 2” fabric squares.
2. Place one square right side down on one end of the zipper.
3. Stitch across the zipper.
4. Fold the fabric over to the back and press.
5. Trim excess zipper if needed.
6. Repeat on the other zipper end.
• Your zipper is now cleanly finished and ready to install.
⸻
3️⃣ Zipper End Covers (Using the 2” Squares)
1. Take the two 2” fabric squares that were cut from the corners.
2. Place one square right side down at one end of the zipper, aligning the raw edge of the fabric with the zipper edge.
3. Stitch straight across the zipper.
4. Fold the square over the zipper end, wrapping it around to the back.
5. Press flat.
6. Trim any excess zipper if needed.
7. Repeat on the other end of the zipper.
✔️ The fabric square is folded over the zipper end, fully covering it for a clean and professional finish.
4️⃣ Sew Around the Pouch
1. Open the zipper halfway.
2. Place outer fabrics right sides together and lining fabrics right sides together.
3. Clip or pin all around.
4. Sew around the pouch, leaving a 3–4” opening at the bottom of the lining.
5️⃣ Box the Corners
1. At each cut corner, pull the fabric apart so side seam and bottom seam align.
2. Sew straight across the opening.
3. Repeat for:
• 2 outer corners
• 2 lining corners
6️⃣ Turn & Finish
1. Turn pouch right side out through the lining opening.
2. Push out corners neatly.
3. Close the lining opening by machine or hand stitch.
4. Push lining into pouch.
5. Press and topstitch around zipper if desired.
✨ FINAL RESULT
A beautiful boxed zipper pouch with:
• Clean zipper ends
• Structured bottom
• Perfect size for makeup or personal essentials
If you want, I can now:
• simplify this into on-screen steps
• rewrite it as a voice-over script
• or brand it with your logo and name for a printable handout
👉 Linktree: https://linktr.ee/CarmenNegron
Thank you so much for watching, and happy sewing!
Повторяем попытку...
Доступные форматы для скачивания:
Скачать видео
-
Информация по загрузке: