冬末枫树移栽 从地栽变盆栽/ Japanese Mapple: Transplantation in Winter from Ground Planting to Potting
Автор: 德国小青蛙DE_Frosch
Загружено: 2026-03-01
Просмотров: 11
Описание:
#garden #mapple #transplantation #potting #ahorn #eintopf #winter
前房主在花园里栽种了很多树木,其中有零星几棵长得很一般。其中就包含这棵要被移栽的日本枫树。
这棵日本枫树在两棵绣球花丛之间,后面(南侧)则是高达的杜鹃花,再后面则是南向遮荫的小乔木。前面是花园小道。因此,树型本身就被修剪得很狭长。而这个地方,因这棵日本枫树长得太差,被我看中来种软枣猕猴桃。
原本得移栽计划是3月中下旬,但是Oberhausen进入2月后,温度突然升高,并且持续数天在10度左右,这棵日本枫树要发芽了。
而移栽一定要在它长出叶子之前进行,不得不提前到2月初进行紧急移栽。
1 盆土准备
这棵日本枫树是地栽变盆栽,那么挖掘的时候根须肯定会有损伤,因此需要新鲜盆土,而不能使用旧盆土(或者不能占比太多),避免根须伤口持续损伤。
盆土选用的椰糠、珍珠岩以及新购入的盆土。剩余部分则是旧土以及少许地栽时的土。
盆选用的建筑用的塑料大盆,直径65厘米、深35厘米。底部钻了十几个排水口。为了提供更多盆土支撑,在盆中放入了一圈园艺用的塑料隔层。这个隔层外加盆本身高度,能有65-75厘米。
在盆地与盆土直径,则用了碎瓷盆以及陶粒做了渗水层。
2 挖掘地栽的日本枫树
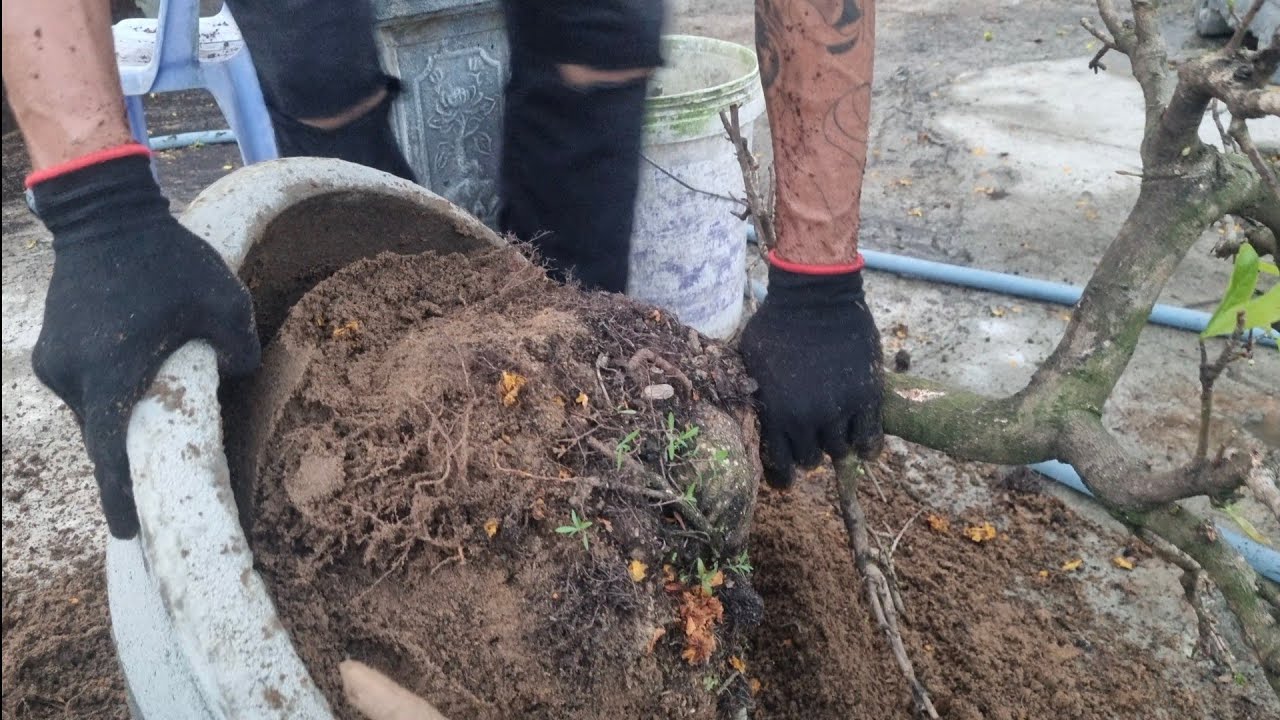
日本枫树并不是深根植物,因为周五的植物,根须也没有完全向四周扩散。挖掘的时候,在直径45-50厘米的区域进行挖掘。差不多深挖了30厘米左右。
日本枫树挖出来的时候,断了部分根须。最大的问题是一个比较粗的根挖断了,并且有撕裂。可能会影响盆栽存活。
3 盆栽
种植盆最底端是一层5厘米左右厚的碎瓷片与陶粒,上面是盆土,填了差不多30-40厘米的盆土后,上面放置挖掘出来的日本枫树。继续填土直至达到植株底部地栽的高度。
最后浇透定根水,并再次添加一部分盆土,填补浇水后被冲走的部分。
因为挖掘时,植物根须有一个大裂痕,不确定是否能成功盆栽,需要等到四月初才能确定是否存活。
(English Text)
The previous owner planted many trees in the garden, a few of which grow not very good. This included the Japanese maple that was to be transplanted.
This Japanese maple was situated between two hydrangea bushes, in behind (to the south) are tall azaleas, and further behind those are small trees providing shade. A garden path is in front of the mapple. Therefore, the tree itself grows into a very narrow shape. Because this Japanese maple was growing so poorly, I decided to plant hardy kiwifruit in this place.
The original transplanting plan was for mid-to-late March, but after entering February, temperatures in Oberhausen suddenly rose and remained around 10 degrees Celsius for several days, causing the Japanese maple to sprout.
Transplanting must be done before it grows leaves, so it had to be done urgently in early February.
1. Potting Soil Preparation
This Japanese maple was planted in the ground and now will be transferred to a pot. Therefore, the roots will inevitably be damaged during digging. Fresh potting soil is necessary; old potting soil should not be used (or should not be used in large quantities) to avoid further damage to the roots.
The potting soil used consists of coconut coir, perlite, and newly purchased potting mix. The remaining portion is old soil and a small amount of soil from the ground planting.
A large construction-grade plastic pot was used, 65 cm in diameter and 35 cm deep. A dozen drainage holes were drilled in the bottom. To provide more support for the potting soil, a ring of garden plastic dividers was placed inside the pot. This divider, plus the height of the pot itself, provides 65-75 cm of drainage.
A drainage layer of broken ceramic pottery and clay pebbles was used between the bottom of the pot and the diameter of the soil.
2. Digging the Ground-Planted Japanese Maple
Japanese maples are not deep-rooted plants, as their roots do not spread outwards completely. Digging was done in an area 45-50 cm in diameter, reaching a depth of approximately 30 cm.
When the Japanese maple was dug up, some of its roots were broken. The biggest problem was that a relatively thick root was severed and torn. This may affect the survival of the potted plant.
3. Potting
At the bottom of the planting pot, there was a layer of broken porcelain shards and clay pebbles about 5 cm thick, followed by potting soil. After filling the pot to about 30-40 cm, the dug-up Japanese maple was placed on top. Soil was added until the base of the plant reached the height for ground planting.
Finally, the plant was thoroughly watered to settle its roots, and some more potting soil was added to fill in any areas washed away by the watering.
Because the plant's roots had a large crack during digging, it's uncertain whether it can be successfully potted. I need to wait until early April to determine its survival.
Повторяем попытку...

Доступные форматы для скачивания:
Скачать видео
-
Информация по загрузке: