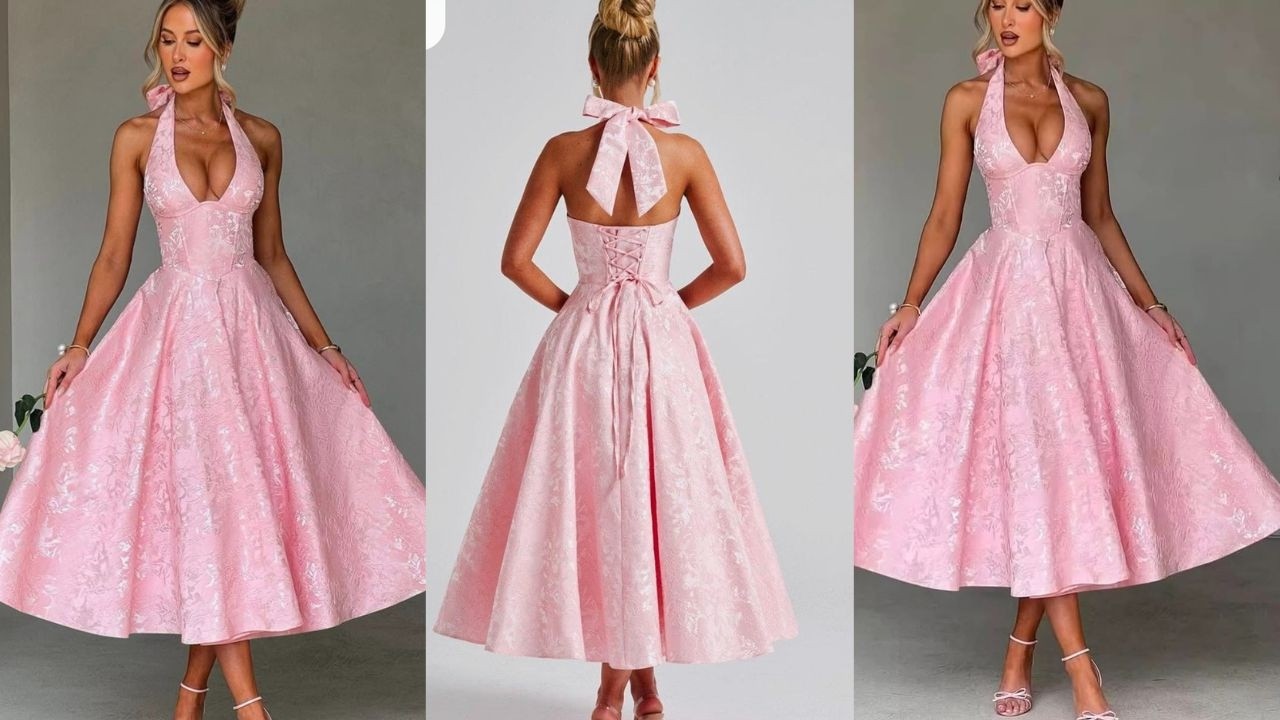
DIY : HOW TO MAKE AN HALTER BACKLESS CORSET
Автор: Maky’s closet
Загружено: 2025-03-28
Просмотров: 41096
Описание:
Cutting and sewing a halter neck backless corset requires precision, patience, and attention to detail.
Materials needed
1-2 yards of main fabric (depending on the design and your size)
1/2 yard of lining fabric (optional)
Interfacing or stabilizer
Thread (matching the color of the fabric)
Pattern preparation
1. *Choose a pattern or draft your own*: Select a pattern specifically designed for halter neck backless corsets, or draft your own using a corset block.
2. *Adjust the pattern for your measurements*: Make any necessary adjustments to the pattern to fit your body. Consider factors like bust size, waist length, and hip shape.
3. *Add seam allowances and grain lines*: Include seam allowances (about 1/4 inch) and grain lines to ensure accurate cutting.
Cutting the fabric
1. *Cut the main fabric pieces*: Cut two front pieces, two back pieces, and any additional pieces required by your pattern (such as a lining or interfacing).
2. *Cut the lining fabric pieces (optional)*: Cut two front pieces and two back pieces from the lining fabric.
3. *Cut the interfacing or stabilizer*: Cut interfacing or stabilizer pieces for the front and back pieces.
Creating the halter neck
1. *Mark the halter neck*: Mark the halter neck on the front piece, using a ruler or measuring tape.
2. *Cut the halter neck*: Cut the halter neck, making sure to cut accurately and smoothly.
3. *Press the halter neck*: Press the halter neck to create a crisp fold.
Creating the backless design
1. *Mark the backless design*: Mark the backless design on the back piece, using a ruler or measuring tape.
2. *Cut the backless design*: Cut the backless design, making sure to cut accurately and smoothly.
3. *Press the backless design*: Press the backless design to create a crisp fold.
Sewing the corset
1. *Construct the bodice*: Sew the front and back pieces together, starting from the center and working your way outwards. Use a 1/4 inch seam allowance.
2. *Add the boning*: Insert the boning into the corset channels.
3. *Add the lining (optional)*: Sew the lining pieces to the corset, using a 1/4 inch seam allowance.
4. *Close the seams*: Close the seams by hand or using a serger.
5. *Add the zipper or closure*: Install the zipper or other closure.
DIY : HOW TO CUT AND SEW A STYLISH 3 PART CORSET BASQUE DRESS WITH GATHERS #viral #video
• DIY : HOW TO CUT AND SEW A STYLISH 3 PART ...
HOW TO CUT A SIMPLE ASYMMETRIC OVER BURST CORSET BLOUSE #viral #video
• HOW TO CUT A SIMPLE ASYMMETRIC OVER BURST ...
HOW TO CUT AND SEW A TRANSPARENT INBUILT CORSET FOR A BRIDAL DRESS #how
• HOW TO CUT AND SEW A TRANSPARENT INBUILT C...
DIY : HOW TO CUT AND SEW A SIMPLE CORSET GOWN WITH YOKE || beginner friendly corset #corset #how
• DIY : HOW TO CUT AND SEW A SIMPLE CORSET G...
HOW TO CUT AND SEW A VICTORIAN CORSET WITH BURST CAGING #victoriancorset #viral #how
• HOW TO CUT AND SEW A VICTORIAN CORSET WITH...
1. #HalterNeckCorsetSewing
2. #BacklessCorsetSewing
3. #UnderbustCorsetSewing
4. #TubeCorsetSewing
5. #VictorianCorsetSewing
6. #OverbustCorsetSewing
7. #WaistSnatchedCorsetSewing
8. #CorsetSewing
9. #Corsetry
10. #GarmentConstruction
11. #FashionSewing
12. #PatternMaking
13. #CorsetPattern
14. #SewingTips
15. #FashionTips
16. #SewingInspiration
17. #FashionInspiration
18. #SewingBlogs
19. #FashionBlogs
20. #SewingTutorials
21. #FashionTutorials
22. #GarmentSewing
23. #CorsetSewingCommunity
24. #SewingForBeginners
25. #FashionForBeginners
26. #GarmentConstructionForBeginners
27. #CorsetSewingForBeginners
28. #SewingTipsAndTricks
29. #FashionTipsAndTricks
30. #SewingHacks
31. #FashionHacks
32. #SewingProjects
33. #FashionProjects
34. #CorsetInspiration
35. #HistoricalCostuming
36. #PeriodCorsetSewing
37. #CorsetSewingTechniques
#CorsetSewingInspiration
#UnderbustCorsetInspiration
#OverbustCorsetInspiration
#VictorianCorsetInspiration
#WaistSnatchedCorsetInspiration
Повторяем попытку...

Доступные форматы для скачивания:
Скачать видео
-
Информация по загрузке: