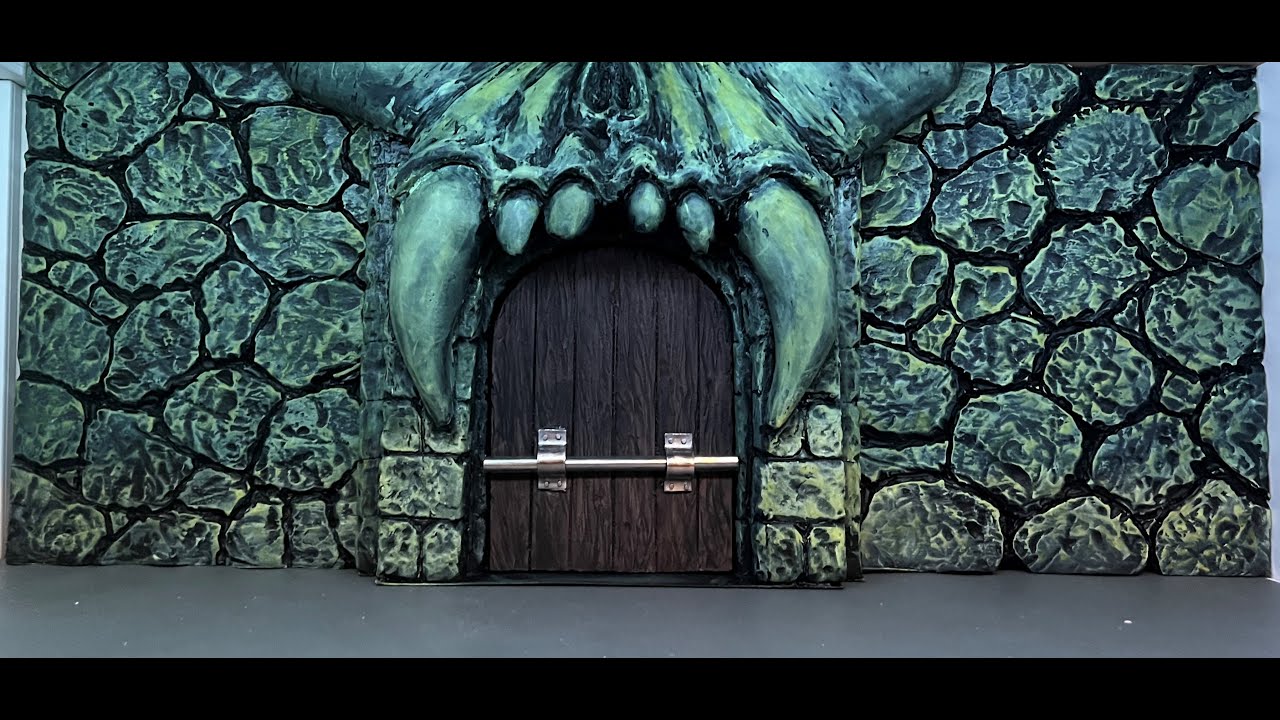
How to create a stone wall to use with your toy displays or dioramas. (Castle Greyskull, wall only)
Автор: lordhyperkill
Загружено: 2021-12-05
Просмотров: 184
Описание:
In this Video I create an insert for a toy Masters of the Universe "He-Man" display shelf. The process can be used for any stone wall type surface.
It is my first instructional type video so be kind.
It took me about an hour of working time not counting drying time. I used the ideal tools for the project but you could substitute with lesser tools at the cost of time/quality.
Materials:
3/4" Rigid Insulation $15
Cardboard "Double Ply" $Free
Supper 77 3M Spray Adhesive $10
Kiltz Latex Primer $12
Flat Black Spray Paint $5
Craft Paint $8
Tools:
Box Cutter
Metal Ruler
Belt Sander
Dremel with coarse sanding drum
Variable temp soldering iron
TAKE YOUR TIME!!!
It is important to practice on scrap materials before starting a large project. That goes for hot-knife/soldering iron work, dremel work and paint application.
Solvents/Caustic Glue/Non-Acrylic Paints will melt the foam!
I have 25 years of experience so don't get discouraged if your final product is a little wonky. I have made tons of wonky crap.
At the start of the video the foam has already been mounted to the cardboard with the spray adhesive for rigidity, it has been cut to size, and the edges have been sanded to make sure the foam and cardboard are flush.
If this will be an insert please dry fit it before you start before you begin what is covered in this video.
Procedure (Pre-Video).
Cut foam to desired size. Use a metal ruler/strait edge and a brand new razor knife. I prefer the colorful ones that go Click, Click, Click. when cutting squares and rectangles try to use a factory finished edge and a tool like a drafting triangle or carpenters square to get goo 90 angles.
Trace foam shape on cardboard. Use the double thick type that comes with appliances and such if possible. Cut out the shape. It should be oversized a little if not exact. Make registration marks or arrows on the sides that will face each other so you don't align them crooked or backwards.
Spray each surface with adhesive per instructions. then bond them together so that the card board is flush or proud at each edge. If the card is proud sand it flush. lightly sand all sides to assure your sides are clean. it also helps with any stray adhesive.
Tips:
When hot cutting and sanding go slow. Get to a temperature you are comfortable cutting at and speed you are comfortable sanding with.
When priming apply liberally. The foam will suck it in and dry up "especially on the faces". Where this happens pink will start to show through. Go back and redistribute the primer. This will help you get a thick coating as well as pull excess wet media from the crevices.
When paint remember spray paint will eat trough non primed foam. That is why it is important to have full primer coverage before you spray paint. Always use flat paint for your base coat. When spray painting try to do one light coat then let it dry to the touch then follow up with a heavy coat for complete coverage. You can accelerate drying of the spray paint with a space heater or hair drier. Be careful and don't get to close to it. it is combustible.
For a final finish that is on you to experiment. I use cheap acrylic craft paint and a makeup sponge for rock. Its quick looks good and is cheap. Start basic and build up color slowly. you can do a finish coat of clear if you want to change the sheen or give it a bit of protection.
HAVE FUN!!!!
If you have any questions drop a comment.
Повторяем попытку...
Доступные форматы для скачивания:
Скачать видео
-
Информация по загрузке:


