ycliper

Популярное

Музыка Кино и Анимация Автомобили Животные Спорт Путешествия Игры Юмор

Интересные видео

2025 Сериалы Трейлеры Новости Как сделать Видеоуроки Diy своими руками

Топ запросов

смотреть а4 schoolboy runaway турецкий сериал смотреть мультфильмы эдисон
Скачать

Discover how to create an anti gravity table!

Автор: Rainbow Marble Run Asmr Race

Загружено: 2024-08-19

Просмотров: 12709

Описание: Creating an anti-gravity table with ice cream sticks is a fantastic DIY project that combines creativity with a bit of physics! Here’s a step-by-step guide on how to build your own anti-gravity table.

Materials Needed:
*Ice cream sticks (popsicle sticks)* (about 10-15)
*Thread or strong string*
*Scissors*
*Glue*
*Weights* (like small stones or coins for stability)
*Optional: Decorative items* (to personalize your table)

Steps to Create the Anti-Gravity Table:

#### Step 1: Form Two Triangles
1. *Create the Base Triangles:*
Take six ice cream sticks and form two triangles.
For each triangle, use three sticks: one for each side.
Glue the ends together to secure the corners. Allow them to dry completely.

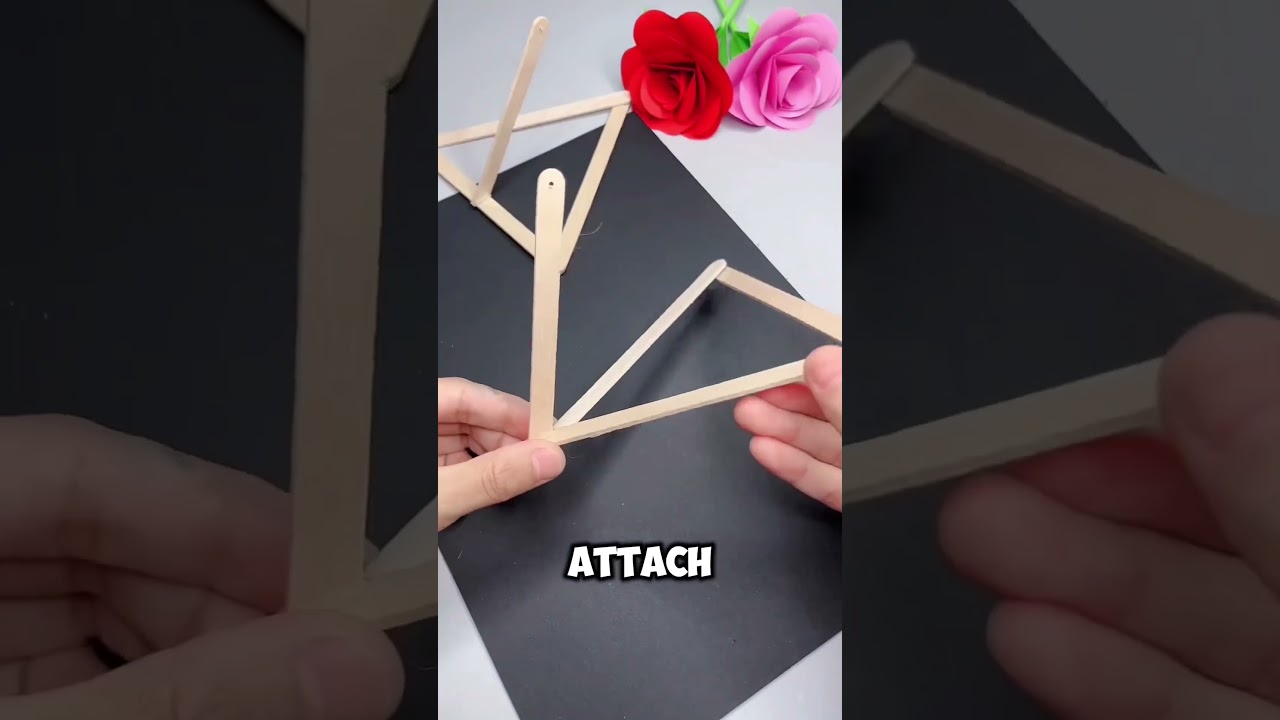
#### Step 2: Cut and Prepare Angled Sticks
1. *Cut Two Sticks at an Angle:*
Take two additional ice cream sticks and cut them at an angle. This will give them a slanted appearance.
The angle should be steep enough to provide a good incline but not so steep that it can't support the structure.

#### Step 3: Attach Angled Sticks
1. *Connect Angled Sticks to Triangles:*
Attach one angled stick to one triangle on the side, connecting it to the top corner and extending downward.
Repeat this with the second angled stick on the opposite triangle.
Ensure that both angled sticks are securely glued and check for stability.

#### Step 4: Secure with Thread
1. *Reinforce the Structure:*
Take your thread and wrap it around the connections of the triangles and angled sticks. This adds extra support and stability to your model.
Make sure to tie tight knots and secure the thread to prevent any wobbling.

#### Step 5: Create the Tabletop
1. *Add Stability:*
For the tabletop, take a few more ice cream sticks and lay them across the top of your triangles, forming a flat surface.
Secure them with glue or additional thread.
You can add weights (like small stones or coins) underneath the tabletop to enhance the anti-gravity effect!

Final Touches:
*Decoration:* Once everything is dry and secure, feel free to paint or decorate the table as you like.
*Demonstration:* Show your friends and family how it seemingly defies gravity! With the right balance and support, it should hold small objects without tipping over.

Educational Aspect:
*Physics Concepts:* Discuss center of gravity and balance with your child. Explain how the angled sticks create a stable structure that can hold weight.
*Creative Problem-Solving:* Encourage brainstorming on how to make the design even more stable or artistic.

This DIY project not only sparks creativity but also introduces basic engineering concepts. Enjoy building your anti-gravity table, and don’t forget to save this idea for future fun! If you have any questions or need further tips, just let me know! 🎉✨

Не удается загрузить Youtube-плеер. Проверьте блокировку Youtube в вашей сети.
Повторяем попытку...
Discover how to create an anti gravity table!

Поделиться в:

Доступные форматы для скачивания:

Скачать видео

  • Информация по загрузке:

Скачать аудио

Похожие видео

10 удивительных лайфхаков для дома, о которых вы хотели бы узнать раньше.

10 удивительных лайфхаков для дома, о которых вы хотели бы узнать раньше.

How to make an Anti gravity structure|Tensegrity structure #viral  #trending #diy

How to make an Anti gravity structure|Tensegrity structure #viral #trending #diy

Самые Удивительные Уличные Представления в Мире

Самые Удивительные Уличные Представления в Мире

Чем ОПАСЕН МАХ? Разбор приложения специалистом по кибер безопасности

Чем ОПАСЕН МАХ? Разбор приложения специалистом по кибер безопасности

DIY 3D Hologram Projector From Plastic Bottle | Cách Làm Máy Chiếu Hologram 3D Từ Chai Nhựa

DIY 3D Hologram Projector From Plastic Bottle | Cách Làm Máy Chiếu Hologram 3D Từ Chai Nhựa

7 Amazing Science Gadgets!

7 Amazing Science Gadgets!

Самый БЫСТРЫЙ способ  НАУЧИТСЯ рисовать с НУЛЯ / РАБОЧАЯ МЕТОДИКА

Самый БЫСТРЫЙ способ НАУЧИТСЯ рисовать с НУЛЯ / РАБОЧАЯ МЕТОДИКА

Самые удовлетворяющие видео рабочих, идеально выполняющих свою работу!

Самые удовлетворяющие видео рабочих, идеально выполняющих свою работу!

Cómo hacer una estructura de suspensión antigravedad? - es la estructura de Tensegridad

Cómo hacer una estructura de suspensión antigravedad? - es la estructura de Tensegridad

Вы не поверите! Я сделал и продал множество таких изделий, используя выброшенные пластиковые бутылки

Вы не поверите! Я сделал и продал множество таких изделий, используя выброшенные пластиковые бутылки

Как сделать миниатюрную неоновую вывеску с помощью 3D-печати — мастер-класс своими руками

Как сделать миниатюрную неоновую вывеску с помощью 3D-печати — мастер-класс своими руками

Make an Impossible Anti Gravity Structure Science Project at Home | Impossible Floating Table Build.

Make an Impossible Anti Gravity Structure Science Project at Home | Impossible Floating Table Build.

How to Make Anti-Gravity Suspension structure - Floating Table Diy with Popsicle Sticks

How to Make Anti-Gravity Suspension structure - Floating Table Diy with Popsicle Sticks

Умные Хаки для Самодельщиков, Которые Действительно Работают! #лайфхаки #советы #эффективность

Умные Хаки для Самодельщиков, Которые Действительно Работают! #лайфхаки #советы #эффективность

Making a Da Vinci Bridge from Chopsticks

Making a Da Vinci Bridge from Chopsticks

Автоматизированный резак для стеклянных бутылок своими руками

Автоматизированный резак для стеклянных бутылок своими руками

Everyone asked how much I paid for it! Nobody believed I made it out of cardboard!

Everyone asked how much I paid for it! Nobody believed I made it out of cardboard!

Как художники рисуют действительно ХОРОШИЕ круги

Как художники рисуют действительно ХОРОШИЕ круги

Столешница из эпоксидной смолы  Изделия из эпоксидки и слэбов через 2 года Что с ними стало.Мой опыт

Столешница из эпоксидной смолы Изделия из эпоксидки и слэбов через 2 года Что с ними стало.Мой опыт

Сшейте эту вещь за 10 минут и заработайте деньги ✂️ Простое шитье для получения прибыли

Сшейте эту вещь за 10 минут и заработайте деньги ✂️ Простое шитье для получения прибыли

© 2025 ycliper. Все права защищены.


  • Контакты
  • О нас
  • Политика конфиденциальности


Контакты для правообладателей: [email protected]