How I Built a Custom Eurorack Case
Автор: Corey Lofthus (souLyft)
Загружено: 2021-04-16
Просмотров: 4694
Описание:
This video takes you through the process of building a custom eurorack case. Thanks to my friend Jason and http://www.modularsynthlab.com it turned out even better than I anticipated!
I can't wait to fill this up with modules! If you have any questions about more specifics let me know in the comments and I will try to answer them. Also if you've read this far and watched the video please subscribe!
CREDITS
music and production by (myself) souLyft http://www.soulyftaudio.com
wood-working by Jason Rautio
cinematography by Austin Mier
eurorack DIY gear from Modular Synth Lab (thanks Robert!) http://www.modularsynthlab.com
Video Script
...The case that I wanted to build was 84hp and 9u so I ended up I ended up getting three sets of black rails with threaded inserts and the brackets. Through modular grid I figured out how much power I was going to need for this FX/generative/drum machine thing I am creating and one power supply with two busboards was enough. I also picked up a few other parts like the feet, an iec insert and some screws that you can see here in this unboxing. Modular synth lab just came out with this passive splitter and cables that he sent over that are very nice!
Once all of the parts came it was time to start the build! I had sent Jason some inspiration photos of other cases that I liked and he made a template for the sides that we dialed in via text. I then went over to his shop where he had already made these boards out of some African mahogany planks. Each board was planed down to reduce the thickness and weight of the wood and he had one each side/back/top/and bottom . He then used varying saws to cut the boards to size and then used a router to get the exact size and shape on the size. I thought it was pretty cool that his bandsaw was also a modular working tool! Now I don’t really know much about it but it kind of felt like it was meant to be.
Once all of the panels were carefully molded into their proper shapes we glued them together. Before this point we had mocked it up with the rack rails to make sure everything fit nicely. If it was great and it was time to let the glue dry.
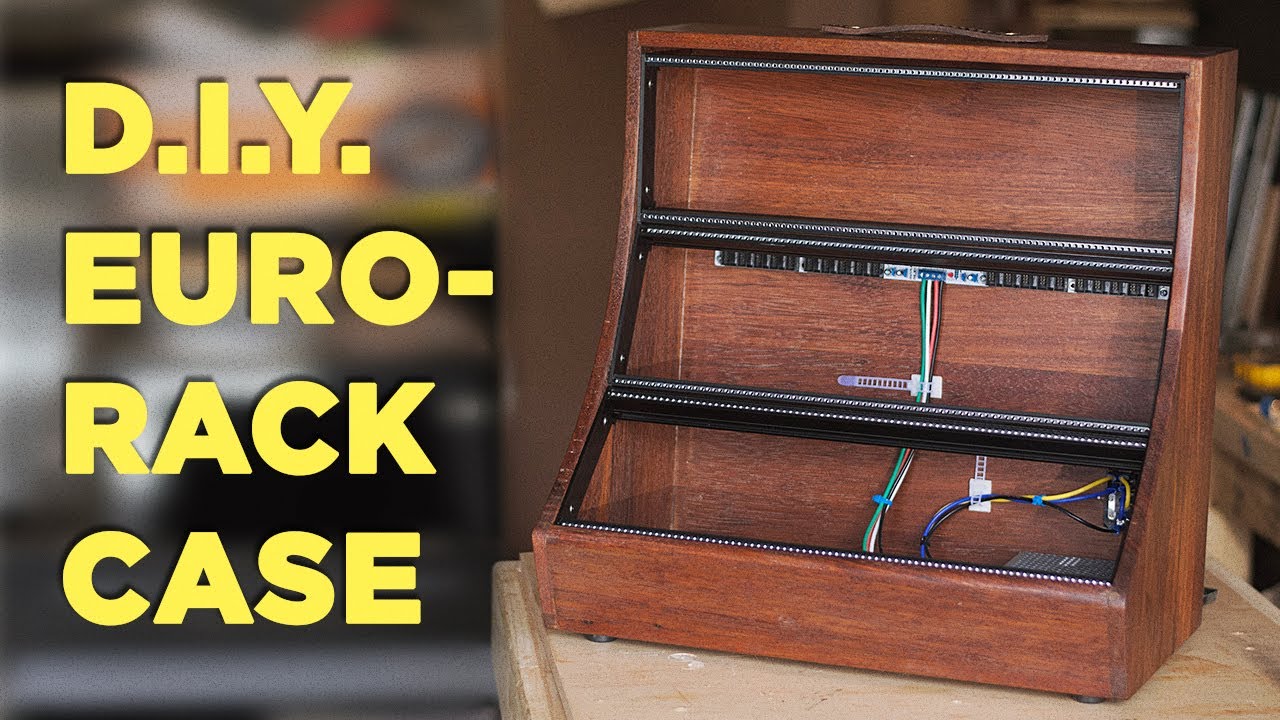
When I came back to Jason‘s shop in the next week he had already finished the “cabinet” portion of the case with the iec power insert already in place. It looked amazing! All of the corners were slightly rounded and the front had an amazing curve. The wood is insanely smooth thanks to a ton of sanding and a finishing wax on top. The only other thing applied to the wood was a danish oil that really brought out the rich deep red of the African Mahogany. Jason also added a hand stitched leather strap on top for a handle to make moving the case a little easier. I think it’s a really nice touch and it's one of those customization that you can’t really get from a pre-built case.
At this point it was just time to put everything in the case from modular synth lab. We installed the feet first and then the internal components. The power supply unit went in the back next to the iec insert and the busboards were spaced evenly so I can eventually plug in ALL of the modules I’m going to get. Because the wood was fairly thin we did end up using the rubber spacers from modular synth lab which I think might also help protect the solder points on the back of the busboards.
Jason then installed the rails by clamping them in place and then drilling the pilot holes before eventually screwing them into the side panels. The rail brackets were really nice to have for this design because I didn’t want any screws showing on the outside and as a bonus we didn’t need to measure the exact 3u spacing. These brackets ARE made out of plastic but I didn’t have any trouble with durability and they definitely made the install a lot easier. I highly recommend getting them if you plan on building your own case.
The last step was to wire everything together on the inside which was really easy with the help of the diagram on Modular Synth Labs website. And because I had two busboards and one power supply Robert recommended directly wiring each busboard to the psu for the most even power distribution.
Once that was done we plugged it in to make sure but would light up and because we carefully followed the instructions it worked first time! I powered the case off and installed my first module, the make noise Rosie, and it also powered up without any trouble.
I am so excited to have this case and I am extremely grateful for the friends that helped make it possible! The final product is even better than I had imagined and I can’t wait to fill it up with all sorts of strange and creative tools.
Повторяем попытку...
Доступные форматы для скачивания:
Скачать видео
-
Информация по загрузке:


