Fasade Backsplash Installation
Автор: DIY Decor Store
Загружено: 2016-08-30
Просмотров: 87429
Описание:
Fasade Backsplash Installation
Learn more at https://diydecorstore.com/
0:27 Surface prep
0:41 Determine height and layout
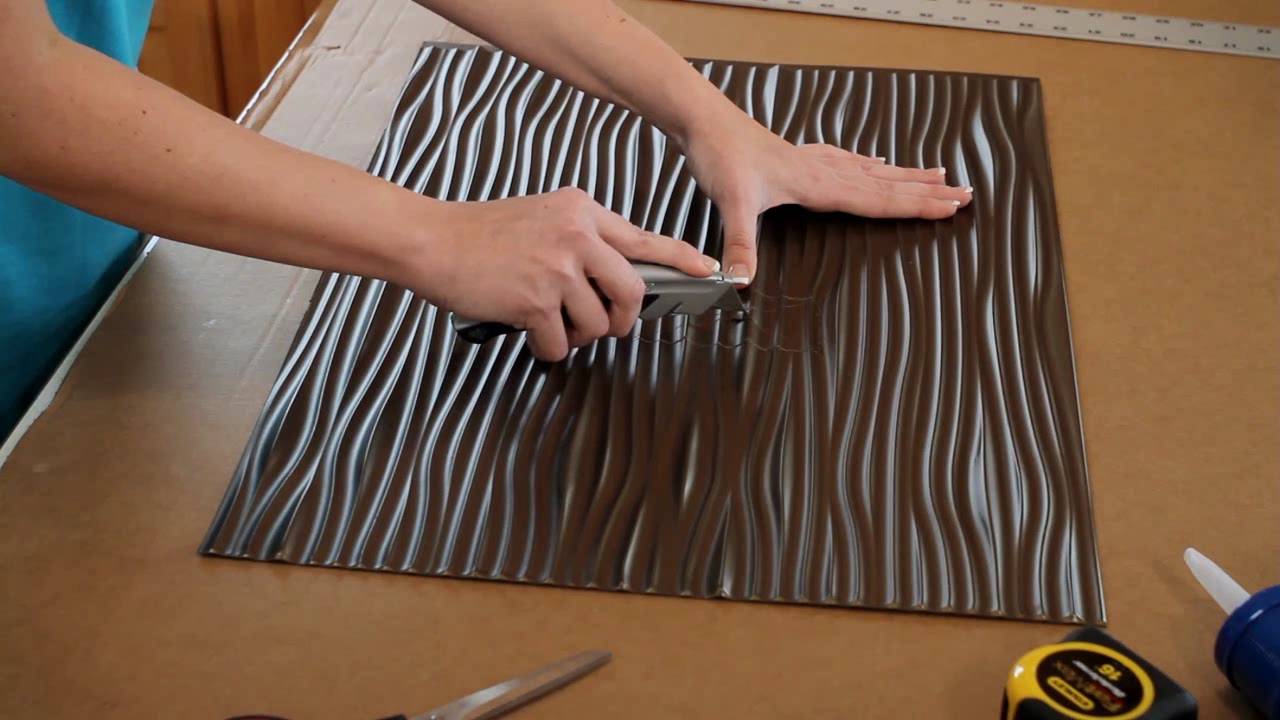
1:01 Cut backsplash panels to size
1:33 Cutting for an outlet
2:09 Clean back of panel with alcohol
2:17 Use J-trim
2:32 Using tape application
2:48 Using tube adhesive
3:10 Remove protective film
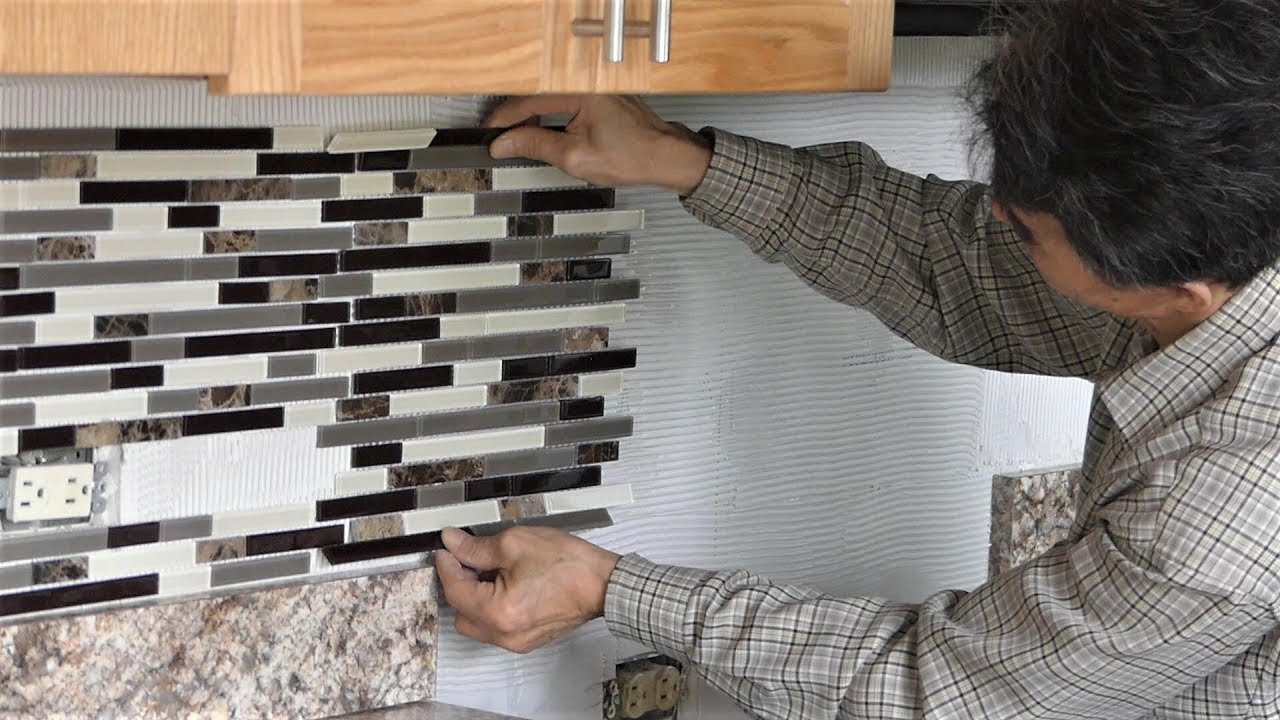
3:18 Pressing panels to wall
3:38 Remove adhesive with mineral spirits
3:43 Outlet covers
4:30 Alison admiring her beautiful kitchen
Transcript:
Today I’ll show you how easy it is to update the look of your kitchen using Fasade backsplash panels. When we’re done you’ll be amazed at the transformation. And it only takes a few hours.
Before installing your new backsplash, we need to make sure your kitchen walls are prepped. As you can see here, the surfaces where you are going to install panels are clean, dry and smooth. Lightly sand any glossy surfaces to remove sheen. These steps will ensure proper adhesion of the panels.
Determine the height and general layout of your backsplash project. You can lay out the panels on a table or floor if you need to visualize your layout. Start from the left side and work to the right. Or, if your layout is to be centered at a focal point, such as behind a sink or stove, then build out from both sides of the focal point.
Cut your first backsplash panels to size using a sharp utility knife, scissors or tin snips. When using a utility knife, score the finished side of the panel using a steel straight edge as a guide. Apply light pressure on the first pass with the blade. Then gradually increase the pressure on a few more passes. There is no need to try to cut through the panel. Just bend it back and snap it off. If you’re using tin snips or scissors, be sure to draw your cut lines and follow the lines.
If you have an outlet, light switch or other obstacle, you’ll need to cut the panel to allow access. Measure and mark the border of the opening on the panel. Score along the entire border with a utility knife making a few passes with a bit more pressure each time. Then, in the center of the area to be removed, cut a half inch to one inch triangular hole through the panel. Next, with a sharp scissors or tin snips, cut from the edges of the triangle to the corners of the border scores. Then carefully bend each corner area along the scores until they break free.
Before you apply adhesive to the backsplash, clean the back side of each panel using isopropyl alcohol with a paper towel or cloth. Use our half inch j-trims for panels like Waves that have substantial depth. There are two ways of applying the backsplash to your walls: double-sided tape or tube adhesive. If you’re using high bond double-sided tape, apply three horizontal strips of tape on top, middle and bottom of the panel. Do not remove the release film from the tape yet. Be sure to fit and locate each panel prior to installation as the adhesive tape is very aggressive.
If you’re using tube adhesive, we recommend Loctite PL Premium. Apply the adhesive to the back of the first panel using an S pattern, using a 3/16” to ¼” bead. A 10 oz. adhesive tube covers about 2 backsplash panels. A 28 oz. tube covers 5 panels. Be sure to read the adhesive manufacturer’s directions.
If your panels have a protective film, remove it before installing any panels on the wall. Place the panel into position and press against the wall using your hands to apply pressure firmly and evenly across the panel and squeeze out any air bubbles. Add additional panels in the same fashion. After an hour, re-press panels to ensure a good bond, overlap and placement. If any adhesive gets on the front of the panels, use mineral spirits or rubbing alcohol to remove it before it dries.
We also offer outlet cover laminates that perfectly match our backsplash panels. Here’s how to apply the laminate:
1. Align pattern or grain direction to match backsplash.
2. Cut around cover with a hobby knife.
3. Peel off the backing and apply the laminate to the front of the outlet cover.
4. Cut small squares out at each corner to allow a fold.
5. Then fold over the edges of the outlet cover.
6. Cut away the switch hole with your hobby knife.
If the style of panel has substantial depth like this Waves panel, you may have to shim out the outlet covers to accommodate the depth of the panels. Use clear silicone or matching caulk to seal the edges of outlet covers if necessary.
Now you’re ready to step back and admire your new kitchen makeover.
This kitchen now has a beautiful new look. In just a few simple steps, we’ve replaced the old backsplash with Fasade’s fresh modern decor. It’s easy, affordable, and available in hundreds of styles and finishes.
Повторяем попытку...
Доступные форматы для скачивания:
Скачать видео
-
Информация по загрузке: