CellProfiler: Classifying Cells with Machine Learning
Автор: Broad Institute
Загружено: 2012-08-06
Просмотров: 12072
Описание:
Copyright Broad Institute, 2013. All rights reserved.
CellProfiler Analyst contains a machine-learning tool for identifying complex and subtle cellular phenotypes. This tutorial demonstrates how to sort cells into phenotypes of interest using the graphical interface, and how to teach the computer to recognize these phenotypes. Note: This demo is of CellProfiler Analyst 1.0. The newer CellProfiler Analyst 2.0 has upgraded functionality and an expanded feature set, so the tutorial will not correspond to the software completely, but should still be helpful.
For more information about the Broad's Imaging Platform and other software tools available, please visit:
-Imaging Platform (https://www.broadinstitute.org/node/144)
-Software (https://www.broadinstitute.org/scient...)
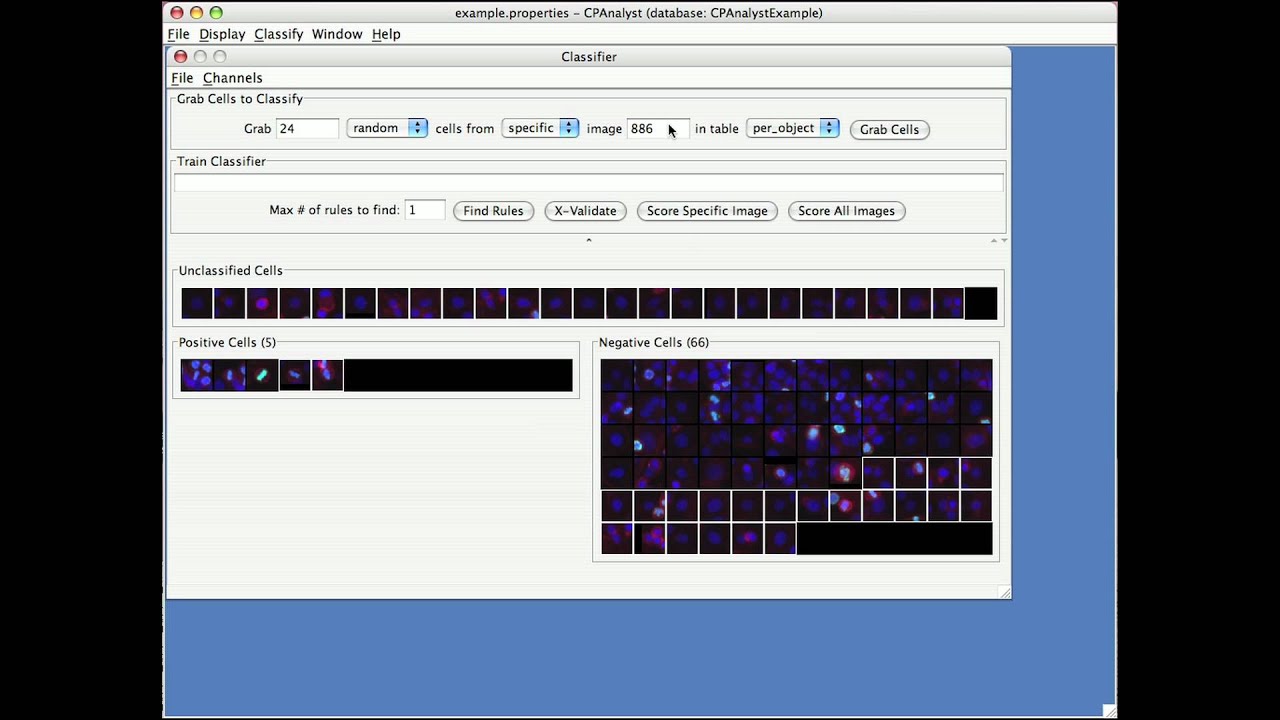
Transcript: Here, I will demonstrate the classify feature of CellProfiler Analyst, which scores complex and subtle phenotypes using machine learning in combination with your knowledge about your phenotype of interest.
When you choose classify, you will choose the classifier window, which has three bins, unclassified, positive cells, and negative cells. To begin classifying, it helps to know the image numbers for some images that contain examples of cells of interest, for example positive controls.
I’m going to train CellProfiler Analyst to recognize metaphase nuclei, and I will enter a positive control image number and request individual cells from that image. When the cells appear, I put the positive cells in the positive bin by dragging and dropping, or you can select multiple cells while clicking them which holding the shift key and then moving them all at once. You are only scoring the cell in the exact center of each small square. You should ignore the surrounding cells.
You can also select all cells in one of the bins by right-clicking or Control-clicking and similarly moving them all at once. If you want to get a closer look a cell in its natural context, you can right-click it to see the original full image.
Not all cells need to be classified. If you aren’t sure about a cell, or if there are duplicates, you can leave them in the unclassified bin and they will be thrown out.
You can also change what colors are shown in case that helps to see the phenotype better.
So far, I haven’t trained the computer yet. So I have been asking for random cells from images rather than asking it for positive cells. This drop-down menu allows you to choose those later when you have trained the classifier.
It’s best to sort a few dozen cells before asking the computer to find rules, but I’m going to short cut and ask it to find a small number of rules that can distinguish my positive cells from the negative cells. I don’t expect the computer to be very accurate based on a small number of positives, but the simple set of rules should yield more potentially positive cells to help me continue sorting in an efficient way. Here I’m choosing five rules.
The rules will appear in the train classier window, and now it makes sense for me to ask for more positive cells from images based on those simple rules. In this case, the specific image that I’ve chosen doesn’t seem to contain 24 positive cells, so I will have to stop looking and show me what it’s found so far. There are many positives based just on the simple rules. This lets me build my training set quickly.
Oops, I just move the positive cells to the negative bin by accident. I’ll fix that in a moment.
In the meantime, I’m searching for positive cells from any image. Choosing cells from any image in the experiment is valuable to make sure your training set is not tuned too much to just a few positive controls. Searching for any image takes a little longer than longer from a specific image.
Note that you can move cells from one bin to another at any time. If you find a duplicate you can remove one of the them from the classified to the unclassified bin to get rid of it.
You can also type in the word “all” instead of a number to get all cells in a specific image. This takes some time to load the images and you can monitor your progress in the terminal window as the images are loading.
I’ve skipped ahead in time here to where I have more examples of positives and negatives.
I’ve asked for 20 rules to distinguish positives from negatives, and you can see whether the rules are accurate by asking for more positives from random images, which will appear here in the unclassified bin. This should be much more accurate now than when I had a small training set and only 5 rules. The cross-validate button also allows you to check the accuracy and to see the optimal number of rules for your phenotype, but keep in mind that the accuracy that you calculate using cross-validate on your training set, which contains many of the hardest to clarify cells is probably much worse than the accuracy on the experiment overall. See the manual for more explanation on this.
Повторяем попытку...
Доступные форматы для скачивания:
Скачать видео
-
Информация по загрузке:


![Цепи Маркова — математика предсказаний [Veritasium]](https://imager.clipsaver.ru/QI7oUwNrQ34/max.jpg)


![1. CS50 на русском: Лекция #1 [Гарвард, Основы программирования, осень 2015 год]](https://imager.clipsaver.ru/SW_UCzFO7X0/max.jpg)
