Instant Photoshop Depth Map: Output Depth Map Only Trick
Автор: What Make Art
Загружено: 2025-09-11
Просмотров: 940
Описание:
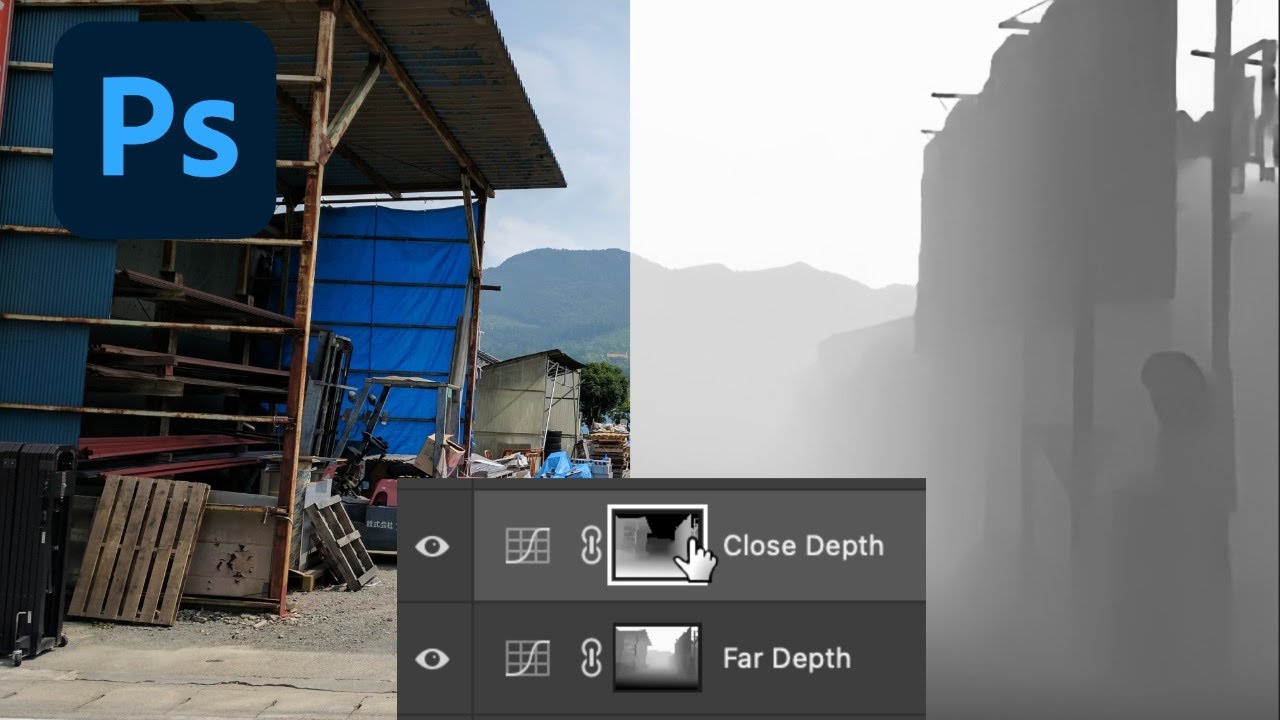
Create a clean depth map in Photoshop in minutes using Neural Filters (Depth Blur) and turn it into a reusable alpha channel. Then use layer masks with Curves and Hue/Saturation to add realistic atmospheric perspective—lowering contrast and saturation in the distance while boosting clarity and color in the foreground. Perfect for portraits, landscapes, and product shots when you want fast, controllable depth-based edits.
You’ll learn how to: open Depth Blur and output a depth map only, save the selection as an alpha channel, build separate “far” and “close” masks, flip masks, and make targeted tonal and color adjustments with pro tips like Ctrl/Cmd-click to load masks and Alt/Option-click to compare changes.
Chapters
0:00 What is a depth map?
0:11 Open Neural Filters (Depth Blur)
0:25 Output Depth Map Only preview explained
0:35 Output to a new layer
0:46 Make a selection from the depth map
1:01 Create adjustment layer to generate Alpha 1
1:16 Save and prep the depth channel
1:31 Curves setup for depth masking
1:43 Invert/flip the close vs. far mask
1:58 Far depth: lower contrast with Curves
2:17 Close depth: increase contrast for foreground
2:32 Quick before/after with Alt/Option
2:43 Reusing masks for new adjustments
2:57 Far depth: lower saturation
3:11 Close depth: raise saturation
3:22 Recap and workflow tips
Key steps covered
• Filter → Neural Filters → Depth Blur → Output Depth Map Only
• Channels: Ctrl/Cmd-click a channel icon to load a depth selection
• Save it as Alpha (rename to “Depth Map” for safekeeping)
• Build two adjustment layers (Curves): Far Depth and Close Depth
• Invert one mask (Ctrl/Cmd + I) so background vs. foreground are separated
• Lower contrast/saturation in the distance; increase contrast/saturation up close
• Alt/Option-click the layer eye for quick before/after
Shortcuts used
Load selection from channel/mask: Ctrl/Cmd + click
Invert mask: Ctrl/Cmd + I
Solo layer visibility: Alt/Option + click layer eye
Duplicate layer: Right-click → Duplicate
Hashtags
#Photoshop #DepthMap #NeuralFilters
Повторяем попытку...
Доступные форматы для скачивания:
Скачать видео
-
Информация по загрузке:


