Ultimate 24V Off-Grid Setup! 660Ah Battery Bank & 2S3P Solar Array Installation
Автор: WERMZ ENERGY LTD
Загружено: 2026-02-18
Просмотров: 27
Описание:
Welcome to WERMZ ENERGY LTD! In today’s video, I will be show you how install a 24V Solar Installation Guide: 12 Panels | 6 Tubular Batteries (Step-by-Step Wiring) we are deploying a massive 24V off-grid solar solution designed for reliability and heavy-duty performance.
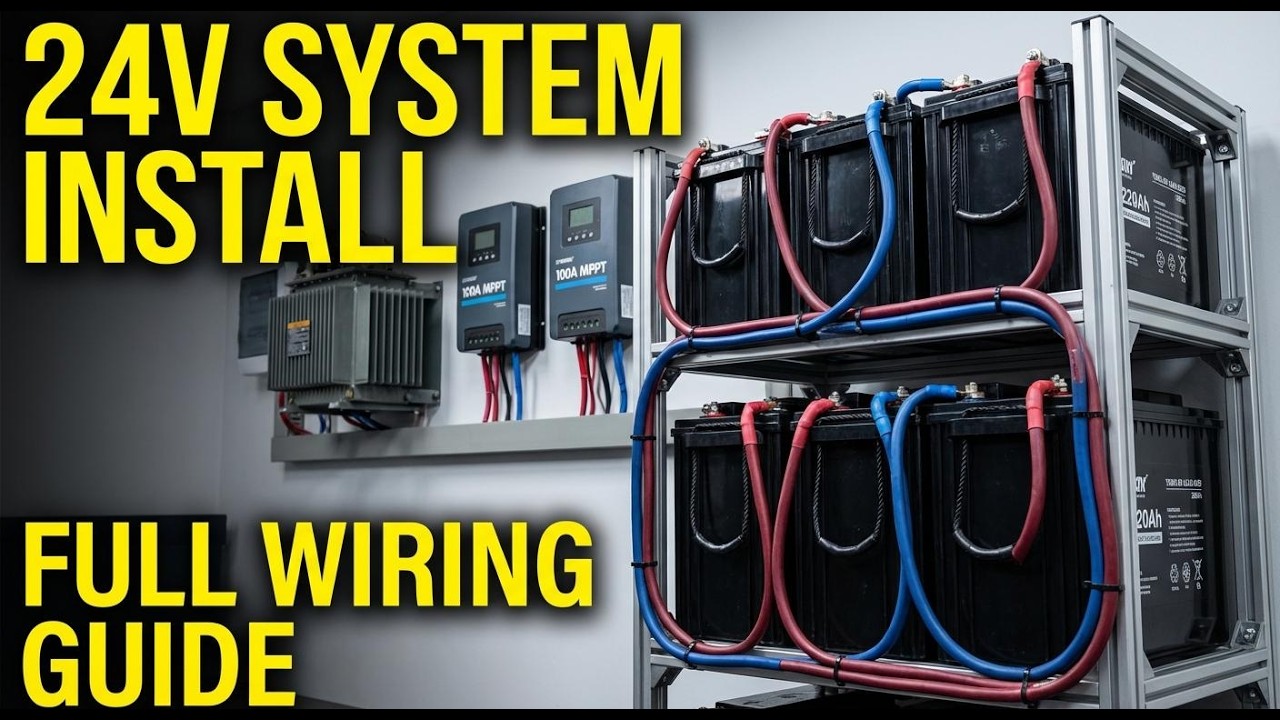
This installation features a robust transformer-based inverter, a 12-panel solar array, and a 660Ah battery bank using Star Plus tubular batteries. Whether you are a professional installer or a DIY enthusiast looking to understand complex series-parallel wiring, this video breaks down every single cable connection.
⚡ SYSTEM SPECIFICATIONS:
• Inverter Type: 24V Transformer-based (Low Frequency) Inverter • Solar Controller: 2x 100A MPPT/PWM Charge Controllers.
• PV Array: 12x High-Efficiency Solar Panels
• Energy Storage: 6x 220Ah Star Plus Tubular Batteries (12V)
• Cabling: 6mm DC Cables (Oxblood/Positive & Blue/Negative)
🛠️ THE WIRING CONFIGURATION (The Technical Breakdown):
1. The Battery Bank Strategy (2S3P): We are using 6 pieces of 220Ah Star Plus tubular batteries. To achieve a 24V system voltage while maximizing capacity to 660Ah, we used a Series-Parallel connection strategy:
• Step 1 (Series): We paired the batteries into groups of two (2+2+2). Connecting positive to negative on each pair doubles the voltage from 12V to 24V.
• Step 2 (Parallel): We then connected these three 24V strings in parallel (Positive to Positive, Negative to Negative).
• Why this matters: This configuration ensures that if one string has an issue, the others keep the system running. It also balances the charging load.
2. The Solar Array Segmentation: Handling 12 panels requires smart management. We split the array into two separate segments to feed the two 100A charge controllers efficiently:
• Segment A (6 Panels): Wired in a similar 2S3P configuration (2 in series for voltage, paralleled 3 times for amperage). Segment B (6 Panels): Identical configuration for the second controller. Cable Color Code: For safety and clarity, we utilized 6mm DC cables where all Negative wires connect to the Blue cable and all Positive wires connect to the Oxblood cable. Dual Charge Controller Setup: Using two 100A charge controllers allows us to handle the massive current from the 12 panels without overheating a single unit. Each controller manages 6 panels, feeding regulated power directly to the battery bank busbar.
💡 WHY CHOOSE A TRANSFORMER-BASED INVERTER?
Unlike high-frequency (electronic) inverters, the transformer-based unit we installed today uses a heavy copper transformer. This provides:
• Superior Surge Capacity: It can handle start-up spikes from pumps, freezers, and heavy inductive loads easily. Durability: These units are built to last in tough environments and are less prone to failure from grid fluctuations.
🔋 MAINTENANCE TIPS FOR TUBULAR BATTERIES: To get the maximum lifespan (5+ years) from these Star Plus batteries:
1. Check electrolyte levels every 3 months.
2. Top up ONLY with distilled water (never tap water).
3. Ensure the terminal connections remain tight and free of corrosion.
ABOUT WERMZ ENERGY LTD: We are obsessed with helping you tap into the sun's unlimited power with our high-tech solar energy solutions and efficient electrical services. Our mission is to empower individuals, homes, businesses, and communities to embrace sustainable energy and experience uninterrupted power. #solarinstallation
#24VInverter #SolarWiring #OffGridSolar #WERMZEnergy #SolarNigeria #TubularBattery #RenewableEnergy #SolarPowerSystem #electricalengineering #WERMZENERGYLTD #WERMZENERGY #EZEWISDOMMOSES
📢 CONNECT WITH US: Subscribe for more solar installation guides and energy tips
https://bit.ly/4pTQBZV
https://bit.ly/4jSdDPh
https://bit.ly/49IigGX
https://bit.ly/4t7Hisf
Повторяем попытку...
Доступные форматы для скачивания:
Скачать видео
-
Информация по загрузке:

![Почему реактивный двигатель не плавится? [Veritasium]](https://imager.clipsaver.ru/F6UB0V2Fct4/max.jpg)