etrailer | Dexter Trailer Axle w/ Idler Hubs Spec Review
Автор: etrailer
Загружено: 2021-04-15
Просмотров: 1028
Описание:
Click for more info and reviews of this Dexter Trailer Axles:
https://www.etrailer.com/Trailer-Axle...
Check out some similar Trailer Axles options:
https://www.etrailer.com/dept-pg-Trai...
https://www.etrailer.com
Don’t forget to subscribe!
/ etrailertv
Full transcript: https://www.etrailer.com/tv-review-de...
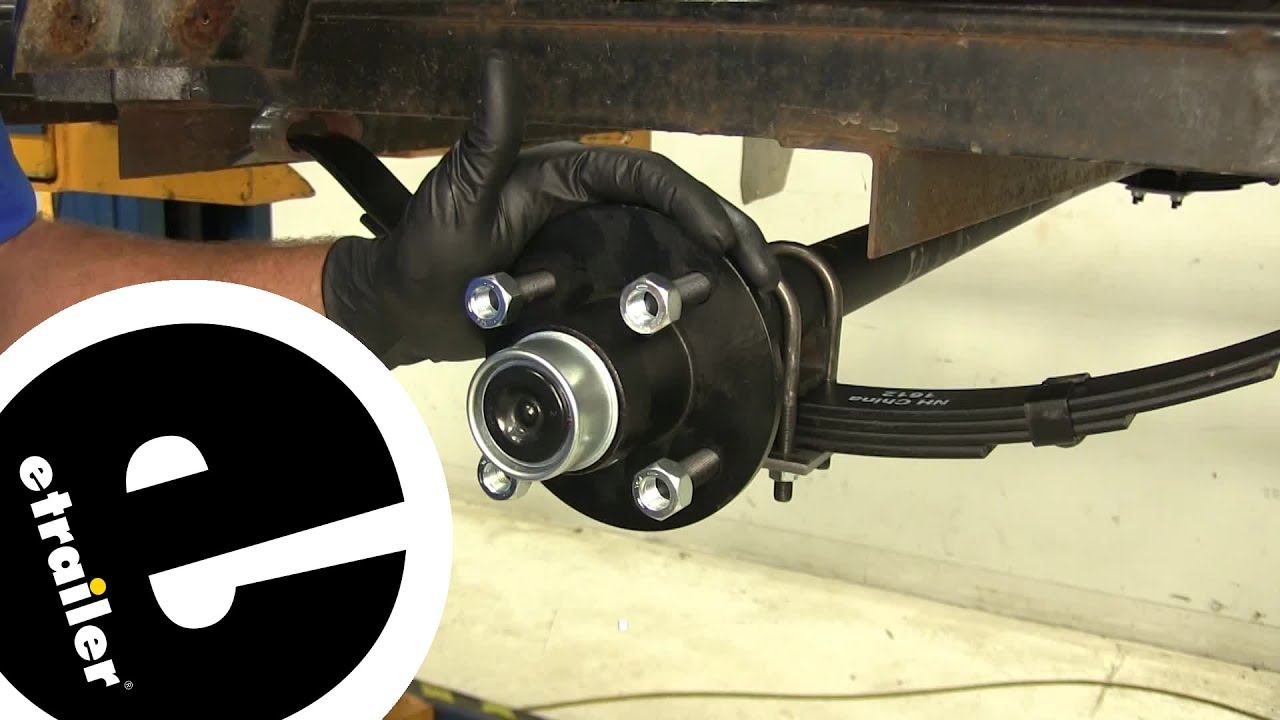
Speaker 1: Today we're going to be showing you how to install the Dexter Trailer Axle with Idler Hubs. Now, this offers the easy lube configuration and measures 72 inches long. It's going to come with the four on four bolt pattern hub. Part number is 20440-EZ-72.Now, to ensure that this axle is going to be the right one for your application, you need to make two measurements. One is going to be from the center of the spring, to the center of the spring on the other side. This axle offers 58 inches from spring center to spring center.
The next measurement is going to be what they call the hub face to the hub face. So, it's going to be from one side to the other. It's going to be wherever your hub naturally sits. You want to measure from the point that the rim makes contact to the hub.So, we measure from here to the same spot on the other side, and what you're looking for there is 72 inches. So, we've got a 72-58 axle.
72 inches hub face to hub face, 58 spring center to spring center. Now, to install the spring on your axle, we're going to use U-bolts to connect it. So, our spring's going to fit around the underside. We'll have a plate to go underneath and two U-bolts to hold it. Now, we recommend using a new U-bolt kit.
The larger hole in the middle is gonna accept the small tab that sticks off there.The top portion of the bolt fits right into the bottom. My spring perch there. Bring that through, then we'll just take the provided nut, we'll snug these down once we have our axle in position, and we know that it's hanging the way we want it. Now, we can get our axle put up in position once we have that done on each end. You'll see here on the backside is going to be the area the slipper portion will slide into, and then we'll rotate it up into position, and we'll use our bolt here in the front.And we just want to rotate that up into position.
Once we align our hole, we can slide through our bolt. You can see that's going to fit right through that bracket up here on the spring eye. It'll go through our bracket, through the spring eye, come out on the inside. Just want to keep in mind you do want a little bit of movement. You don't want to squeeze that bracket down so tight, that it's pulled against the side of the springs. You want those to be able to move a little bit.On the backside of the bolt, right there at the head, you'll see this, lines that are on it. Those are designed to engage the bracket, and keep our bolt from turning. So, you don't want to turn the bolt side. We're going to tighten this down using the nut side only. Now once spring eye bolts are in place, just wanna kind of tap your axle, make sure that your U-bolts are sitting straight up and down, and we'll start to tighten these down evenly.Now, we're gonna go to each one and we're gonna begin to torque them down. Now, typically what you're looking for is torque-to-yield, is what they call it. So, we're going to torque these just until we see our plate start to deform just slightly. That'll give us the proper tension on those U-bolts, so we won't have to worry about them backing off.Now, whether you've just got the replacement beam, or the kit, you're gonna have to assemble your bearings, your hubs, everything, get it put in. Now, the hub kit is going to, of course, have our hub. You see it's go the black powder coat finish on it, has our four studs. These are on a four on four bolt pattern, which is gonna be very, very common. Inside you'll see the races the bearings are going to run on. It's really nice to get a full replacement kit when you do replace axles, just because you're starting right back from scratch, so everything's going to be brand new and fresh.It's going to come with an inner and outer bearing for each side. Course you'll have new lug nuts, you're gonna have the new dust cap, with the removable plug that allows you to get into the easy lube greaser, and we've got the bushing, the nut, and the keeper, that kind of holds all that in place and keeps it from backing out while on the end of the hub.So, this really gives you an excellent way to get everything replaced, and then once you have your bearing in the backside of your hub, you've got the new seal. That's going to keep all the grease inside, not let it seep out. Now, we're just gonna use some regular red style high temp grease. It's important that you use high temp grease. You don't want to use the universal or anything like that, just because as fast as this is gonna be turning, it builds up a lot of heat.We'll ta
Повторяем попытку...
Доступные форматы для скачивания:
Скачать видео
-
Информация по загрузке:


