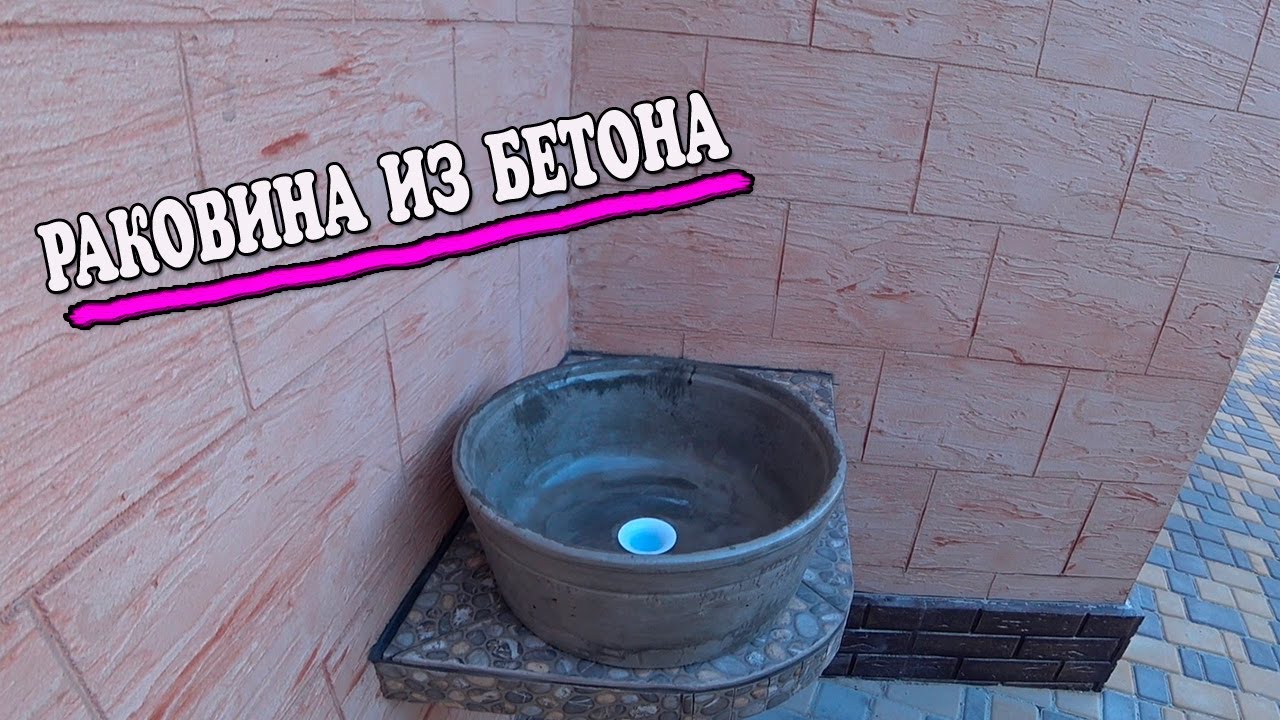
Concrete Sink Pour DIY, Bathroom Renovation Project, Michigan Artists
Автор: M5 Collaborative
Загружено: 2022-12-11
Просмотров: 720
Описание:
The Concrete Sink is the third process in our vanity build for our bathroom renovation.
We have the vanity base & top ready for a new sink and faucet.
Our home was built in 2007 and we moved in mid-2013. This is the main floor laundry room & heaviest traffic bathroom in our home. After 15 years, it's time for an update!
THE SINK PROCESS:
Step 1
Mix the dry concrete, colorant, and water thoroughly.
We prepped 2 large mixing bowls as molds for this sink pour.
A small piece of PVC pipe is centered for the drain.
The kettlebell will keep the mold in place while it sets up.
Next, we'll resin & grind the sink.
Step 2
The concrete was set aside to cure for a few days. We wanted to use resin to match the top and base to fill the holes left by bubbles.
The angle grinder cleared out the bulk of the resin very quickly. Once that was mostly cleaned up it was time to give the rim a nice shape.
We used a few coats of concrete sealer to finish the sink.
The concrete sink is now ready for installation of the drain.
🛠 Tools used on this project are listed below:
Quikrete Cement Color, Charcoal: https://amzn.to/3BqtKi6
Alumilite Amazing Clear Cast Resin Plus: https://amzn.to/3YhO27s
BOSCH Angle Grinder, 5": https://amzn.to/3W4HxCQ
Flap Disc Abrasive Grinding Polishing Wheels: https://amzn.to/3he43uc
8QT Mixing Bowl: https://amzn.to/3UWm3r2
13QT MIxing Bowl: https://amzn.to/3Pf88uQ
Chapters:
00:00 - 00:05 Intro
00:06 - 00:16 Combine dry concrete + colorant + water
00:17 - 00:42 Mix concrete thoroughly
00:43 - 01:12 Fill the base of the prepared bowl
01:13 - 01:26 Place the inside bowl mold
01:27 - 01:42 Add weight to keep the molds in place
01:43 - 01:52 Center and level the inside bowl
01:53 - 02:22 Fill the mold and let it set up for a few days
02:23 - 02:26 We poured blue resin into the bowl to fill any holes
02:27 - 03:12 Angle grinder to remove the bulk of resin and shape the inside of the bowl
03:13 - 03:50 Angle grinder to shape and smooth the sink rim
03:51 - 03:52 After a few coats of sealer
03:53 - 03:54 Sink in place
03:55 - 03:58 Sink, drain, & faucet connected to new vanity
03:59 - 04:07 Outro
Thanks for watching :)
#bathroom #bathroomdemolition #bathroomremodeling #bathroomrenovation #bathroomremodel #michiganartists #michigan #woodworking #slab #bathroomvanity #dewalt #sawstop #woodart #michiganartists #reclaimedwood #woodworker
Повторяем попытку...

Доступные форматы для скачивания:
Скачать видео
-
Информация по загрузке: