etrailer | Hydrastar Brake Kit Installation - 2020 Grand Design Momentum 5W Toy Hauler
Автор: etrailer
Загружено: 2021-02-01
Просмотров: 2630
Описание:
Click for more info and reviews of this Hydrastar Trailer Brakes:
https://www.etrailer.com/Trailer-Brak...
Check out some similar Trailer Brakes options:
https://www.etrailer.com/dept-pg-Trai...
Search for other popular Grand Design Momentum 5W Toy Hauler parts and accessories:
https://www.etrailer.com/vehicle/2020...
https://www.etrailer.com
Don’t forget to subscribe!
/ etrailertv
Full transcript: https://www.etrailer.com/tv-install-h...
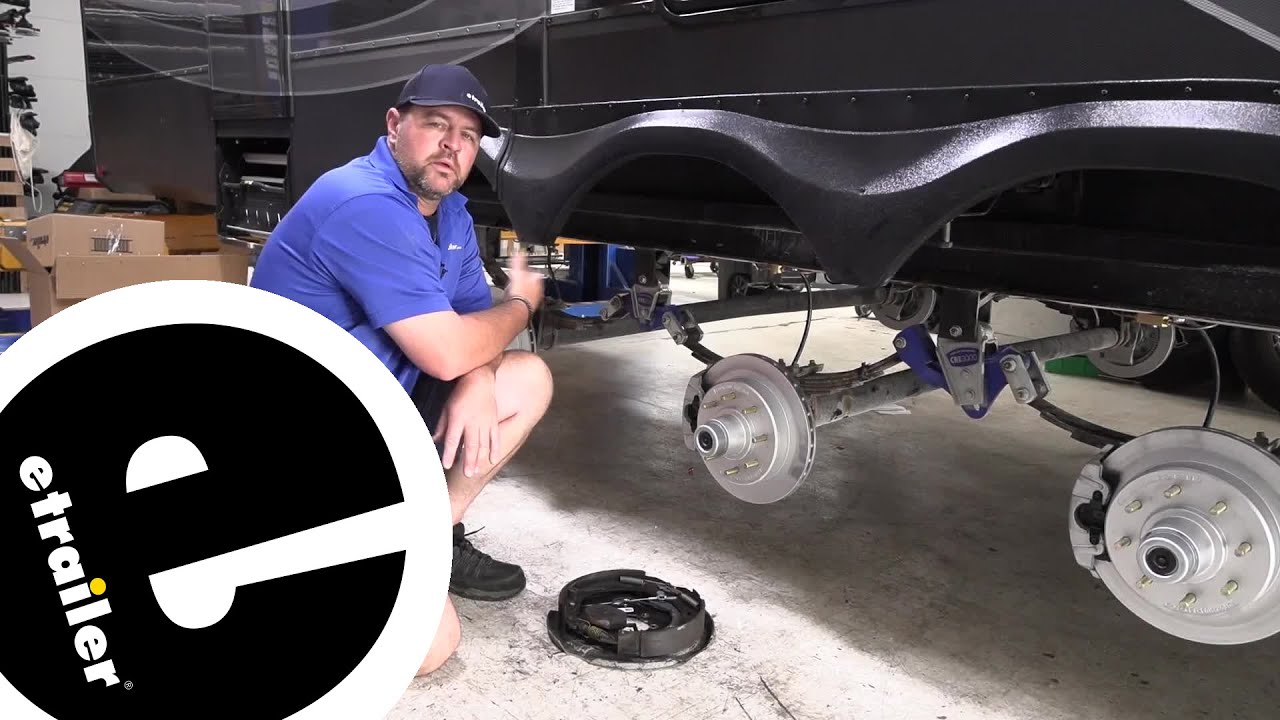
Shane: Hey guys, Shane here with etrailer.com. today I have a 2020 Grand Design Momentum Fifth Wheel, and I want to walk through how to install the Hydrastar Hydraulic Brake Kit. When you have a trailer this size, you can see it's a triple axle, we want and we need maximum braking power. What normally comes on these trailers is drum brakes. Adding a hydraulic kit to it is going to give you better braking power, so that you're able to stop this size of a trailer. This kit is going to be designed for triple axle trailers with 7,000 pound axles.
The nice thing about it when you compare it to some of the other types out there, is this is a complete kit. So it's going to come with everything you need to get it installed. Where some of the other ones, they come pieced, so it's going to take you a little bit of time to go out and try to figure out what parts you need.There need to be 13 inch rotors, and they're going to be eight on six and a half. They're also coming with the calipers and the pads pre-installed. Now, when we compare our new disc brakes to our old drum brakes, these are typically what are going to come on trailers.
You notice all the components that are in here, that's a lot more stuff we have to worry about. With disc brakes, if we have to get down here and do any work, change the pads or anything like that, it's very easy, you remove two screws, pop this off, replace the pads, and then put it back in place. With this, you almost have to take the whole wheel assembly off, including the bearings, to get to this. Just to change the pads, it's a much bigger process. You have a bunch of springs in here just becomes a big pain.Also, the wheel seal mounts right inside of here.
So if that leaks, it's potentially leaking on all the pads that are inside here causing damage to them, could cause an issue later on. We don't want that, we want to make our job easy. We want to make sure that our trailer is going to stop, that's why I'm going to suggest going with the Hydrastar Hydraulic Brake Kit. Kit's going to come with all the hard lines to run from the actuator back to each wheel, the fitting to tie into them and a rubber line that goes down to each caliper. Our actuator is going to have an electrically controlled proportioning valve.
And what that does it make sure that each one of your wheels has the same amount of braking pressure. It's going to give a 1600 PSI max output. We compare that to electric brakes or drum brakes, they require a significantly less output, but you're also getting significantly less braking power than you will with this setup.As far as the installation process, it's pretty straightforward, not really difficult. It is time consuming, but again, not difficult. And in my professional opinion, a trailer of this size, I would definitely go with a hydraulic setup like this, over a drum break setup. With all that being said, let's go ahead and walk you through how to get it installed. To start our installation, you need to get your wheel off the ground. Couple of ways you can do it, we actually have stands, but what you can do is you can use a jack. Jack up the side of the axle wheel you're going to be working on. Make sure you put a jack stand under it so it's secure, and then you want to take your wheel off.Once you get your wheel off, you need to take this cap off. What we don't want to do, because we're going to reuse these, is we're not just going to grab with pliers because it squeezes them together. So we're going to take a flathead screwdriver, we're going to get right in this edge, and once we get it pried out, we can just pry the whole thing off.I'll set this inside. We're going to wipe that grease off. Make sure you have a bunch of paper towels with you. We're going to pop this clip off, and you want to hold on to that because we're going to be reinstalling it. We're going to take this nut off and it shouldn't be on there tight, you should be able to spin it off. Now, what I like to do is when I take these off, even though this is a new trailer and you got new grease in it, is cleaning these off because we we're going to be putting new grease in.Another thing to keep in mind is, make sure to try to match your grease, some greases will not work together. So if you have a cer
Повторяем попытку...
Доступные форматы для скачивания:
Скачать видео
-
Информация по загрузке:


![Уральские Пельмени |[НОВЫЙ 2026] собрание ассоциации пожилых людей | Комедийная группа №1 в России](https://image.4k-video.ru/id-video/vpugGkc87Yg)


![DIY Disc Brake RV Upgrade [Prepping for Alaska RV Living]](https://image.4k-video.ru/id-video/UTiO_S11NCc)
