Connect DHT11 Sensor to Internet/Adafruit IO Programming Tutorial
Автор: Maker Jake
Загружено: 2020-12-30
Просмотров: 655
Описание:
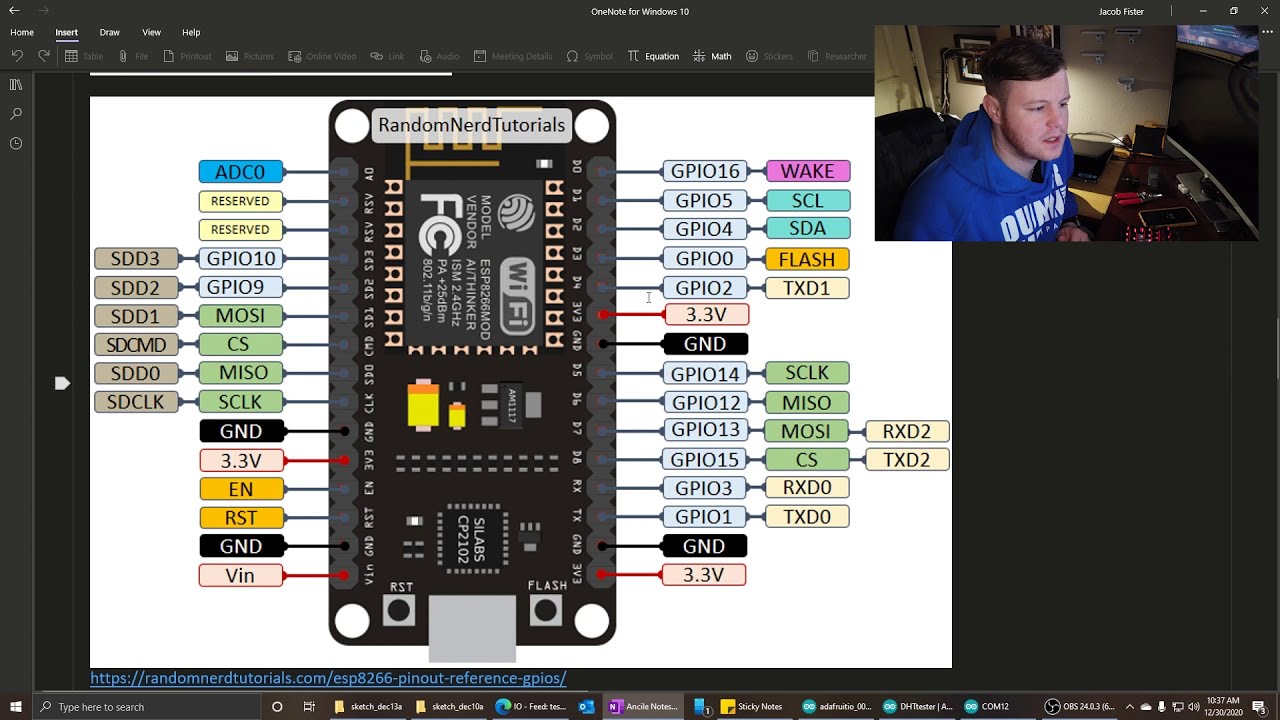
This video is an expansion to my IFTTT Applet contest submission that shows you how to connect an ESP8266 with a DHT11 sensor to Adafruit IO.
Paste this link into your preferences to add the ESP boards:
http://arduino.esp8266.com/stable/pac...
Here is the code for the sketch I wrote in the video. You still need the config.h file from the 00_publish example though:
NOTE: Angled brackets are not allowed in YouTube descriptions so look at the example for where you need to put them and what type. Here I've inserted "[angled bracket]" replacing the actual bracket.
// Adafruit IO Publish Example
//
// Adafruit invests time and resources providing this open source code.
// Please support Adafruit and open source hardware by purchasing
// products from Adafruit!
//
// Written by Todd Treece for Adafruit Industries
// Copyright (c) 2016 Adafruit Industries
// Licensed under the MIT license.
//
// All text above must be included in any redistribution.
/************************** Configuration ***********************************/
// edit the config.h tab and enter your Adafruit IO credentials
// and any additional configuration needed for WiFi, cellular,
// or ethernet clients.
#include "config.h"
#include "DHT.h"
#define DHTPIN 14
#define DHTTYPE DHT11
/************************ Example Starts Here *******************************/
// this int will hold the current count for our sketch
DHT dht(DHTPIN, DHTTYPE);
// set up the 'counter' feed
AdafruitIO_Feed *testtemp = io.feed("testtemp");
void setup() {
// start the serial connection
Serial.begin(115200);
Serial.println(F("DHTxx test!"));
dht.begin();
// wait for serial monitor to open
while(! Serial);
Serial.print("Connecting to Adafruit IO");
// connect to io.adafruit.com
io.connect();
// wait for a connection
while(io.status() [angled bracket] AIO_CONNECTED) {
Serial.print(".");
delay(500);
}
// we are connected
Serial.println();
Serial.println(io.statusText());
}
void loop() {
// io.run(); is required for all sketches.
// it should always be present at the top of your loop
// function. it keeps the client connected to
// io.adafruit.com, and processes any incoming data.
io.run();
float t = dht.readTemperature();
// save count to the 'counter' feed on Adafruit IO
Serial.print("sending -[angled bracket] ");
Serial.println(t);
testtemp-[angled bracket]save(t);
// Adafruit IO is rate limited for publishing, so a delay is required in
// between feed-[angled bracket]save events. In this example, we will wait three seconds
// (1000 milliseconds == 1 second) during each loop.
delay(5000);
}
My IG:
@jakeleef
Photography IG:
@jacoblee_photos
My personal website:
jacoblee.tech
My photography website:
jacoblee.photos
Повторяем попытку...
Доступные форматы для скачивания:
Скачать видео
-
Информация по загрузке: