BLDC Hover Board Motor Controller | Arduino Mega | Part 2 | Tutorial # 36
Автор: Netmedias
Загружено: 2018-12-26
Просмотров: 106181
Описание:
Alexa Taking out the trash
https://www.youtube.com/edit?o=U&vide...
Arduino Code:
https://github.com/nassir-malik/BLDC_...
5V-36V 350W DC Brushless Motor Controller BLDC PWM Driver Board
https://goo.gl/qnQ32U
Specification :
Operating voltage: DC 12V-36V
Operating Current: less than or=15A
Driver Power: less than or =500W
Speed Voltage: 0.1V-5V
Operating Temperature:-40-85C
Humidity: 90%RH
Stall protection:Yes
Enable Control: Yes
Over-current protection: Yes
Steering control: Yes
Speed control signal: Yes
Size: 63*42*17mm(L*W*H); Probe size 3mm,length: fixing hole center distance 57mm; width:fixed hole center distance 36.5mm
Power terminal Out:
VCC(positive power supply)
GND(negative one)
MC(motor phases W)
MB(motor phases V)
MA(motor phase U)
Set for the control side:
GND control terminal ground
VR the governor end 0-5V(corresponding to 10% of motor speed -100%)
ZF reversing control(connected to 5V or ground can charge the motor rotation direction)
M tachometer pulse output(depending on the number of motor poles corresponding to the number of pulse per revolution of the output number)
EL enable control terminal(connected to 5V ot ground running then 5V, grounding the motor stops)
5V 5V control terminal
HALL for the hall terminals:
5V, Hall power positive
Ha, Hall signal
Hb, Hall signal
Hc, Hall Signal
GND, Hall negative
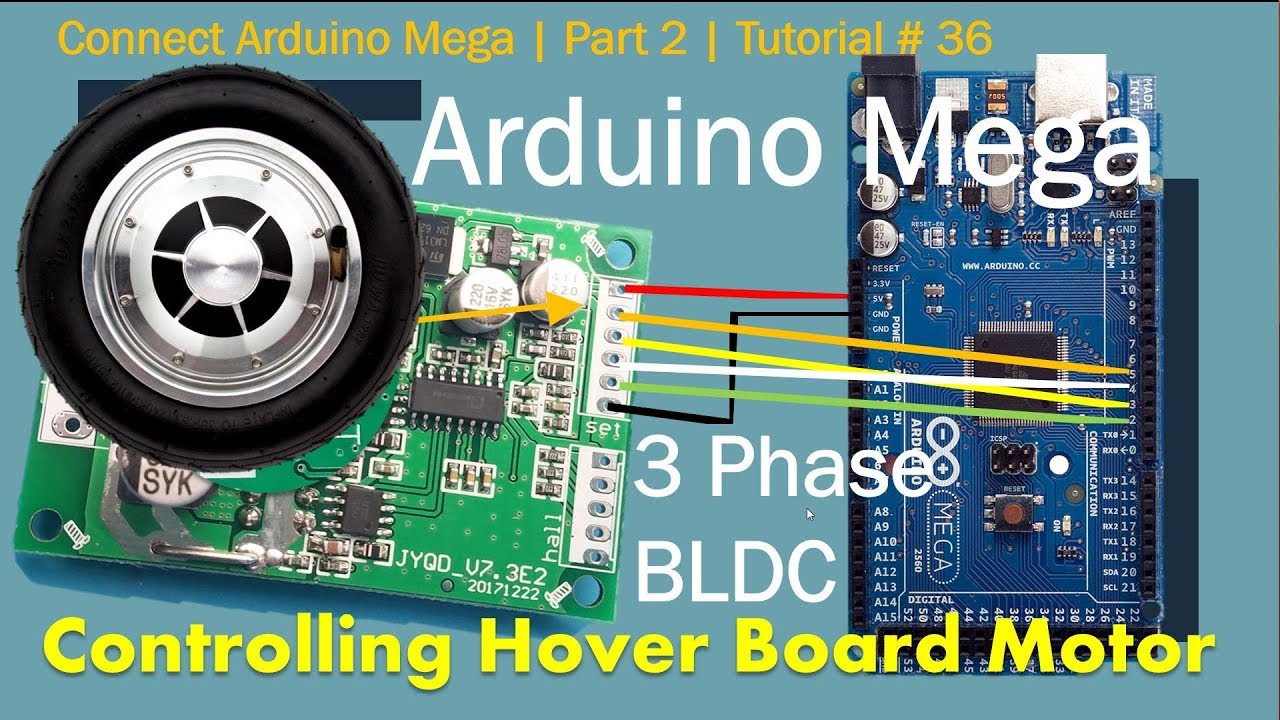
Wiring:
Control terminal for SET:
1. The motor speed control wiring methods: available potentiometer system speed can also be connected to the MCU control, when the potentiometer control wiring, the potentiometer middle pin is connected to VR speed port, a potentiometer connected to both ends of 5V and GND terminal voltage more high speed faster
2. Motor steering control wiring methods: you can switch control can also be connected to the MCU control, to GND in one direction, then in one direction 5V
3. Pulse speed signal: high and low output. IC can not understand the information with the customer request
Hall signal inputs for hall:
The wiring diagram is shown, one corresponding to the HA, HB,HC and on the motor, 5V power supply connected to the motor hal signals positive, GND power supply negative signal to the motor hall
Note: Due to different motor manufacturers to make the hall of hall line order does not necessarily follow the line on the board to match the sequence, need to be adjusted, please parents who pay attention! If the line sequence wrong, does not boot properly, current, or start other phenomena not open, forced to use the drive plate will burn!!!
Motor driver board 12-36V DC power input,
VCC positive power supply,
GND power supply is ground (0 Volt).
Electrical wiring methods:
Brushless DC motor for the three lines, corresponding MA/U,MB/V,MC/W
Tips: If you use less than 60W, without additional heat sink , be sure to add more than 60W heatsink fins drive efficiency without lowering the temperature is too high will shine into permanent damage! The size of the heat sink may be a bad environment based work(recommended cooling surface area greater than 200 square centimeters)!When installing the heat sink ,must pay attention to the back of the module 6 MOS pipe insulation, no insulation, it will be adhered to drive plate permanently damaged! Proposes to add insulation films, both sides of the insulating sheet plus thermal grease!
Повторяем попытку...
Доступные форматы для скачивания:
Скачать видео
-
Информация по загрузке:


