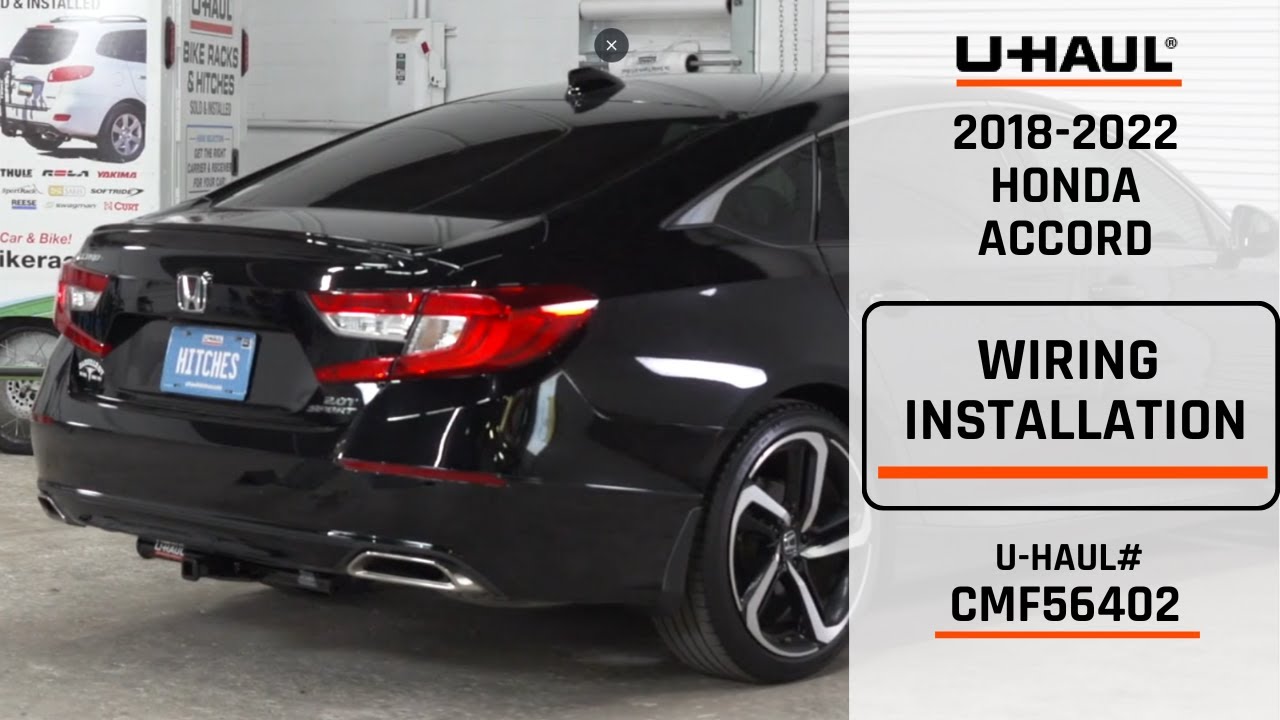
etrailer | Curt T-Connector Vehicle Wiring Harness Installation - 2018 Honda Accord
Автор: etrailer
Загружено: 2022-09-11
Просмотров: 1557
Описание:
Click for more info and reviews of this CURT Custom Fit Vehicle Wiring:
https://www.etrailer.com/Custom-Fit-V...
Check out some similar Custom Fit Vehicle Wiring options:
https://www.etrailer.com/fitguidet1.htm
Search for other popular Honda Accord parts and accessories:
https://www.etrailer.com/vehicle/2018...
https://www.etrailer.com
Don’t forget to subscribe!
/ etrailertv
Full transcript: https://www.etrailer.com/tv-install-c...
Hey everyone, how's it going Today we're gonna be going over and showing you how to install the Curt T-connector trailer wiring harness here on a 2018 Honda Accord. So a trailer wiring harness is gonna be one of the few things that you need in order to tow a trailer with your Accord. In addition to this, you're going to need a trailer hitch and a ball mount/hitch ball. All of which we carry here at etrailer. So what your trailer wiring harness is gonna do is it's simply going to transfer these signals from our vehicle to our trailers. So we can let other motors out on the road know where we're gonna be going allowing us to ride to our destination, safe and sound.
Now, this is not only a safety issue, it is a legal requirement in every state. A lot of the times your larger camping trailers are gonna entirely block the taillights on the vehicle. So we still need a way to transfer those signals from the vehicle to the trailer. Now, this is gonna provide us with a 4-way, also known as a 4-pole flat. This is the most common and standard type of trailer connector on the market and used here in the US.
So this is more than likely the one you're going to need. This is gonna transfer all of your basic lighting signals such as your stop and turn signal circuits for either side as well as your running lights. And then when we're not using it, it's just gonna be tied to the safety chain loops here on a trailer hitch with the included dust cap which is gonna keep out moisture from inside the connector and prevent any lighting issues from occurring. So this kit does have a powered module. And basically what that means is all of these circuits for the trailer are gonna be separated from the vehicle.
So you don't have to worry about any issues with the trailer affecting your vehicle. You also don't have to worry about the lights for the trailer pulling that from the vehicle's lights. Instead, it's gonna pull in from the battery, which is again, gonna cut down any potential for issues to the lights on your vehicle. Now, in regards to installation, this is pretty easy. There's really not too many modifying to the vehicle whatsoever.
There's actually no cutting or splicing at all. The bulk of the installation, you're just gonna be running that wire, the power wire from the rear of the vehicle to the front of the vehicle. Keep in mind, you do have to do this, you can't tap into any accessory circuit back here, you do have to attach it straight to the battery. But aside from that, it's really not that bad. Now we do recommend routing the wire under the vehicle cause it's easiest but I understand you don't have a ton of room to work. If you want to try to route it through the inside you're more than welcome to do that. But I would say it is gonna take a little bit more time to do that. So just go ahead and plan for that. Give yourselves around an hour or two, depending on your experience level. Let's go ahead and jump into the install now. We're gonna come to either side here and we're gonna removing this cover plate here for our taillight. In order to do that I'm gonna get a plastic trim panel tool and you're gonna sneak it inside this edge here where it meets the taillight and go ahead and pull it out. Now, once they get that cover plate off, there's gonna be two Phillips head screws holding our taillight to the body of the vehicle. Go ahead and get them out. And once we get our taillight screws removed we can remove the taillight by just pulling it straight out and away from the vehicle, like so. And on the back side here we're gonna have a little connector that we depress and this should allow us to pull out our connector just like that. And then on the bottom here we have a wiring connector we need to break free as well. Next thing we're gonna do is we're gonna take a piece of airline tubing, whatever you have similar, a wire coat hanger, we're gonna stick it between the backside of the body and our bumper there and try to fish it out down from below. So once we have our wire routed underneath the vehicle here what we're gonna do is we're gonna take our wiring harness. We're gonna take the two connectors with the yellow wire in them, and then I'm gonna tape them to this airline tubing. Get everything as tight as I can. And once I have it taped on there I'm gonna take the other end of my airline tubing. I'm gonna pull it back behind the bumper here. Hopefully ou
Повторяем попытку...

Доступные форматы для скачивания:
Скачать видео
-
Информация по загрузке: