How to Resin a Wooden Clock
Автор: ArtResin
Загружено: 2017-09-11
Просмотров: 36590
Описание:
www.artresin.com
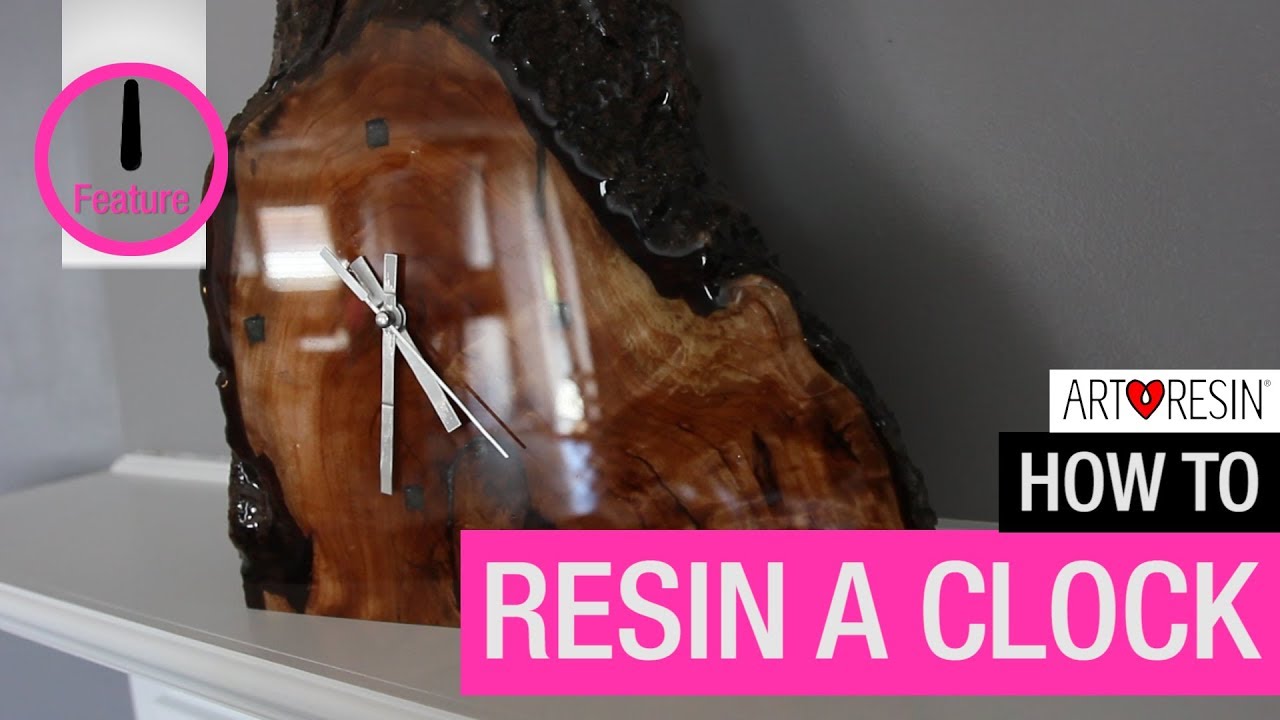
Joanne and Dave are back and this time they're transforming a live edge piece of wood into a functioning mantle clock ... for those of us who can still tell time the traditional way :)
Dave found a beautiful piece of willow and, inspired by a family heirloom, knew it would make a one-of-a-kind, custom clock, that could also double as a beautiful piece of artwork!
Next he picked up the clock mechanism ( called a clock movement kit. ) There are lots of styles to choose from good hobby and craft stores or online! Dave went with an inexpensive, battery operated model with simple, clean lines to allow the natural beauty of the wood to shine.
With wood, tools, and clock movement set in hand, Dave and Joanne walk us step by step through the process:
The first step is to outline the clock face. Joanne drew an outline using a small plate, and Dave drilled a hole for the clock movement set to poke through right in the center. They then marked out the 12, 3, 6 and 9 points on the clock face to keep the look clean and simple.
Next, the jokes didn't get any better as Dave and Joanne drilled out a cavity in the back for the clock movement set to sit in. Next, Dave sanded down the face of our clock in preparation for a thin pre-seal coat of ArtResin.
TIP: The pre-seal step is super important when working with an organic material like wood that is prone to off-gassing. By rubbing in a thin coat of ArtResin first, you're sealing up the wood to prevent bubbles being released later in our final coat.
A small preventative step that saves a potential headache down the road!
Next, Dave and Joanne used a square chisel to make 4 holes for the 3, 6, 9, and 12 hour markers and filled the holes with Silver ResinTint!
After the ResinTint had dried, Dave sanded down the clock once more, in preparation for the final coat of crystal clear ArtResin!
Once the final coat had dried, Dave re-drilled the center hole that had becomed filled in with ArtResin. Next he trimmed up the bottom of the clock to create a nice, clean edge for the clock to sit on, fitted in the clock movement set, along with the minute, second and hour hands and our clock was ready to go!!
Our finished clock looks beautiful!! The ArtResin highlights the natural grain of the wood and makes it absolutely shimmer!
We hope this inspires you to grab a piece of wood and get resining .... with ArtResin!! :)
Bad Clock Puns Tally:
episode one - 11!
episode two - 23!!
episode three - 29!!!
episode four - 37!!!!
episode five - 40!!!!!
epside six - 44andthankgodtherearenomoreclockpuns!!!!!!
;)
Повторяем попытку...
Доступные форматы для скачивания:
Скачать видео
-
Информация по загрузке:


![Making A Wall Clock [12]](https://image.4k-video.ru/id-video/hy8OPCmW1hY)