Part 2 Replacing the electric water pump on late model BMW N-series 6 cylinder engines
Автор: Bavarian Autosport
Загружено: 2013-09-12
Просмотров: 250240
Описание:
BLOG ARTICLE: http://blog.bavauto.com/14581
"Like" us on Facebook - / bavarianautosport
"Follow" us on Twitter - / bavauto
"Subscribe" to us on YouTube - / bavarianauto
Visit our online store - http://www.bavauto.com/
All of the items shown in these videos are available in our online store at http://www.bavauto.com/. Need additional tech help? Please visit our tech blog for thousands of Tech and DIY BMW and MINI articles at: http://blog.bavauto.com/
---
In Part-2 of this two part series, we will install the electric water pump and thermostat on a typical late model BMW with the N-series 6-cylinder engine We will be using an E90 335i, but these general procedures will apply to most models that have the N engine. See Part-1 for the removal.
The Bentley repair manuals will cover model specific points, torque values and fill quantities. This DIY will assume that the DIYer has the applicable Bentley manual for additional references.
Since the thermostat resides beside the water pump, and the pump must be removed in order to replace the thermostat, we highly recommend that the thermostat be replaced when the pump is replaced. We normally would also recommend that the coolant hoses be replaced while the system is drained. However, in these models the only hose that is readily accessible for replacement is the thermostat to water pump hose. We would suggest replacing this hose, but the others would require quite a bit of additional work.
PARTS USED:
• Water pump
• Water pump mounting bolts
• Thermostat
• Thermostat to water pump hose
• Various size hose clamps
• O-ring assembly lubricant
• BMW coolant
• Distilled water
TOOLS USED:
• 3/8" drive E-Torx socket set
• Flex shaft hose clamp driver
• Spill-Free coolant funnel
• Form-A-Funnel
• Garage Guard absorbent mat
• 3/8" drive sockets, universal joint, extensions and ratchet, 8mm -- 13mm
• 17mm open-end wrench
• Various flat-head and phillips screwdrivers
• 10-amp battery charger
PROCEDURE:
1) Safely and properly raise and support the front of the vehicle. This repair task can be performed with the vehicle on jack-stands or using drive-on ramps.
2) Remove the forward under-chassis splash panel.
3) Disconnect the power steering cooler hose assembly mount on the passenger side and move the hoses rearward and toward the driver side. Use a piece of wire or a cable tie to hold the hose assembly out of the way.
4) Remove the two mounting nuts on each swaybar mount and lower the swaybar. Move the bar toward the rear of the vehicle and tie it up with a section of wire or a cable tie.
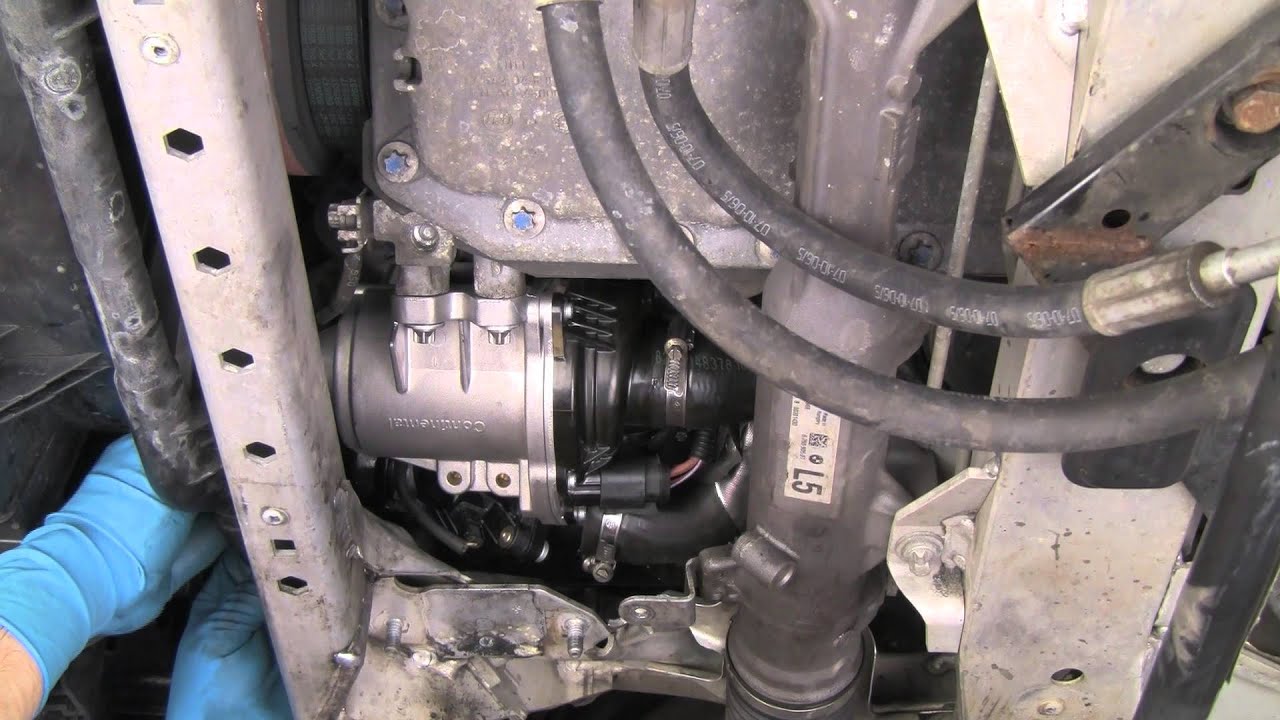
5) Remove the water pump harness plug wiring connector plug.
6) Place the coolant catch pan under the water pump. Using the flexible hose clamp driver, loosen the hose clamp on the thermostat to water pump hose (the nipple that is facing the rear of the vehicle) and carefully pull the hose off the water pump inlet nipple. This will drain most of the coolant that is in the water pump, thermostat and local hoses.
7) Use the flex driver to loosen the water pump outlet (supply) hose. The hose nipple points toward the passenger side and is above and to the rear of the thermostat (look at the new water pump to help locate the nipple and hose). We cannot remove the hose as it is solidly mounted. We will pull the water pump from the hose, in step # 13.
8) Remove the two lower water pump mounting bolts, using an E12 Torx socket.
9) Place the coolant drain pan under the forward end of the thermostat and water pump. Disconnect the radiator to thermostat hose (large plastic hose elbow at the forward end of the thermostat) by pulling out the locking wire on the quick disconnect fitting and pulling the fitting off of the thermostat nipple. Allow the coolant to drain.
10) Remove the two thermostat mounting bolts.
11) Pull the ground cable from the mounting clip that is affixed to the water pump rib, just forward of the upper water pump mounting bolt. Look at the new pump and use a light to locate the ground cable and the clip. Pull the cable out of the clip and push the clip off the rib (toward the passenger side), using a long screw driver.
12) We're sorry, but the description can not be any longer (youtube requirement). Watch the video and see our tech blog for the full DIY steps at http://blog.bavauto.com/14581
--------
All products noted in this video can be purchased in our online store, http://www.bavauto.com/, 24 hours a day, 7 days a week. You are also welcome to e-mail us at [email protected] or call into our headquarters and speak to our knowledgeable advisors at (800) 535-2002 (Mon.-Thurs. 8AM to 9PM EST, Fri. 8AM to 7PM EST, and Sat. 9AM to 4PM EST).
Повторяем попытку...
Доступные форматы для скачивания:
Скачать видео
-
Информация по загрузке:


