etrailer | Installing the Konig Easy Fit Tire Chains on your 2019 Toyota RAV4
Автор: etrailer
Загружено: 2020-05-04
Просмотров: 145
Описание:
Click for more info and reviews of this Konig Tire Chains:
https://www.etrailer.com/Tire-Chains/...
Check out some similar Tire Chains options:
https://www.etrailer.com/fitguidechai...
Search for other popular Toyota RAV4 parts and accessories:
https://www.etrailer.com/vehicle/2019...
https://www.etrailer.com
Don’t forget to subscribe!
/ etrailertv
Full transcript: https://www.etrailer.com/tv-install-k...
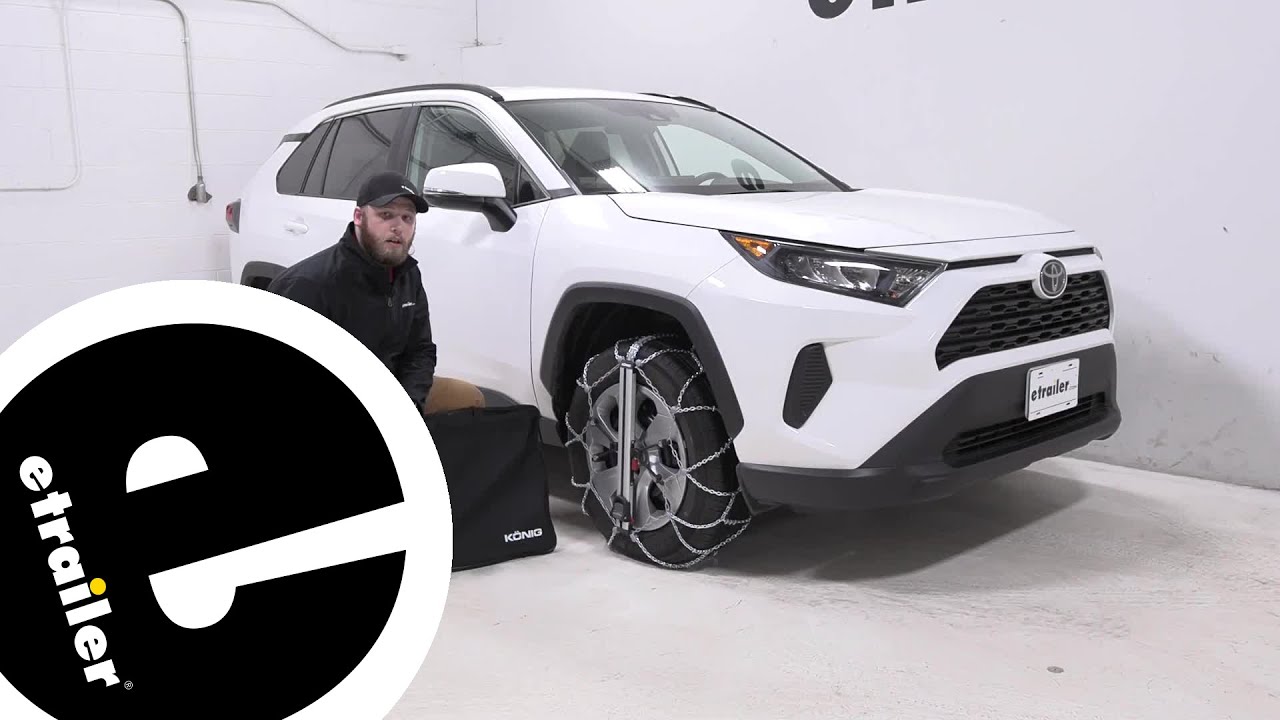
John: Hey guys, John here from etrailer.com. Today we have our 2019 Toyota RAV4. We are test fitting the Konig, easy fit tire chains.Our tire chains have d-links in a diamond pattern, which gives us the most coverage and the best traction for snow and ice. They have a manganese, nickel, alloy steel construction, which again just helps with durability, really gives you a nice chain that lasts you a long time.The tire size we have on our RAV4 today is 225/65r17. You will find your tire size on the sidewall. And so if you have a different tire size than this, you can use our fit guide to figure out which tire chains fits specifically.
Another couple of things, just to point out, along with the tire size, you will want to check your owner's manual and make sure that you install your tire chains as per the instructions. For application today, the instructions say to install them only on the front tires.I really liked the easy fit tire chains. Not only are they high quality, but I really feel like Konig did a good job of thinking of the consumer with this product. So we have the nice carrying bag. We also have the instructions on the lid so that we can use this as a kneeling pad and simply look down and we're not having to fumble with instructions while we're installing the chains.
These chains install just by draping them over and stepping down on this foot pedal, for the tension. They're self-tensioning, so as we're driving, they get tighter. Plus we don't have to crawl behind the vehicle just to install the chains. So it was very nice, very easy to use and probably the least amount of effort and getting dirty as possible.One of the features I really like about this tire chain is that they really put thought into protecting our wheels. They're these plastic caps that we install over the portions of the chains that are going to be a little closer to our wheels.
So plastics rubbing against it and not metal. And then here this plastic, this is plastic. This is plastic. This piece is metal, but on the back side, it is plastic. So all of this, they go through a whole lot of effort just to make sure that our wheels stay in good shape as well.Removing our chains is just as easy as installing them.
Basically follow the same steps. We start off by pinching these two tabs here, and then pull this out. Do be mindful of this because as you just saw, it does shoot up, so don't have your hand here and trying to pull that. Keep your hands clear so that pops up, pull this out and then we are able to pull up the backside. Truly set tension off this cable. Remove the chains, put it back on our bag, zip it up and we're ready to get going.Now that we've taken a look at these tire chains. Let's see how they install.To begin our installation, we're going to open up our bag and get all of our components ready to go. Lay it out. It's a nice storage bag, it's durable, it's an easy way to keep your tire chains stored in the back of your vehicle. More than likely the chains will be kind of caught around each other. So I do recommend trying to put them away neatly. So that way, when you are out in the elements, you don't get quite as frustrated trying to get it all untangled cause you're not going to want to be outside for very long when you're trying to install these. We'll set that aside.In our bag, we will have our instructions. They have a nice laminate finish so we can lay them down in the snow and not have to worry about them becoming ruined. We have a tarp to help keep our clothes a little cleaner with a few replacement links, if we do need them down the road. Then we also have a bag of these plastic protectors and these protectors will install on these links, but only on the ones that face outside. We have some here on the inside. These are going to go on the back of your tire. These are only going to install on the outside ones. So to do that, we'll stick the stem through and then just snap it in place. I do recommend taking this step before you actually get out on the road, because this is something that just remains installed. So you can do this as soon as you get the chains and you don't have to worry about it later.Now that we've gone over, what's in the bag, we'll show you how to get these installed. We'll open up our bag. We can remove our chains. And then the top of this bag actually has a dual purpose. Flip it over and lay it d
Повторяем попытку...
Доступные форматы для скачивания:
Скачать видео
-
Информация по загрузке: