Tire Repair Plug
Автор: Tire Repair King
Загружено: 2025-12-30
Просмотров: 3028
Описание:
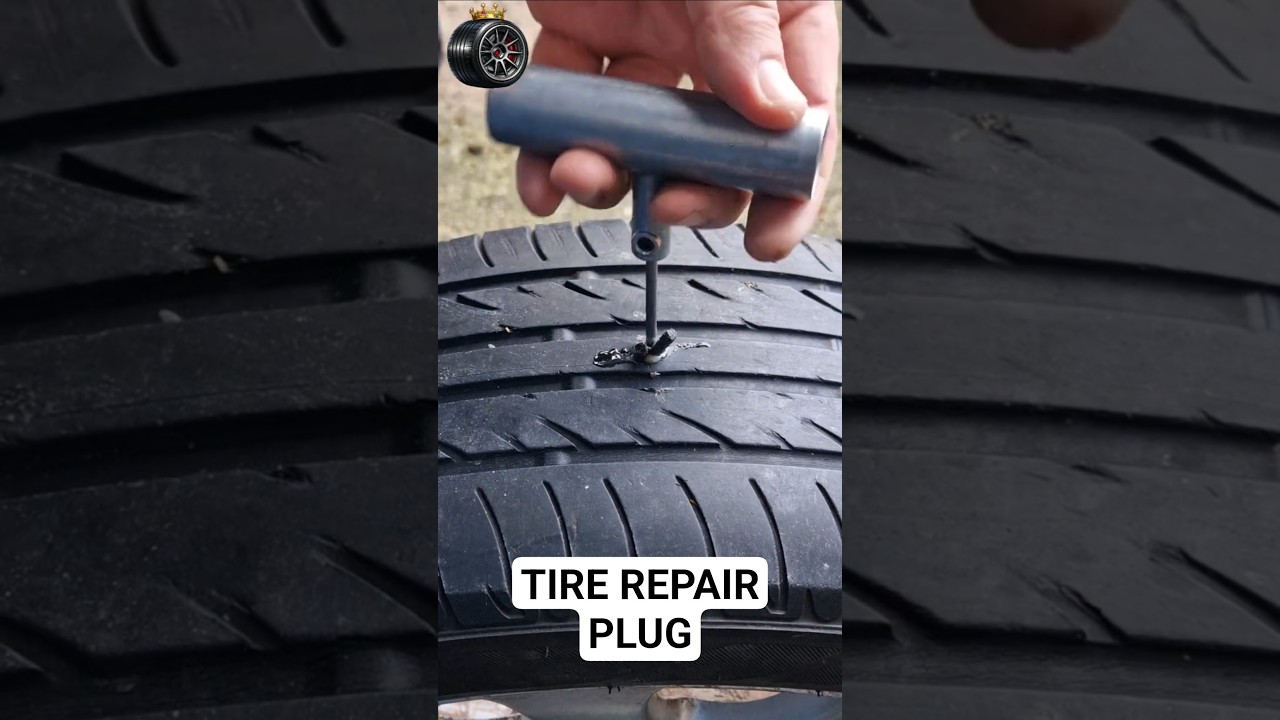
How to use a simple Tire Plug repair kit. This kit is designed for tubeless tires and it is generally used as a temporary repair. I am only demonstrating how to use the repair kit using its exact instructions. I am not endorsing or recommending the use of the kit as a replacement for a professional or permanent tire repair.
The kit instructions are as follows:
Step 1
Pull the puncturing object from the tire.
Step 2
Twist the probe tool into the puncture hole.
Step 3
Rotate the handle in a circular motion
Step 4
Insert a plug strip halfway into the eye of the insertion needle and spread some rubber cement onto the middle section of the strip
Step 5
Pull the probe tool out and quickly push the needle and plug strip into the hole until the plug is about 2/3 way in.
Step 6
Rotate the handle 360 degrees and quickly pull the needle out of the hole, leaving the plug in place.
Step 7
Trim excess plug material flush with the tire tread.
NOTE: This kit is designed for tubeless tires and any repairs should only be carried out on the main treaded area of the tire and NOT on the shoulder or sidewall sections. This should only used as a temporary repair to get you to a tire shop to have the tire inspected and patched internally. This is not intended to be a long-term fix or a replacement for a professional tire repair. I am only demonstrating how to use the repair kit, I have nothing to do with its design or manufacture. WARNING: Use of this product could void tire warranty. Do NOT attempt any type of tire repair if any of the following conditions exist:
• The tire has less than 1.6mm tread depth
• The puncture is greater than 1/4 inch diameter (6mm)
• There is structural damage to tread, carcass, inner liner, or bead (including cracking, bubbling, ply separation, etc.)
• The puncture is on the shoulder or sidewall of the tire
• The tire has been inflated with any flammable gas
• The perforating object cannot be located
• The perforating object is not straight indicating the puncture path is not straight
• There is little resistance felt when inserting the repair
• There is evidence that the tire has been driven under-inflated
• There is evidence of possible structure/internal damage
Thanks for watching, please comment, like and subscribe !
© 2025 / @tirerepairking
Re-uploading this video on any platform is not allowed.
YouTube’s Content ID and DMCA procedures will be used to remove unauthorized copies.
Disclaimer:
Under no circumstances will TireRepairKing be responsible or liable in any way for any content, including but not limited to, any errors or omissions in the content, or for any loss or damage of any kind incurred as a result of any content communicated in this video, whether by TireRepairKing or a third party. In no event shall TireRepairKing be liable for any special, indirect or consequential damages or any damages whatsoever resulting from loss of use, data or profits arising out of or in connection with the availability, use or performance of any information communicated in this video. Due to factors beyond the control of TireRepairKing, it cannot guarantee against improper use or unauthorized modifications of this information. TireRepairKing assumes no liability for property damage or injury incurred as a result of any of the information contained in this video. Use this information at your own risk. TireRepairKing recommends safe practices when performing any do it yourself repairs and or with tools seen or implied in this video. Due to factors beyond the control of TireRepairKing, no information contained in this video shall create any expressed or implied warranty or guarantee of any particular result. Any injury, damage, or loss that may result from improper use of these tools, equipment, or from the information contained in this video is the sole responsibility of the user and not TireRepairKing.
Повторяем попытку...
Доступные форматы для скачивания:
Скачать видео
-
Информация по загрузке:


