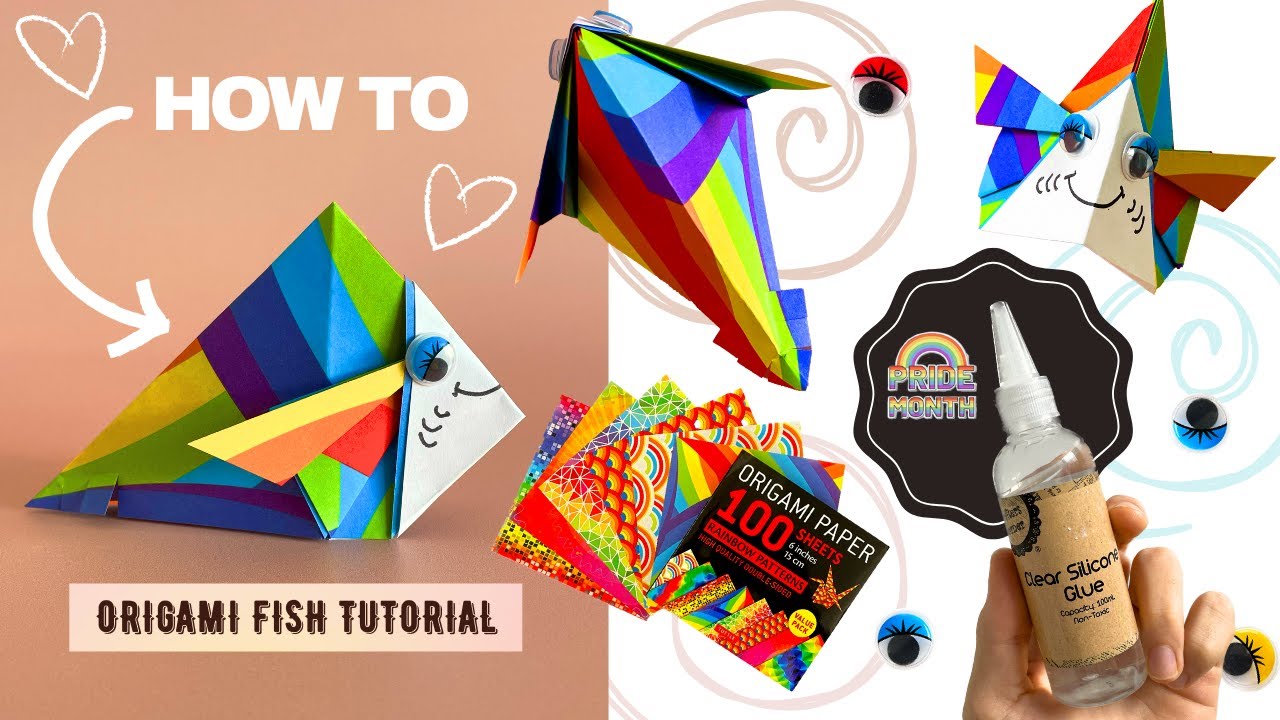
Origami Fish Tutorial - Step by Step
Автор: Studio Sanlúcar
Загружено: 2023-06-09
Просмотров: 14
Описание:
Hello craft lover and welcome to today’s video where we'll be creating this groovy rainbow origami fish in honour of Pride Month as a reminder that just like every colour in the rainbow, each one of us is unique and beautiful in our own way.
All the materials we’re using today can be found below:
Rainbow Origami Paper
USA: https://amzn.to/3MTuNMr
UK: https://amzn.to/3Ngi2wR
CA: https://amzn.to/3oTw8uQ
AUS: https://amzn.to/43rpACC
Craft Glue
USA: https://amzn.to/3WSadAw
UK: https://amzn.to/3MXyxN2
CA: https://amzn.to/3MMKZz2
AUS: https://amzn.to/3qsqOPo
Wiggly Eyes
USA: https://amzn.to/3qxUgne
UK: https://amzn.to/3P1QNHO
CA: https://amzn.to/43N2x56
AUS: https://amzn.to/3oIUx6l
Step 1:
We’ll want to start by creating a triangular insert that will later become the face of our fish.
In this tutorial we’ve used the corner of an A4 sheet of paper and the measurements of our face insert will can be found at 00:25 of this video.
Step 2:
Once we’ve created our face insert, it’s time to get folding our rainbow paper.
First, mountain fold your paper in half to create a perfect triangle and align your face insert with the two points that open.
Step 3:
Next, we’re going to create a rabbit ear fold bringing both corners that are attached to our original mountain fold down to the open corner and crease firmly to create a square shape.
Step 4:
After you have a nice even square shape,
Next we’re going to do a crimp fold on each of our rabbit ears to create the fins of our fish.
Step 5:
Once our fins have taken shape, it’s time to mountain fold the open corner at the bottom along with our face insert that we created at the beginning, upwards to reveal our fish’s face.
Step 6:
From here, we want to take a sharpie pen and draw the mouth and gills on. Try and make sure these are as centred and symmetrical as possible. (You understand in a sec)
Step 7:
Once we’ve drawn our mouth and gills, it’s time to stick our googly eyes on with some clear craft glue gel.
Step 8:
After our eyes have set in place, we can now mountain fold our face and our fish should begin to take shape.
Step 9:
The last step in this process is to cut our tail by simply making 3 cuts at the end with our scissors.
And Wallah, there we have it, our rainbow fish.
A symbol of pride, diversity, and being unapologetically ourselves!
This Pride Month, let's remember to celebrate our uniqueness, to embrace our colours, and to be proud of who we are
Thank you so much for watching this video and don’t forget to smash the love button for the algorithm and hit follow for more craft content in future.
Keep shining, keep standing out, and keep being you. Happy Pride Month!
Yours in love light & beauty,
Studio Sanlucar
#origami #origamifish #origamicraft #origamitutorial #origamicraftwithpaper #pridemonth #pridemonth2023
Повторяем попытку...
Доступные форматы для скачивания:
Скачать видео
-
Информация по загрузке: