DIY Concrete Paver Patio (Simple and Inexpensive method)
Автор: Andrew Thron Improvements
Загружено: 2021-06-11
Просмотров: 595772
Описание:
Check out my Blog for More info on this project!https://atimprovements.com/diy-paver-...
A DIY Concrete Paver Patio can be as simple (inexpensive) or as complicated (expensive) as you would like to make it. Regardless of the complexity, however, the general steps needed to build a DIY Concrete Paver Patio are same. They are:
1. Site preparation
a. Excavation
b. Compaction
2. Backfilling, Compacting, and Leveling the Stone Sub-Base
3. Backfilling, Compacting, and Leveling your Sand Base
4. Installation of the Pavers
5. Installation of Paver Edging Restraint (if required for your installation).
6. Application of Polymeric Sand (not covered in video, but described below).
Link to DIY paver Patio Blog is below:
https://atimprovements.com/diy-paver-...
Step 1: Site preparation
The first step in your DIV Concrete Paver installation project is to plan out the size and configuration of your paver patio. Once you decide on how big your patio will be, it’s time to do some digging. You will need to excavate down approximately 8” (5” for Gravel base, 1” for sand base”, and 2” to account for the thickness of the pavers). These are approximations, however, and you may need to adjust the depth as required for your application.
Step 2: Backfilling, Compacting, and Leveling the Stone Sub-Base
Starting with stone sub-base for your patio is a MUST if you want to have solid base that is going to allow for proper drainage. Calculate how much you will need (Cubic Feet = depth (convert to feet) x length of patio (ft), width of patio (ft). Then, I recommend you do some research on stone suppliers in your area and then get quotes for delivery. Delivery is definitely going to be the easiest, but I picked up my stone from the supplier and had them load it directly into the bed of my truck.
I recommend that you use crushed stone or recycled concrete aggregate, but feel free to consult with your local stone supplier.
Once you have your stone on-site, begin to backfill your excavation to a depth of 4-6” uniformly across the entire patio area.
At this point, you are going to want to do some planning regarding DRAINAGE.
Step 3: Backfilling, Compacting, and Leveling your Sand Base
Sand is the last layer before your pavers and is necessary for a perfectly uniform and level paver installation. I recommend that you use concrete sand or mason sand as your paver sub-base. Once your sand is installed, leveled, and compacted, you are finally ready to begin laying your pavers.
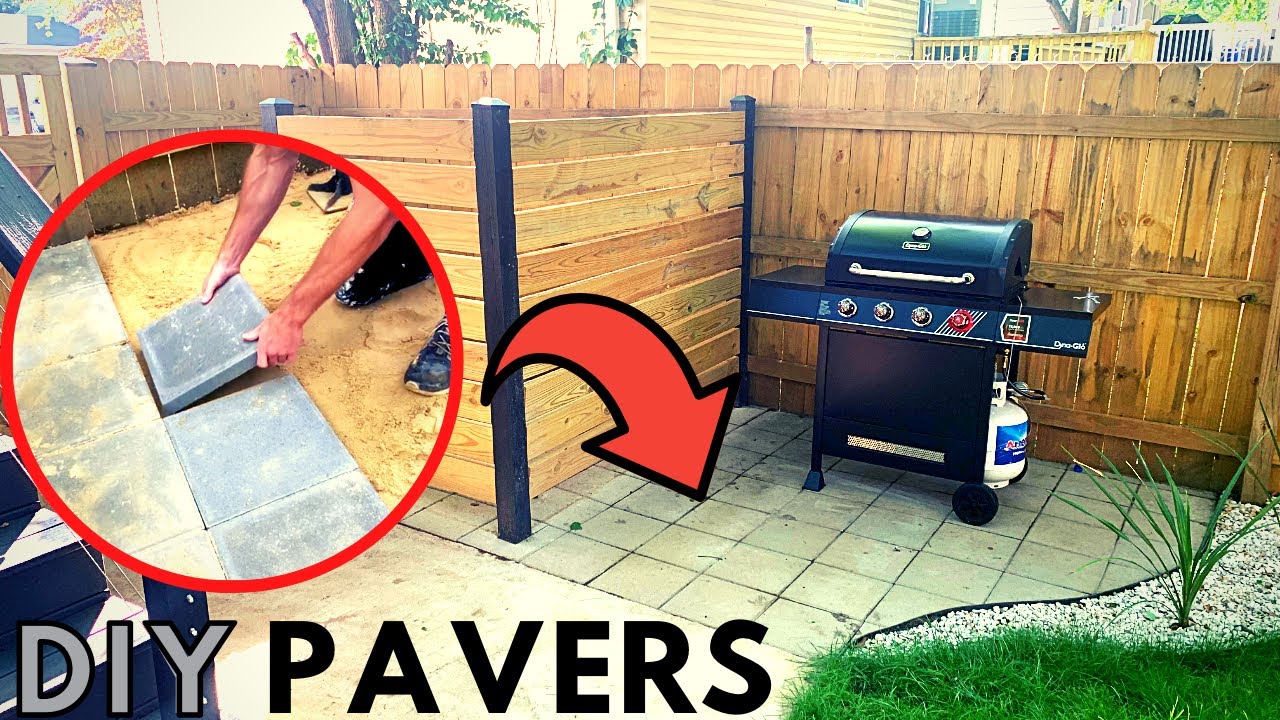
Step 4: Installation of the Pavers
There are many different types of pavers and paver installation patterns, but the general installation procedure is similar for all of them. Start in one of the patio corners and begin placing the pavers on the sand. Feel free to use a string line or a laser level to make sure that you’re a keeping clean lines. Use a rubber mallet to tap the pavers into place and to make minor adjustments.
With every paver job, you will need to cut a few of your pavers to get a uniform line on the edges or to get around an obstruction. For me personally, I cut my pavers using a wet-saw equipped with a diamond blade and with a angle grinder (again, with a diamond blade). The wet-saw makes easy work of cutting the straight lines but the angle grinder is helpful for the precision cuts. Keep in mind that there will be a lot of dust when you cut the pavers, so be sure to wear a respirator and all other necessary safety equipment. .
Step 5: Installation of Paver Edging Restraint (if required for your installation)
In order to prevent your pavers from shifting and moving out of place, it is recommending that you install a paver edging strip on each side of your patio.
Step 6: Application of Polymeric Sand
(Unfortunately, I was unable to capture this part for the video)
To effectively apply the Polymeric sand to your patio, sweep the sand in between the joints of all of your pavers with a broom (a push broom works great). Once the polymeric sand has sufficiently filled all of the voids between the pavers, apply water in accordance with the polymeric sand manufacturer’s instructions. Once you add water to the sand, it acts like "glue", holding all the pavers in place. Both too much water or too little water can be problematic.
Give your polymeric sand approx. two days to set-up and then go enjoy your new DIY Patio!
If this video helped you out, please consider dropping a "like" and subscribing to my Youtube Channel - I would really appreciate it!
Links to the tools I used:
Pavers:
https://www.homedepot.com/p/12-in-x-1...
Hand Tamp:
https://www.homedepot.com/p/Razor-Bac...
Rubber Mallet:
https://amzn.to/3grLyy8
Angle Grinder
https://amzn.to/2RHRjPM
Angle Grinder Blade
https://amzn.to/3iEaK7n
Paver Edging
https://amzn.to/3g9IXK6
Повторяем попытку...
Доступные форматы для скачивания:
Скачать видео
-
Информация по загрузке:


![Мы построили мощеное патио [как профессионалы] от начала до конца](https://image.4k-video.ru/id-video/bJ8OQsAHzY0)