Back To School Chalkboard Sign: A How To Stenciling Project | Designer Stencils
Автор: Designer Stencils
Загружено: 2024-07-30
Просмотров: 100
Описание:
#DIY, #DIY decor, #DIY decorating project, #chalkboard sign, #chalkboard sign ideas
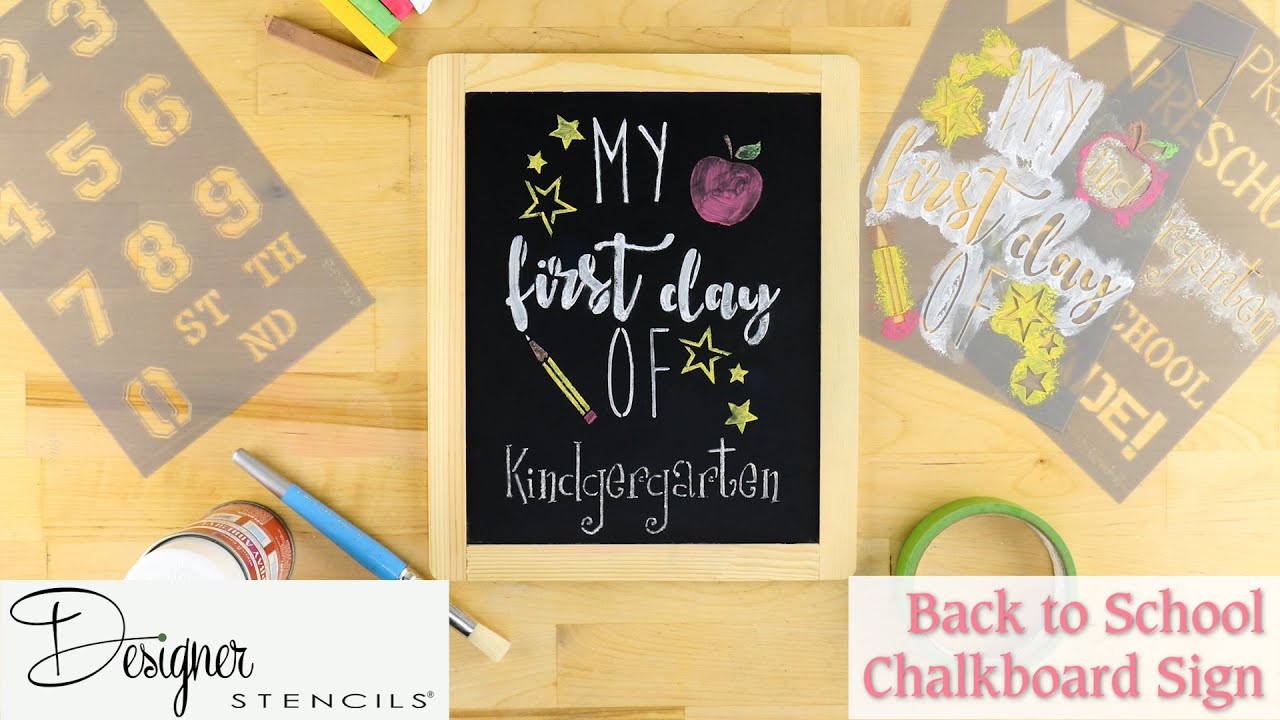
☝️ Capture your child's next big step toward greatness with Designer Stencils' Back To School Chalkboard Sign Project!
0:00 Introduction
0:04 What you need
0:10 Making chalk dust
0:35 Positioning the first stencil
0:53 Mixing chalk paste
1:05 Stenciling
2:25 Grade stencil
2:49 The reveal
What You Will Need - ⬇️
Here's everything you'll need to create a lasting memory for you and your family:
➡️ Back to School Chalkboard 3 Piece Stencil Kit - https://bit.ly/2Xgy0j5
➡️ Repositionable Spray Adhesive - https://bit.ly/3CKwupN
➡️ Stencil Brush - https://bit.ly/37wNn8R
➡️ Frog Tape - https://bit.ly/3lPp2n3
➡️ Multi-colored Chalk
➡️ Blank Chalkboard Sign (minimum 8.5" x 10.5")
➡️ Sand Paper (coarse)
➡️ Small Bowls (6)
➡️ Eye Dropper
1️⃣ Preparing the Chalk
First, sand some colored chalk into a pile of chalk dust over a clean piece of paper and separate it into different cups. Use a new piece of paper and a different section of sandpaper for each color.
2️⃣ Repositionable Spray Adhesive
Next, take the first stencil and turn it over on a protected surface. Spray some Repositionable Spray Adhesive on the back side of the stencil and allow it to dry for a few seconds until it becomes tacky.
3️⃣ Stenciling
Position the stencil on the chalkboard, making sure to leave sufficient space at the bottom for the grade stencil.
Using a dropper, add a small amount of water to the white powder and mix to form a paste. Using too much water will cause the color to bleed underneath the stencil. Remove excess moisture by swirling the brush on a paper towel before stenciling.
Apply the color very lightly - when wet it will be barely visible on the black chalkboard. When working close to the frame, use your other hand to press the stencil down flat against the surface of the chalkboard.
Once finished with a color, rinse the brush well and dry thoroughly using a clean rag or paper towel.
Repeat for each of the other colors.
For stencil elements that are close together, use Frog Tape to mask off the portions that you aren't filling in with the next color.
4️⃣ Grade Stencil
Once finished, wait at least a half hour for the chalk paste to dry completely. Remove the stencil if there if necessary to prevent overlap with the next one. Cover the area that is already stenciled to protect it from accidental rubbing or spilled chalk paste.
Again, use the Repositionable Spray Adhesive on the other stencil and position it on the chalkboard. If necessary, use the Frog Tape to help hold it in place.
By now, the white chalk paste in the bowl will have dried out and will need more water.
Once dry, lift your stencil to reveal your heartwarming new Back To School sign!
👉 Visit DesignerStencils.com today and check out our amazing collection of wall stencils, border stencils, victorian stencils, vintage floor stencils, wall border stencils, farmhouse stencils, supplies, and how-to-videos!
Повторяем попытку...
Доступные форматы для скачивания:
Скачать видео
-
Информация по загрузке:


